Wellbeing
Student wellbeing encompasses all aspects of a student's life, including happiness and health, academic challenges, and social relationships at home and at school. The wellbeing landing page is an area to monitor and support student wellbeing.
Wellbeing Case Management
Create a wellbeing note — manual
Click on the Wellbeing tab to open the Wellbeing landing page.
On the left tile below the heading, click Create wellbeing note →.
Fill in the required fields (indicated by an asterisk *) in the pop-up window.
- Add a Title for the wellbeing note.
- Enter the Student name (you can type or select the name from the dropdown menu).
- Add a Description.
- Select a Note type (choose one of the seven subcategories).
- Under Sentiment, identify if the note is Positive or Negative.
- Identify the Priority for action (Low, Medium, High or Critical).
Note: The student ID and year group will automatically populate.
Attach photos if required.
If this wellbeing note is related to an existing note, you can connect the notes in Linked note by typing the start of the heading of the note you wish to link to, and the content will autofill.
In the Notify staff member text, start typing a staff member's name to share the wellbeing note with other staff members.
Note: A dropdown will open so you can select the staff member without typing the full name.
Click the blue square outline with a + in the centre to add more staff members.
Select if parents need to be notified of this wellbeing note.
Select Publish note.
Note: The note can only be published if all the required fields are completed.


Upload supporting documents
Click on the Wellbeing tab to open the Wellbeing landing page.
On the left tile below the heading, click Create wellbeing note →.
Fill in the required fields (indicated by an asterisk *) in the pop-up window.
Below the Upload optional photos or documents heading, click Choose file.
Note: The total maximum file size is 10MB.
A File folder will pop up, select the relevant document.
Select Open. The file will automatically upload.
You can add as many files as long as you remain below the maximum file size.
To remove a file, press the X on the right of the file heading.
Save by clicking Publish note.
Note: The note can only be published if all the required fields are completed.

Create & assign task from note
Navigate to the Wellbeing landing page from the Navigation bar.
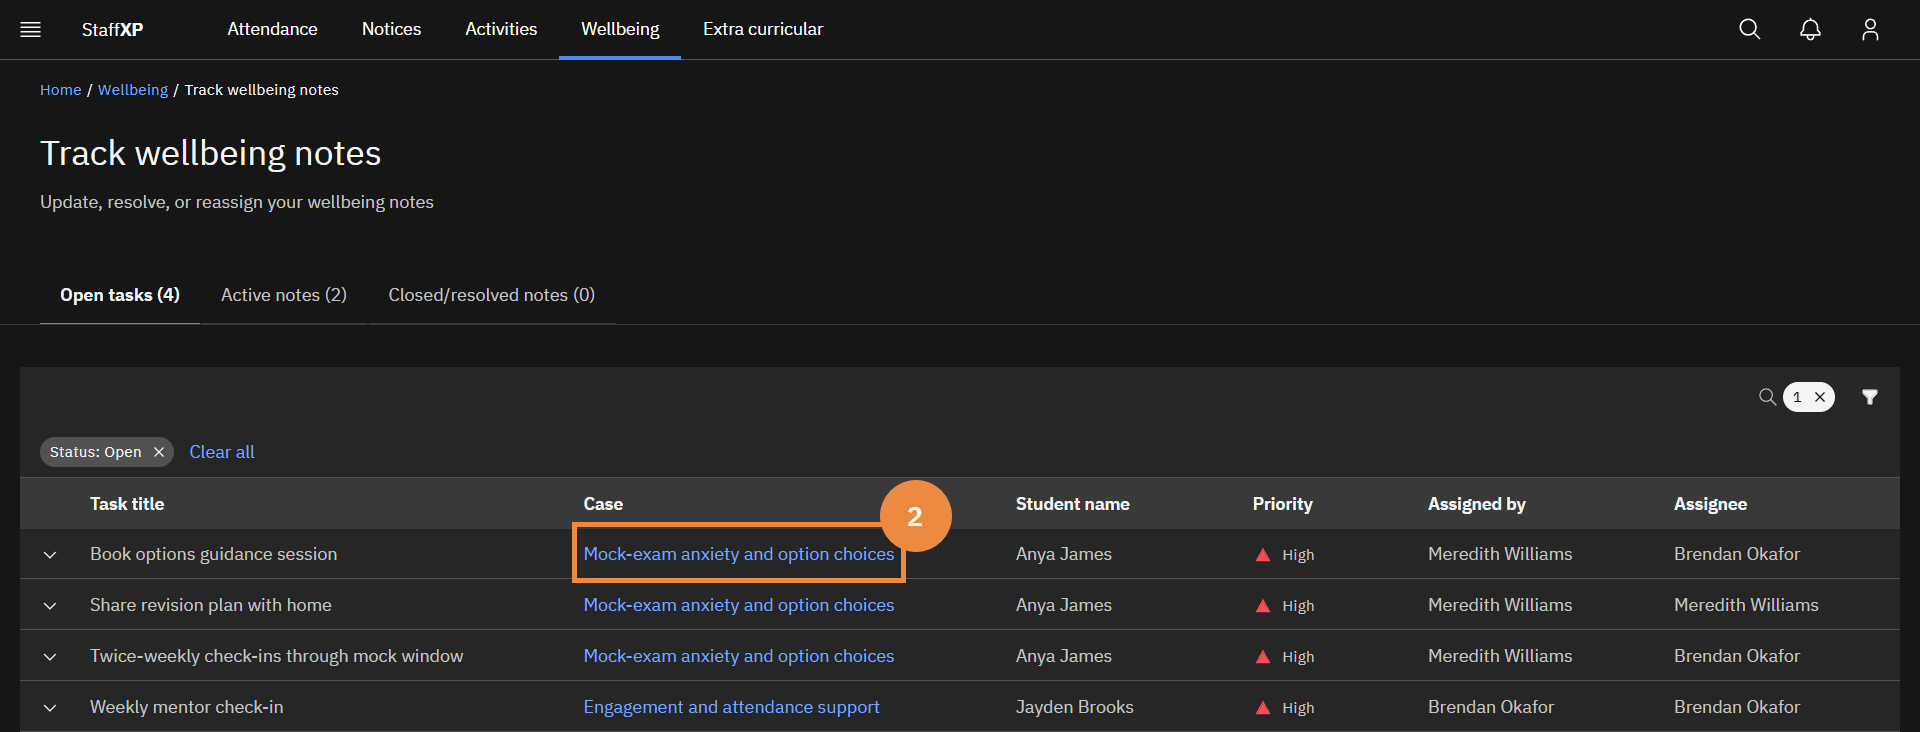
Click Track and resolve notes → on the right tile below the heading.
Select the relevant Wellbeing note from the Active notes tab.
Select the blue square with a + sign on the Tasks tile on the right.
A pop-up window will open up. Complete the required fields marked with an asterisk (*).
- Add a Title.
- Select an Assignee.
- Add Notes to describe the task.
Click Save.
Note: The task will automatically appear in the tasks tile.
Edit the task by clicking on the pencil icon. In the pop-up window, there is a Status bar to update and monitor the task status.


Create and submit a note
Submit and pop up
After you submit a wellbeing note, you will get a pop-up notification at the top right of the window confirming the success of the note submission.
Changing the status of a note will also result in a pop-up notification.
Note: If a linked member of staff makes any edits to the note, the changes will appear as notifications in the dropdown below the Bell icon or in the Notification centre.

Auto-create case
When you successfully create a wellbeing note, it automatically opens a case. The steps below outline how to find Active notes.
In the Wellbeing tab, select Track and resolve notes → on the right tile below the heading.
Below Case Title is a list of all the Active notes.
Click the tab subheading Closed/resolved notes to view previous or currently inactive notes.

Link related cases
In situations where more than one student is involved in a wellbeing case, or more relevant notes are required, it is possible to connect a new Wellbeing note to an existing note. Check the title of the existing note(s) beforehand for linking.
Navigate to the Wellbeing landing page.
Click Create wellbeing note → on the left tile.
Complete the mandatory fields in the pop-up window.
In the Linked note field, begin typing the heading of the relevant wellbeing note. There is a dropdown that will share all the notes containing the same words.
Select the correct note; it is now linked.
To add more linked notes, press the blue square with the white +.
To remove an empty linked note space, click on the red waste bin icon.
Note: To unlink a linked note, press the X at the end of the search field.

View details of a wellbeing case
Navigate to the Wellbeing landing page.
Click Track and resolve notes → on the tile on the right.
In the Active notes tab, find and select the relevant wellbeing note.
The note will automatically open, where you can view:
- Student name and number
- Note description
- Note type
- Sentiment
- Staff Notified
Below the area is an AI-generated summary of the note and details.
There are also tiles for Comment timeline and follow-up Tasks related to the note.

Track & resolve wellbeing notes
Navigate to the Wellbeing landing page.
Click Track and resolve notes → on the tile on the right.
In the Active notes tab, find and select the relevant wellbeing note.
Note: Confirm that there are no outstanding tasks or follow-up required on the wellbeing note. Once a note is resolved or closed, it cannot be opened again. A separate note will be needed.
After selecting the note, the Update status box will become blue. Click the Update status box.
A pop-up will appear. From the dropdown, you can select Active, Resolved or Cancelled.
Click submit, the status will automatically update.


Update existing note
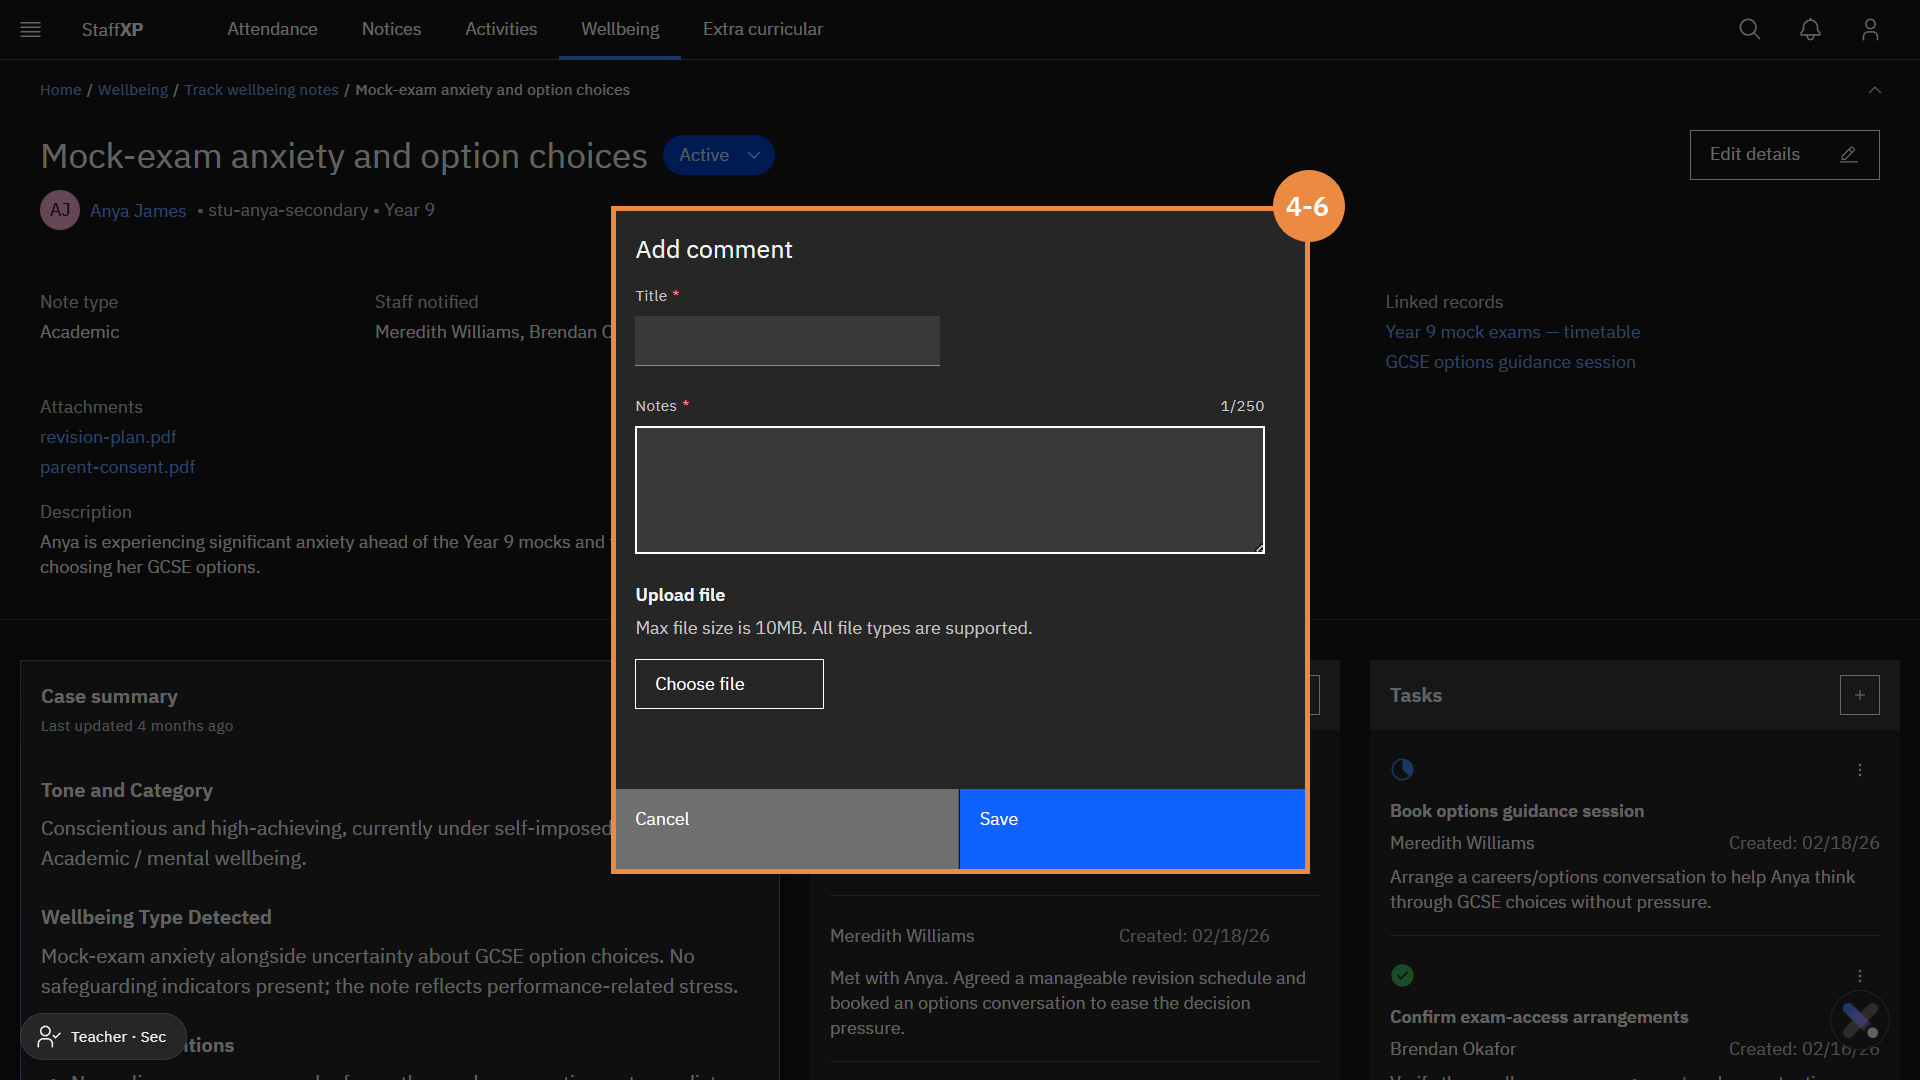
As the wellbeing situation evolves, or more information becomes available, it is possible to add supplementary comments to the existing wellbeing note.
Navigate to the relevant note from the Wellbeing landing page ▸ Track my notes.
Select the relevant note.
In the middle Comments tile, click the +.
Fill in the fields for the comment.
Upload supporting documents if required.
Click Save.
To edit an existing comment, press the pencil icon to edit the note.


Update existing wellbeing task
For each Wellbeing note, you can assign follow-up tasks for yourself or other members of staff. One member of staff can be assigned per task.
Navigate to the relevant note from the Wellbeing landing page ▸ Track and resolve notes →.
Select the relevant note.
Click the blue square with the white + on the Tasks tile on the right of the screen.
A pop-up window will open to Add new task.
Complete the fields.
- Add a Title.
- Select an Assignee. Start typing the name, and all the names, including those characters, will appear in a dropdown.
- Add Notes.
Click Save. The save button will only be enabled when all fields are completed.
The task will appear in the Tasks tile on the right.
Note: After successfully saving, a pop-up message will appear in the top-right corner confirming the addition of the task.
To edit the task or update the status, click on the Pencil icon.
Another pop-up window will open. This window will have an additional field, Status.
Update the task status by selecting either Open, Completed or Canceled.
Click Save. Another pop-up message will confirm successful saving.
Note: Changing the status to Completed or Canceled will permanently remove the task from the Tasks tile.


View AI summary in a case
Navigate to the Wellbeing landing page.
Click Track and resolve notes → on the tile on the right.
In the Active notes tab, find and select the relevant wellbeing note.
The page displays a description and details of the wellbeing note.
Below, with a grey background, on the left, there is an AI-generated Summary of the wellbeing note and details.
Note: The text box expands to adjust to the amount of text present, there is no need to click the information box.
