Setup
Before fees can be generated, processed, or settled across the platform, a range of foundational settings must be configured correctly. This section covers the full scope of that setup work, including fee schedule parameters, fee and charge intervals, gender and academic year configuration, visa types, split billing percentages, fee categories, payment option setup, curriculum and stream configuration, advanced discount policies, deposit policies, sibling order and trade agreement setup, non-tuition item pricing, and the linkage of tuition fee items to academic years. Most of this configuration is completed once during initial implementation and revisited when new functionality is enabled or organisational settings change.
Fee Schedule Parameters (Product)
From the FNO dashboard, open Modules ▸ Academic management.
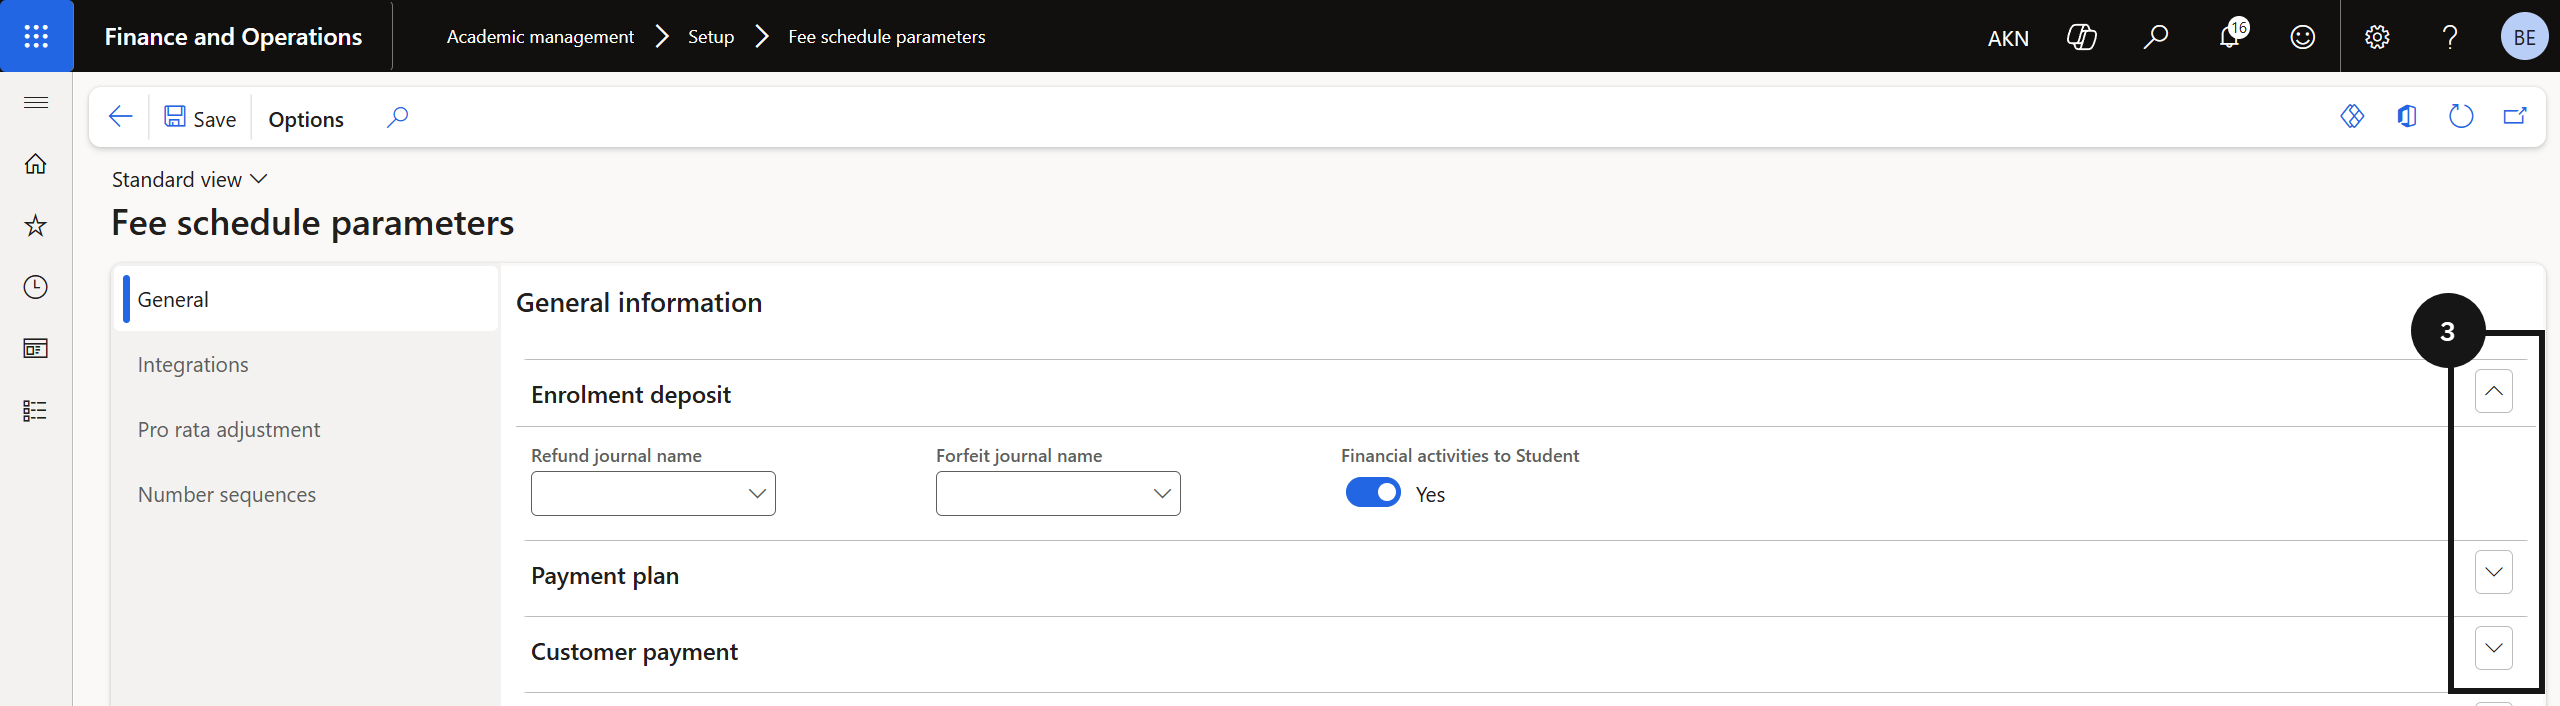
Expand Setup and click Fee schedule parameters.
On the General tab, expand each section and complete the fields based on your school’s requirements. This includes:
- Deposit handling journals for refund and forfeit
- Payment journals for online, over-the-counter, miscellaneous
- User group permissions for generated sales orders
- Staff concession cancellation and adjustment setup
Note: All journals used in this setup must already exist in the system. The selected user group controls who can edit generated sales orders. Staff concession settings apply when a staff contract ends.
In Financial activities to Student:
- Select No when posting financial transactions to the Fee payer account
- Select Yes when posting financial transactions directly to the student account
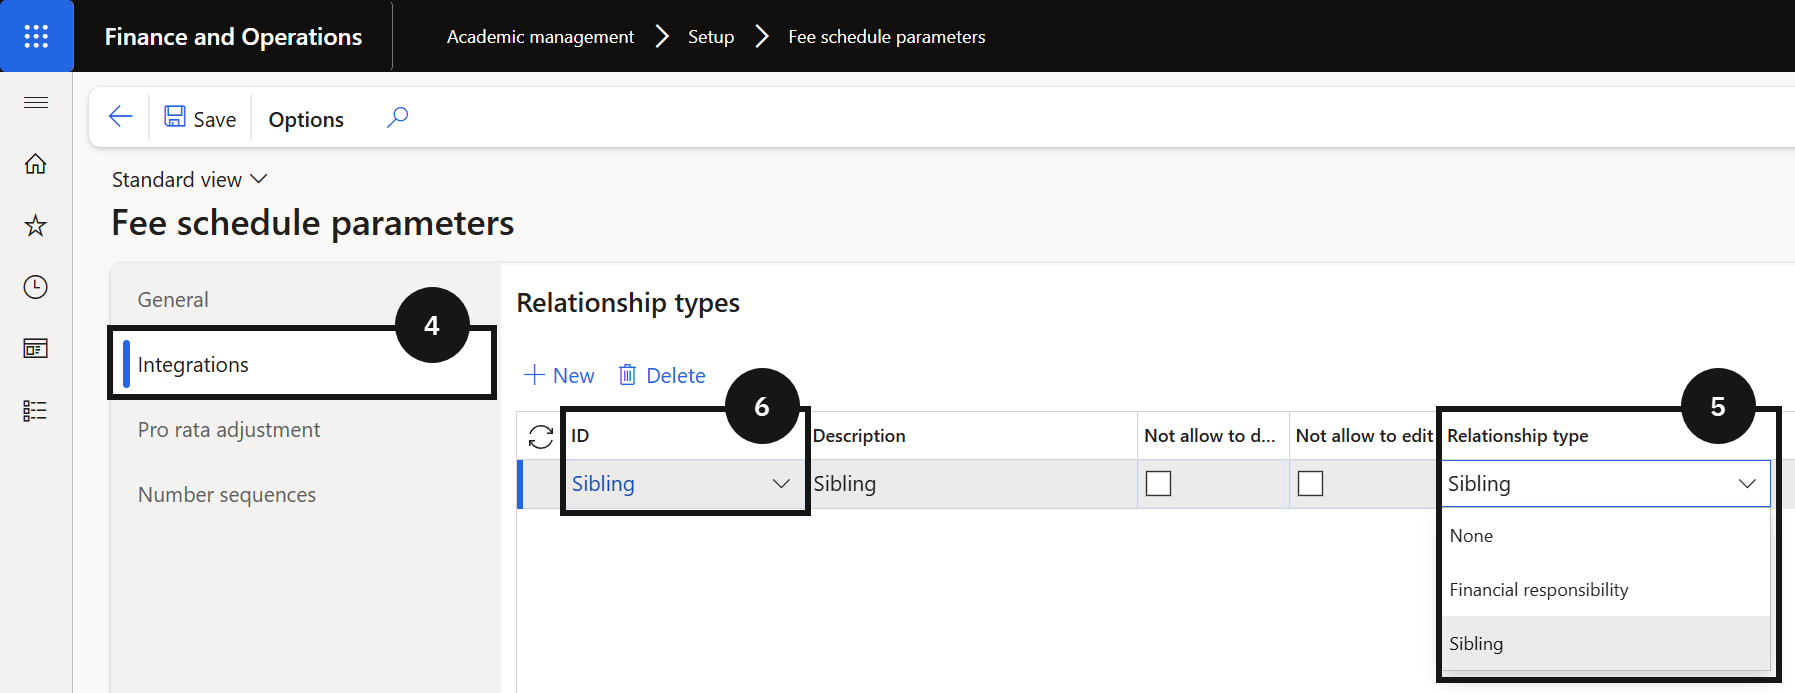
Click the Integrations tab.
Select the Relationship type field, select Financial responsibility, then Sibling.
Note: Financial responsibility is used for parents or guardians who pay fee invoices. Sibling is used for brother/sister relationships and for calculating sibling order in fee calculations.
Select the ID value that matches the configured relationship type.
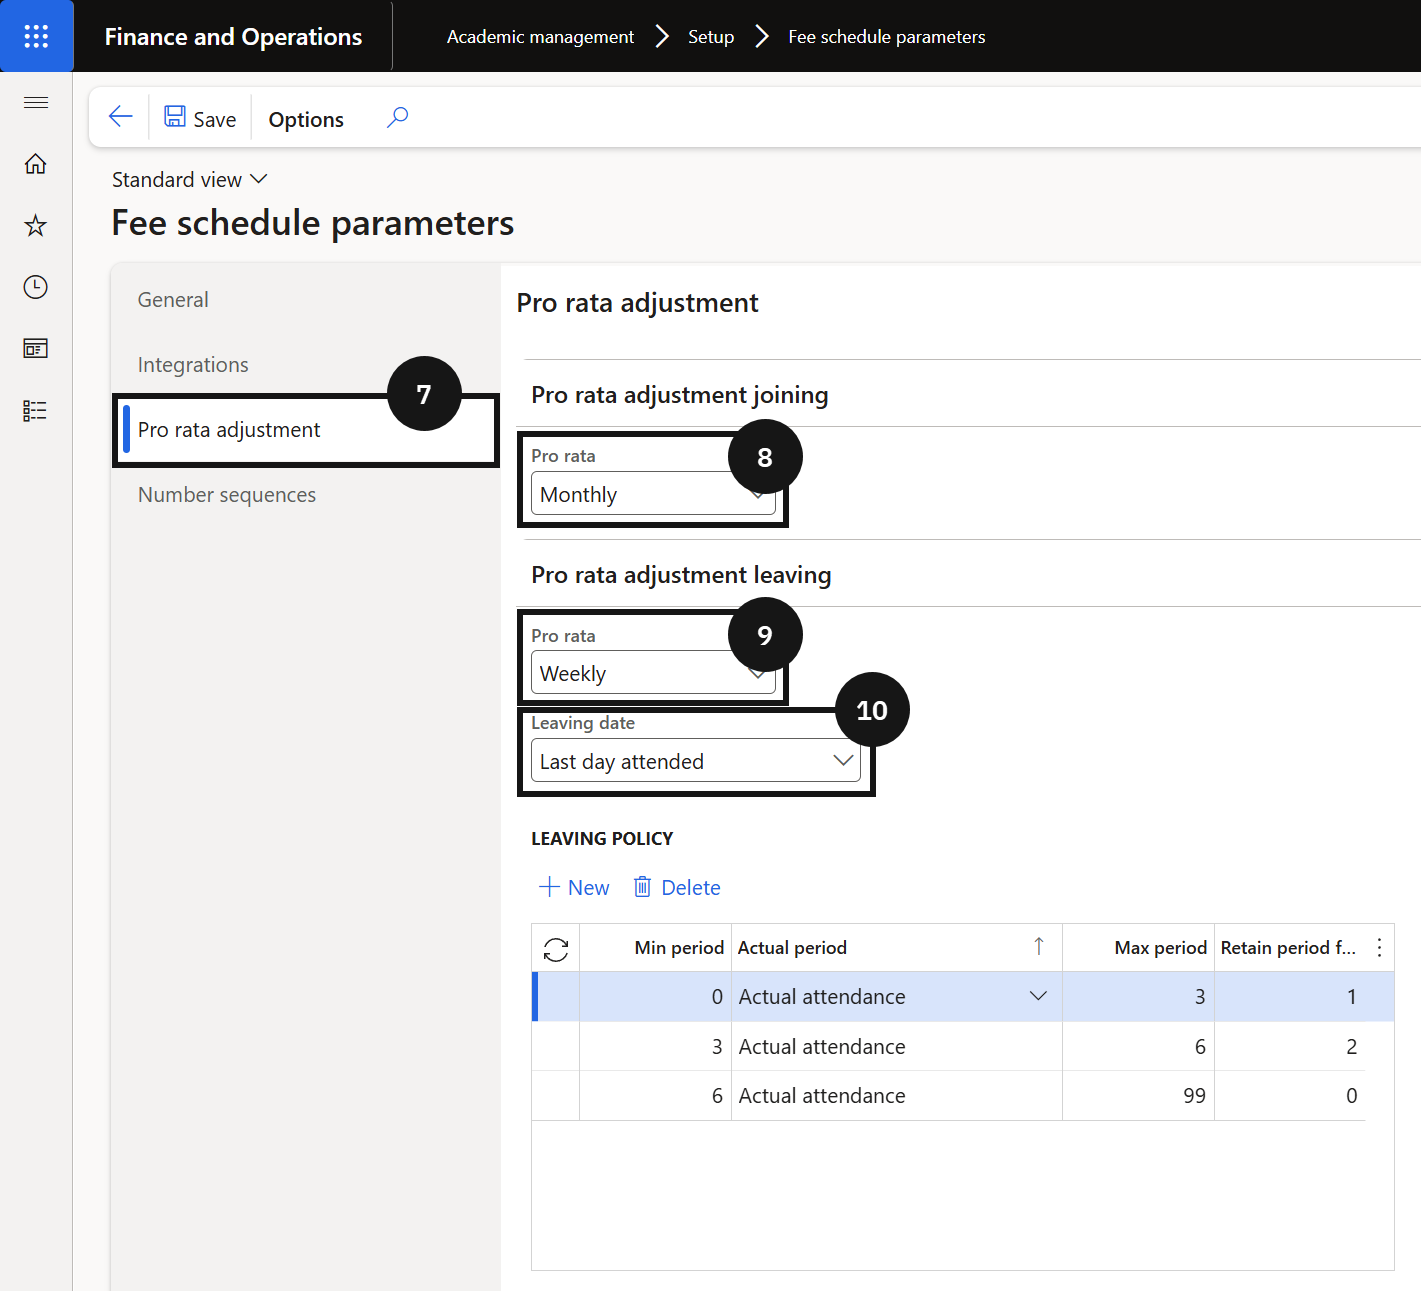
Click the Pro rata adjustment tab.
Select the Pro rata adjustment joining option.
Select the Pro rata adjustment leaving option.
Select the Leaving date option:
- Last day attended — use when the school manages the leaving date as LDA.
- Expiration date — use when the school manages the leaving date as the expiration date in the Academic enrolment table.
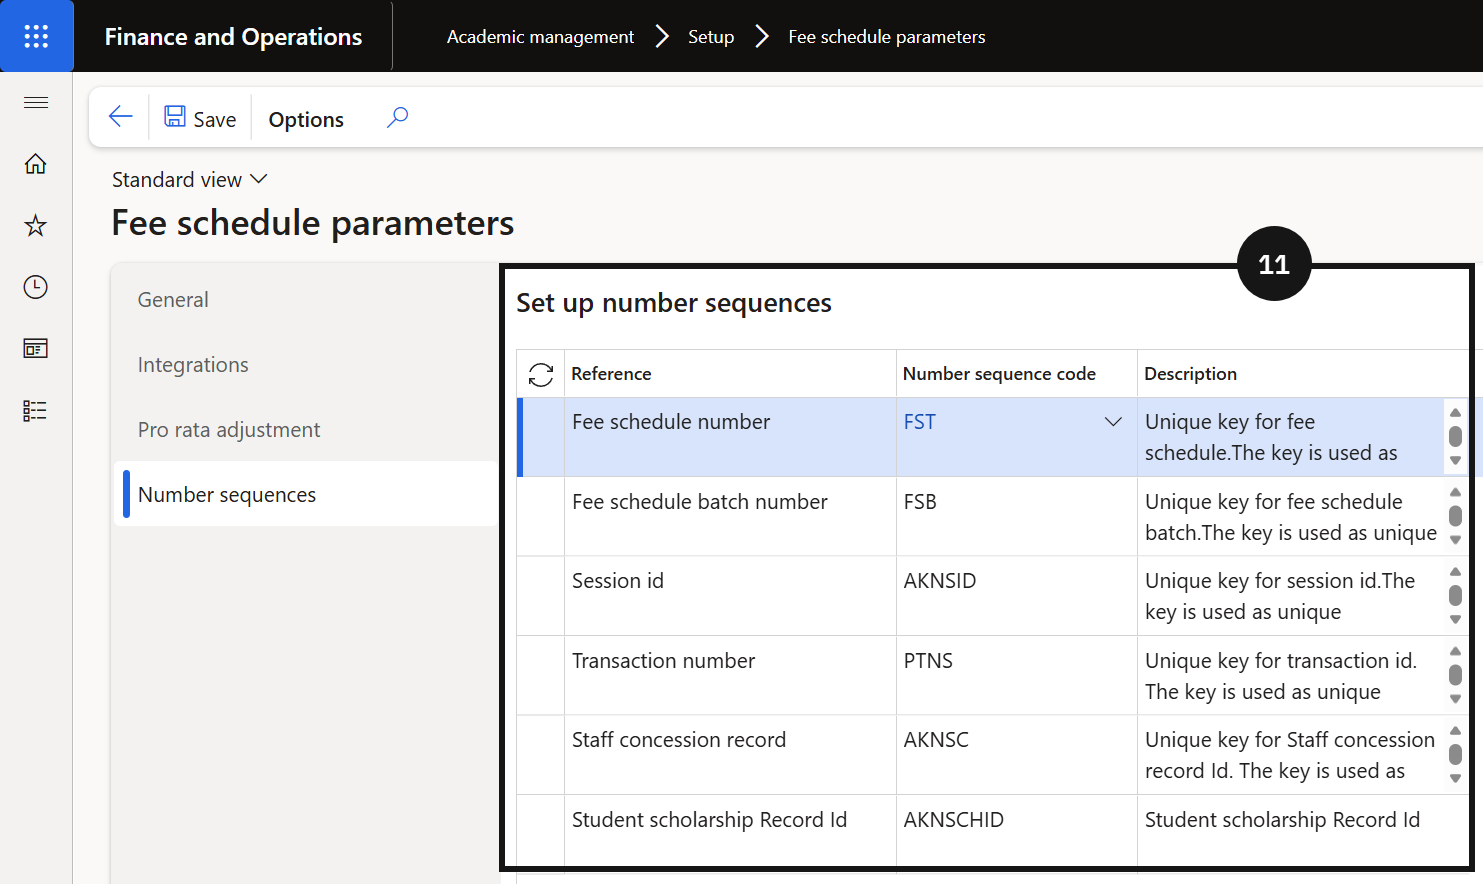
Click the Number sequences tab and confirm all number sequences are set up for all references.
Click Save.
_1-67155e29df7f9b9903c6700d0e22b020.png)
_2-51bb93e245f2763305b7dddcc1dc3264.png)
Fee Schedule Parameters (GEMS)
From the FNO dashboard, open Modules ▸ Academic management.
Expand Setup and click Fee schedule parameters.
On the General tab, expand each section and complete the fields based on your school's requirements.
Click the Integrations tab.
Select the Relationship type.
Note: Relationship type = Sibling is used for brother/sister relationships and for calculating sibling order.
Select the ID.
Click the Pro rata adjustment tab.
Select the Pro rata adjustment joining option.
Select the Pro rata adjustment leaving option.
Select the Leaving date option:
- Last day attended — use when the school manages the leaving date as LDA.
- Expiration date — use when the school manages the leaving date as the expiration date in the Academic enrolment table.
Click the Number sequences tab and confirm all number sequences are set up for all references.
Click Save.
Fee & Charge Interval Setup
The fee and charge interval defines the academic billing cycle, the overall date range for the year and the individual periods within it. Each interval specifies the start and end date of the year, the number of billing periods (such as three terms or ten months), and the due date and revenue recognition date for each period. Week and month breakdowns within each period are generated automatically to support pro rata joining and leaving calculations. The fee and charge interval is one of the most critical configuration records in the system: it is the link between students, fee schedule templates, and the fee generation batch. Any student whose academic enrolment record does not contain a matching interval will be excluded from billing runs.
From the FNO dashboard, open Modules ▸ Academic management.
Expand Setup and click Fee and Charge Interval.
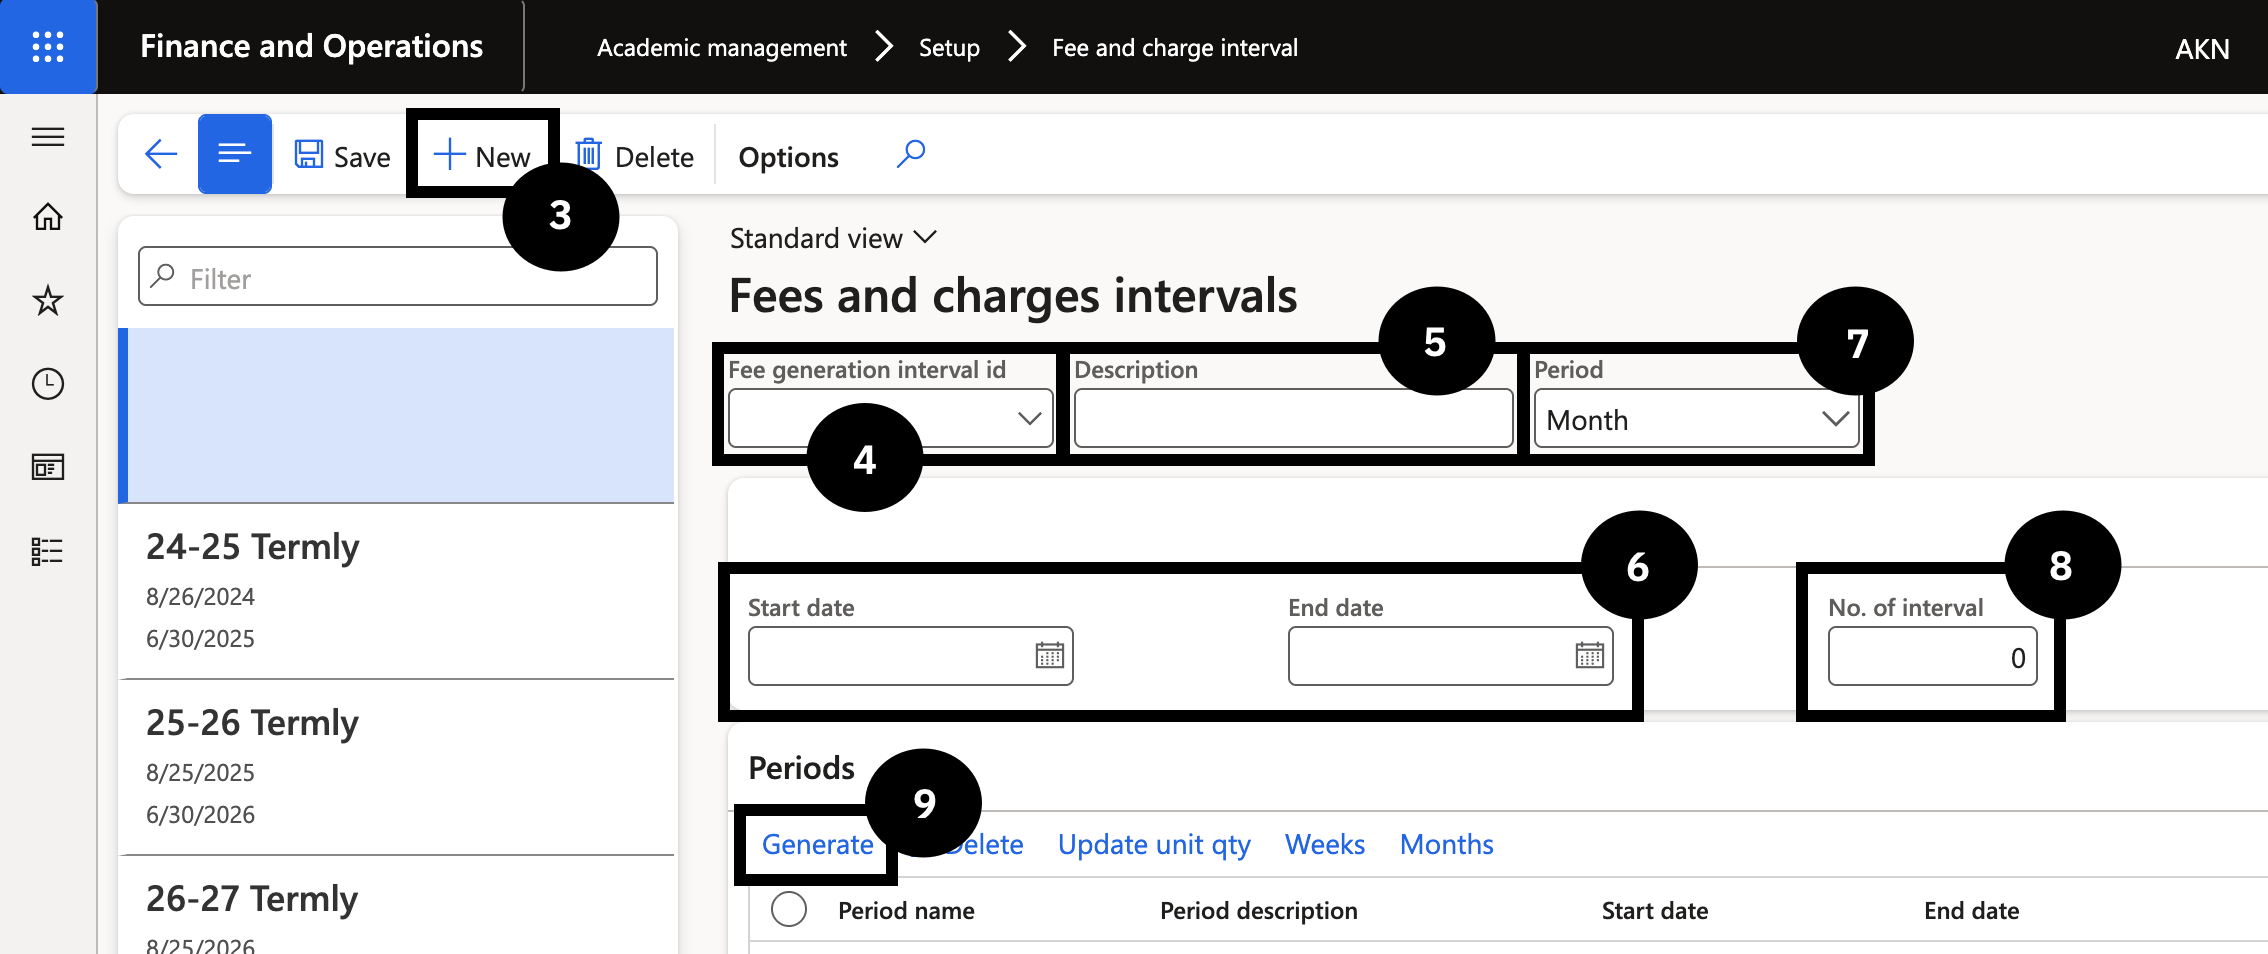
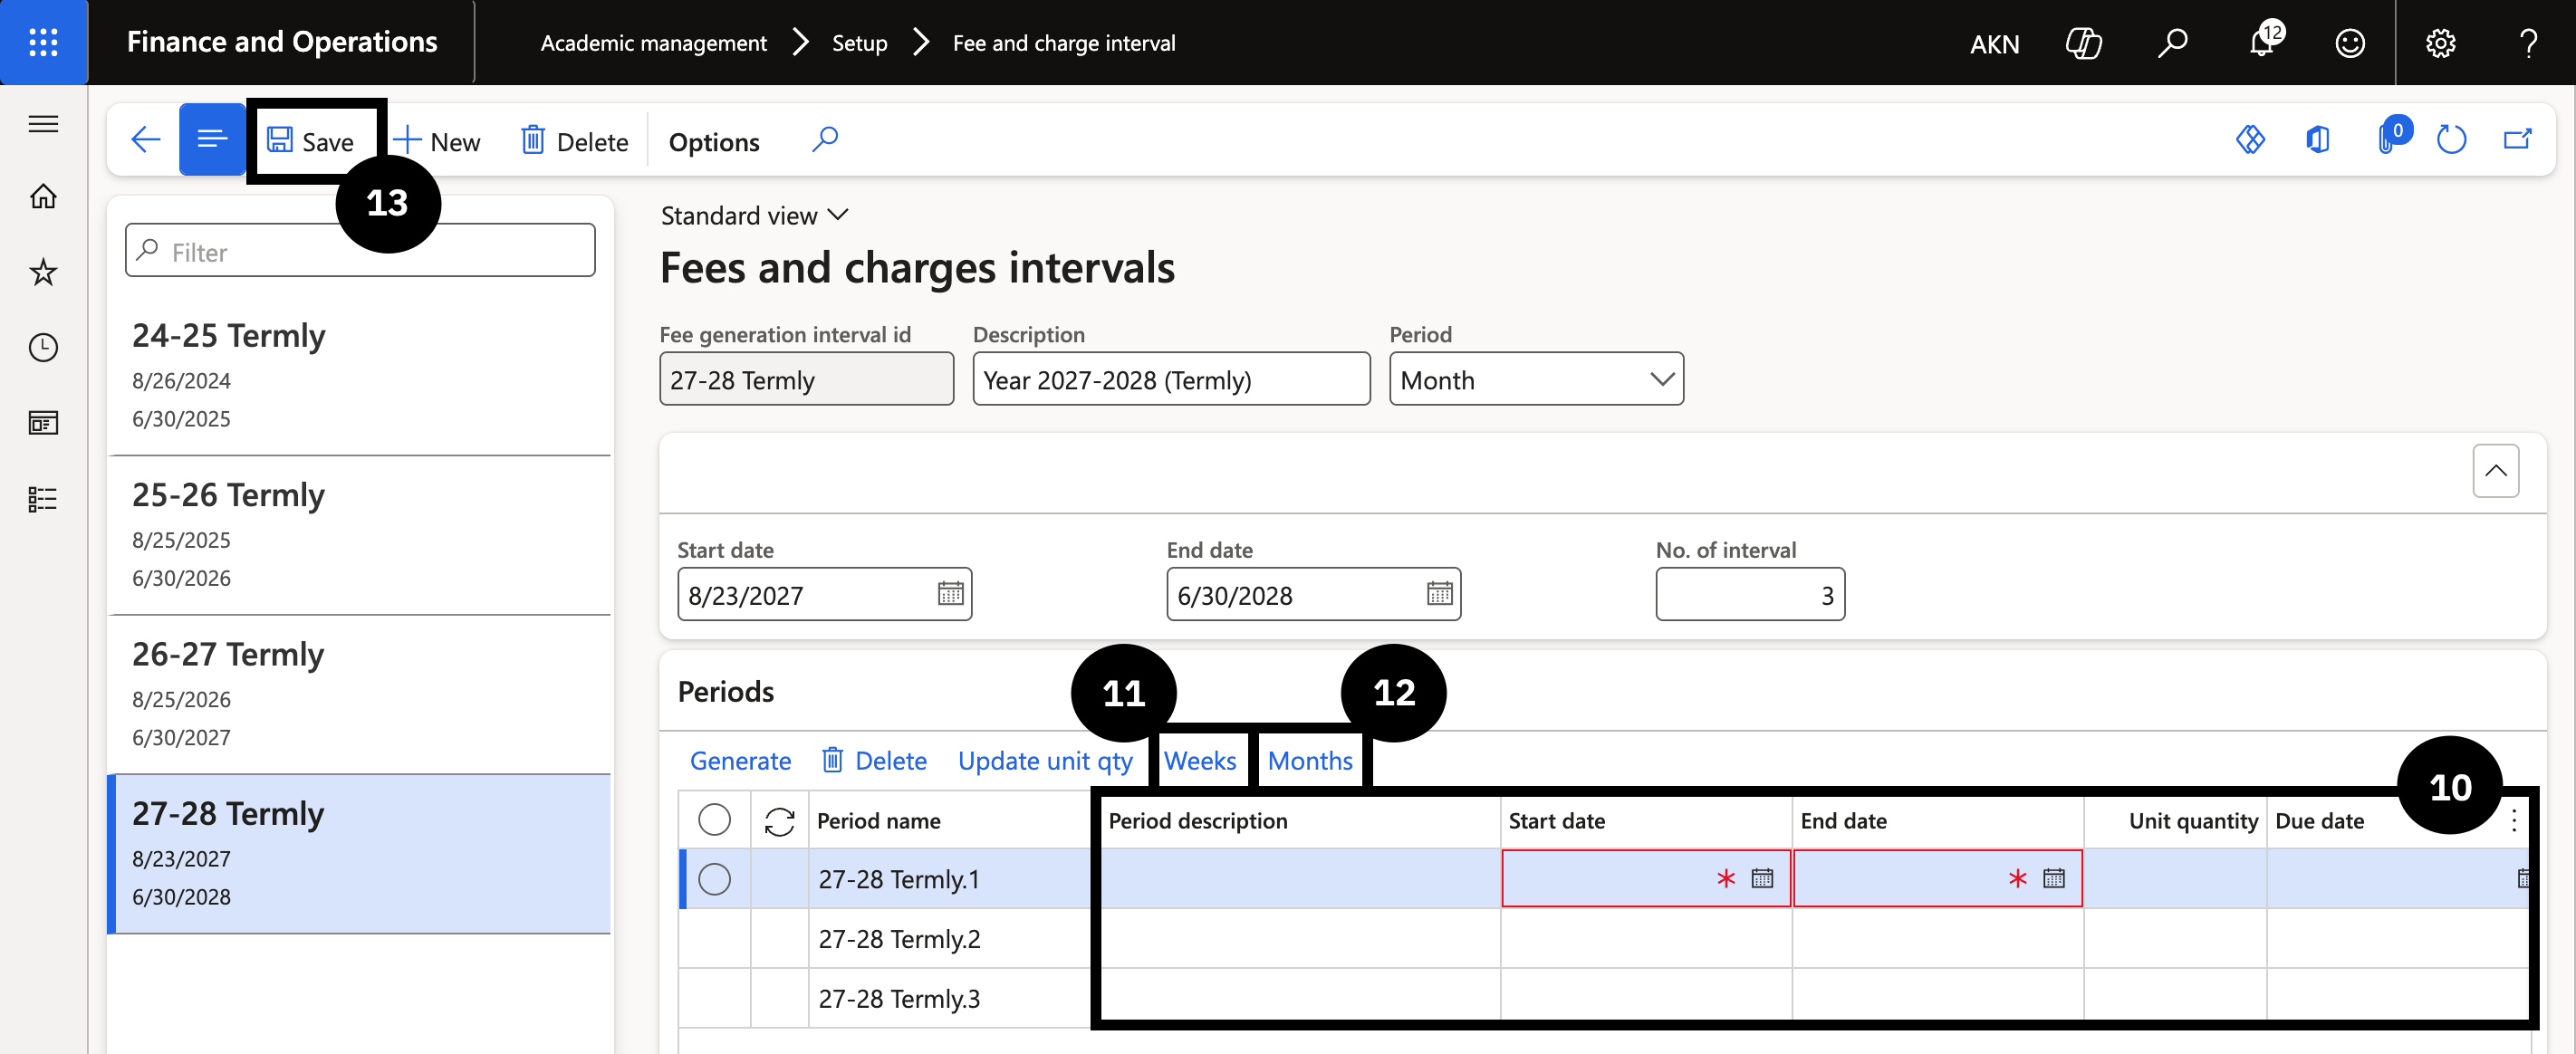
Click New in the toolbar to create a new interval.
Enter details in Fee generation interval ID (e.g., 2025-2026).
Enter details in the Description field.
Enter the Start date and End date for the school academic year (billing cycle).
Choose the Period option from the dropdown (e.g., Month, Week) based on the school’s pricing method.
Enter the Number of intervals to specify how many invoices will be generated in the academic year (e.g. 3 for termly fees, or 10 for monthly). This should match the school’s billing frequency.
Click Generate in the toolbar to create the periods.
For each period:
- Enter details in Period description.
- Enter the Start date and End date.
- Click Update unit quantity so the system calculates the number of months or weeks within the period.
- Enter the Due date to define when payment is expected.
- Enter the Revenue recognition date if required for deferral.
Click Weeks in the Periods toolbar, then click the Generate button to automatically populate the weeks’ start and end dates for each period. This is only required for pro-rata joining and leaving policies.
Click Months in the Periods toolbar, then click the Generate button to automatically populate the months’ start and end dates for each period.
Validate entered data for accuracy, then click Save.
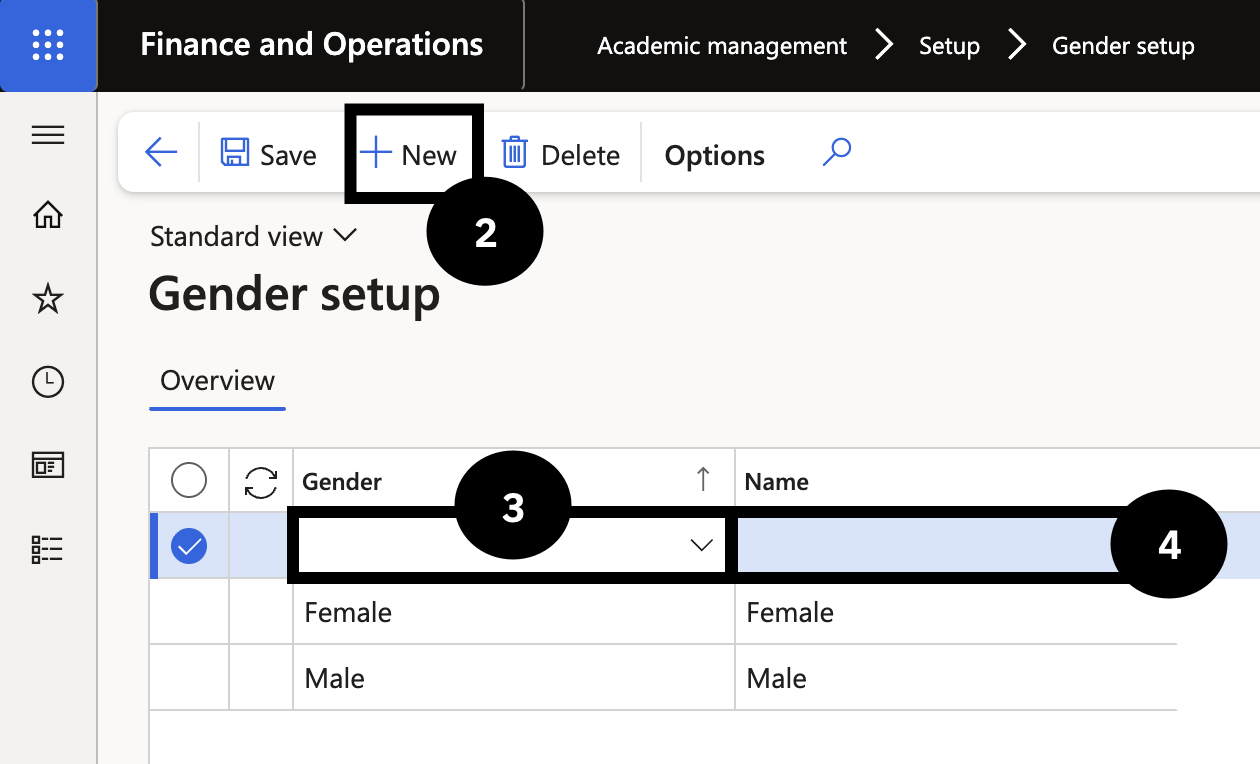
Gender Setup
Navigate to Modules ▸ Academic management ▸ Setup ▸ Gender setup.
Click New.
Enter a value in the Gender field.
Enter the name in the Name field.
Click Save.
Academic Year
Academic year setup defines the academic calendar structure used across the platform and must align with the configuration in the student management system, as finance is downstream from both. Each academic year record is assigned a sequence number, a shared academic year ID, and an optional school-specific description. Year group financial dimensions are linked to each record to automate accounting transactions. Once the academic year is created, tuition fees for re-enrolment and enrolment deposits are attached so the system can look up the correct fees during the deposit process. Where a school has students eligible for a different fee structure — such as foundation students — both fee structures are added at this stage.
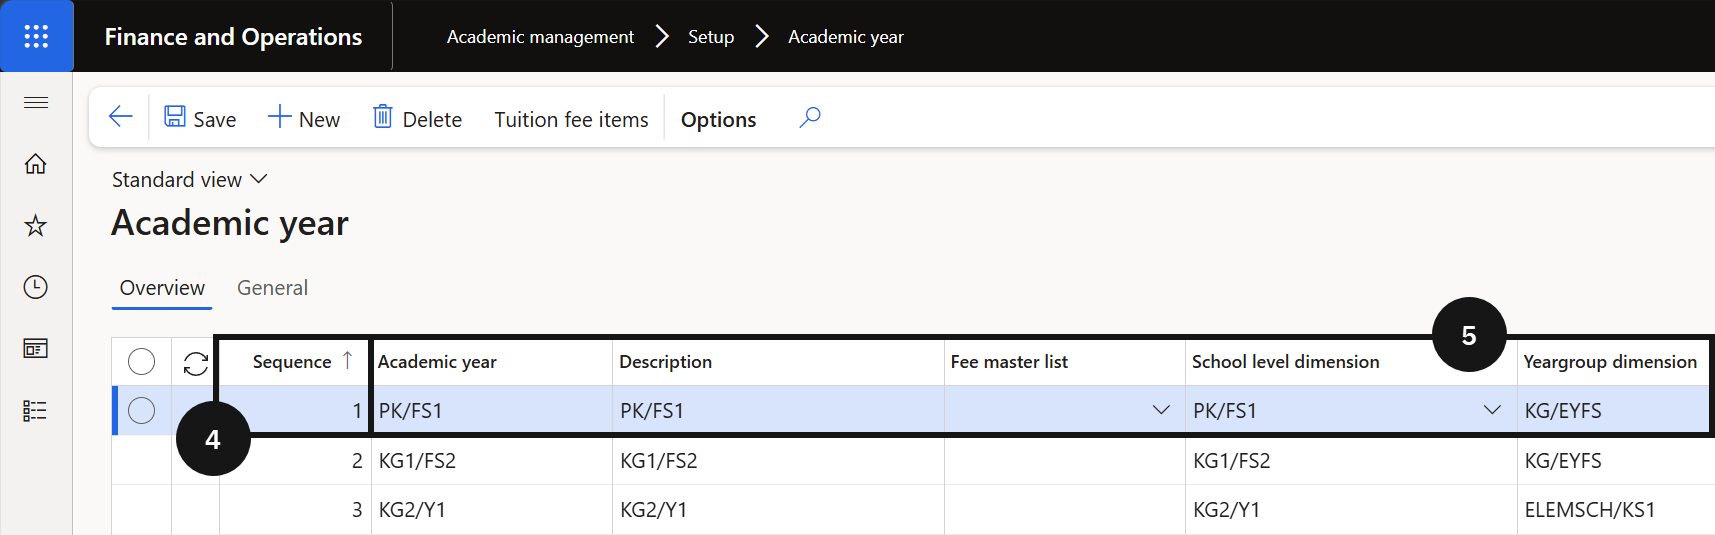
Academic Year (Product)
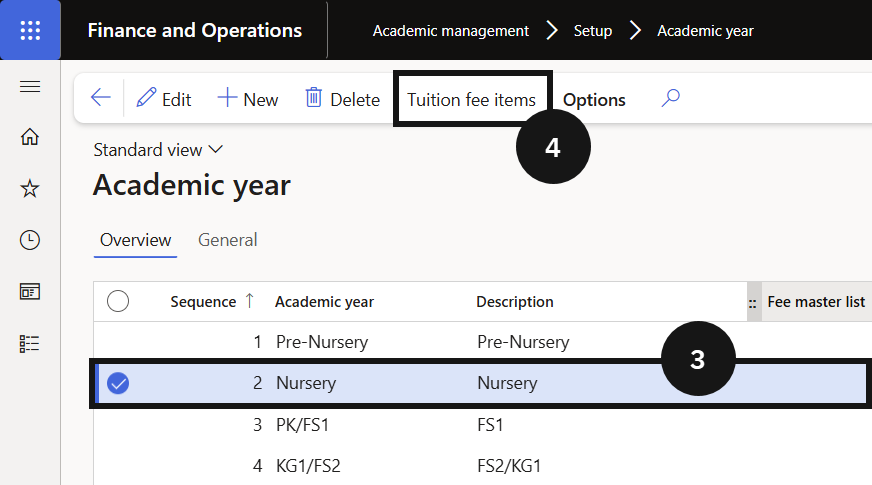
From the FNO dashboard, open Modules ▸ Academic management.
Expand Setup and click Academic year.
Click New in the toolbar.
Note: The Sequence number is assigned automatically by the system and determines the order in which grades appear. This field cannot be edited.
Enter the short code in the Academic year field (e.g., KG1, 01, 02).
Note: This code is used internally and must match the grade code in the student management system.
Enter the full grade name in the Description field (e.g., KG1, Grade 1).
Note: This description is displayed to users across Academic Management.
Select the applicable code in the Fee master list field.
Note: The Fee master list identifies the fees to be sent to the student management system.
Click Save.
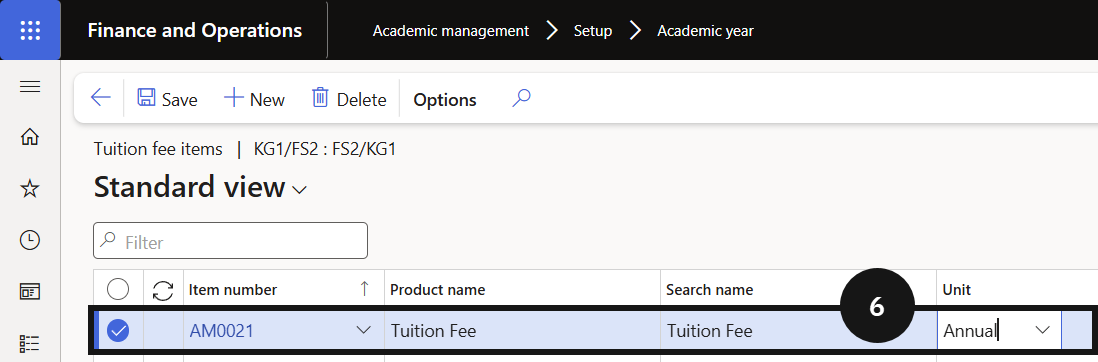
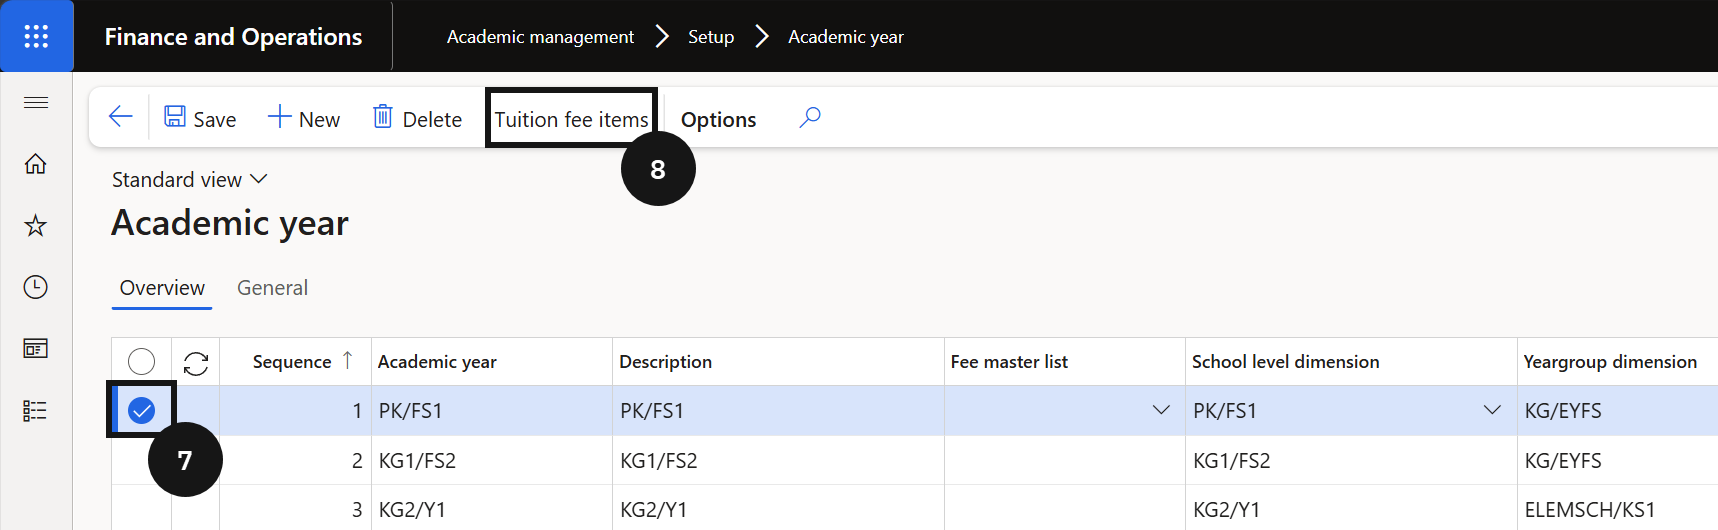
Select Tuition fee items from the Action Pane.
Click New.
Select Tuition fee in the Item number field.
Note: This defines the fee item used to calculate enrolment and re-enrolment deposits for students in this academic year.
Enter Year in the Unit field.
Note: This indicates the tuition fee is charged on an annual basis.
Click Save.
_1-2c06286fcc92e0dac705f398d1f535c9.png)
_2-0a6e952608ea906a3ddf15f9159d7950.png)
Academic Year (GEMS)
Note: Academic year IDs must match the setup in the student management system. The sequence number controls the order used for future billing calculations.
From the FNO dashboard, open Modules ▸ Academic management.
Expand Setup and click Academic year.
Click New in the toolbar.
Enter the next sequence number in order.
Complete the remainder of the fields in the row.
Click Save.
Highlight the academic year record.
Click Tuition fees in the toolbar.
Add the re-enrolment deposit fee and enrolment deposit fee items.
If the school has students eligible for an alternative fee structure (e.g., foundation students), add the additional tuition fee item.
Click Save.
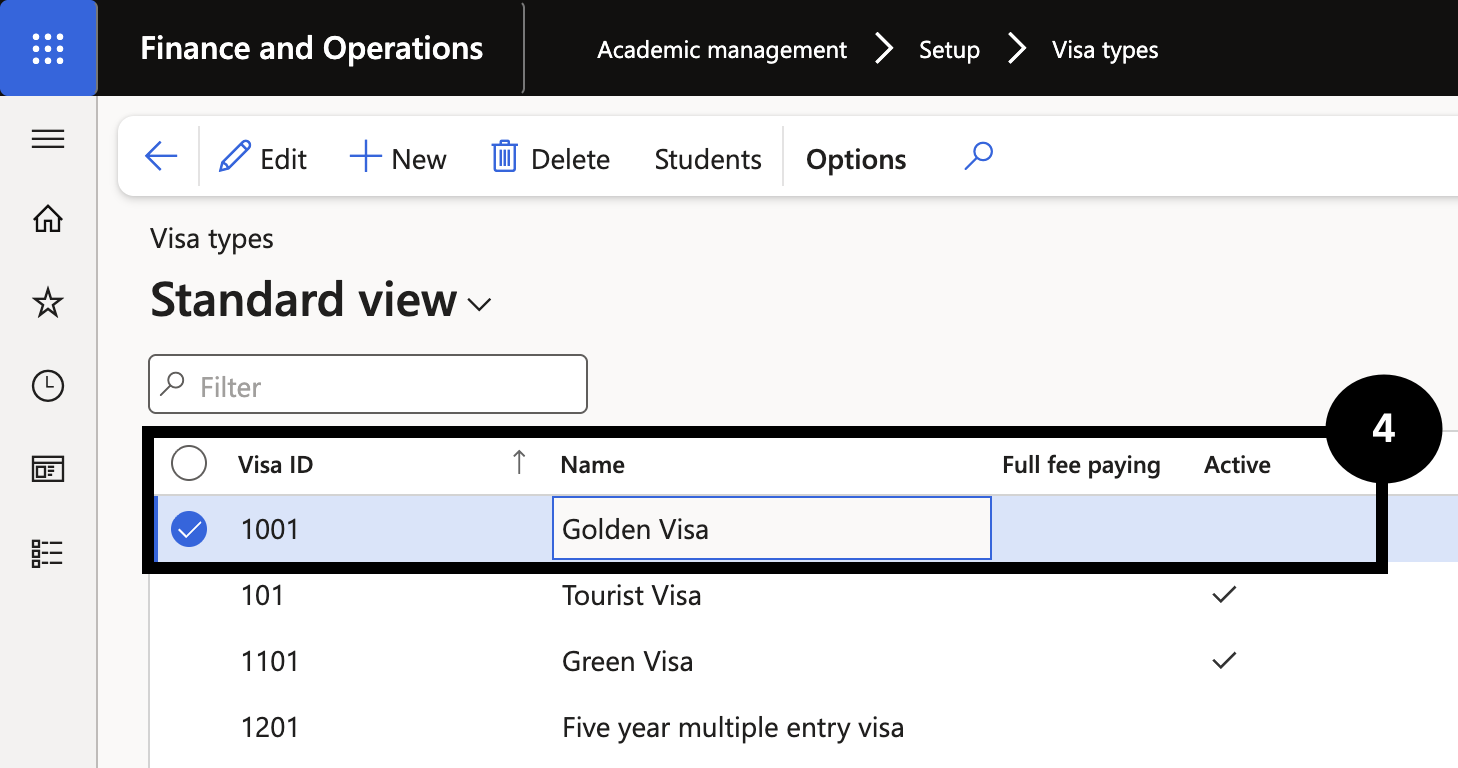
Visa Types
Visa types classify the visa status held by international students and determine whether a student is full fee paying or subsidised. Each type is marked active or inactive, allowing the school to maintain a current list without deleting historical records. Visa types configured here are available for selection on student records and can be used to drive fee calculations where students qualify for a fee reduction based on their visa status.
From the FNO dashboard, open Modules ▸ Academic management.
Expand Setup and click Visa types.
Click New in the toolbar.
Complete the columns to create a new Visa type.
Select Full fee paying if the student is not subsidised and must pay the full tuition fee.
Clear the Active box if the visa is no longer valid.
Click Save.
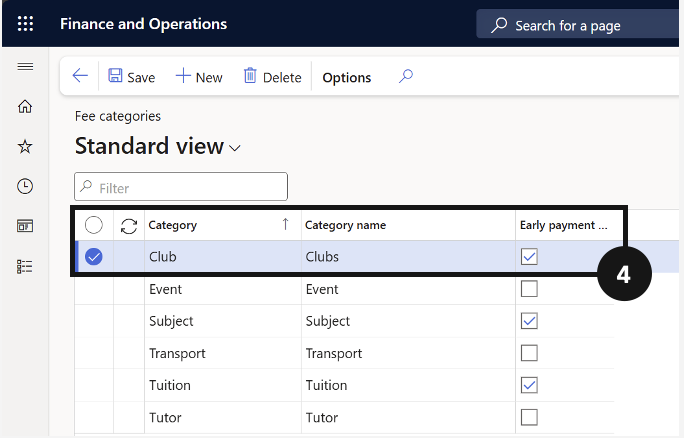
Fee Categories
Fee categories classify the type of activity associated with each fee item and are used throughout the system to drive accounting, reporting, and fee schedule logic. Once categories are created in Academic Management, they must be linked to the corresponding released product in Product information management so the system applies the correct category when generating invoices.
From the FNO dashboard, open Modules ▸ Academic management.
Expand Setup and click Fee categories.
Click New in the top toolbar.
Complete the columns to create new fee categories.
Click Save.
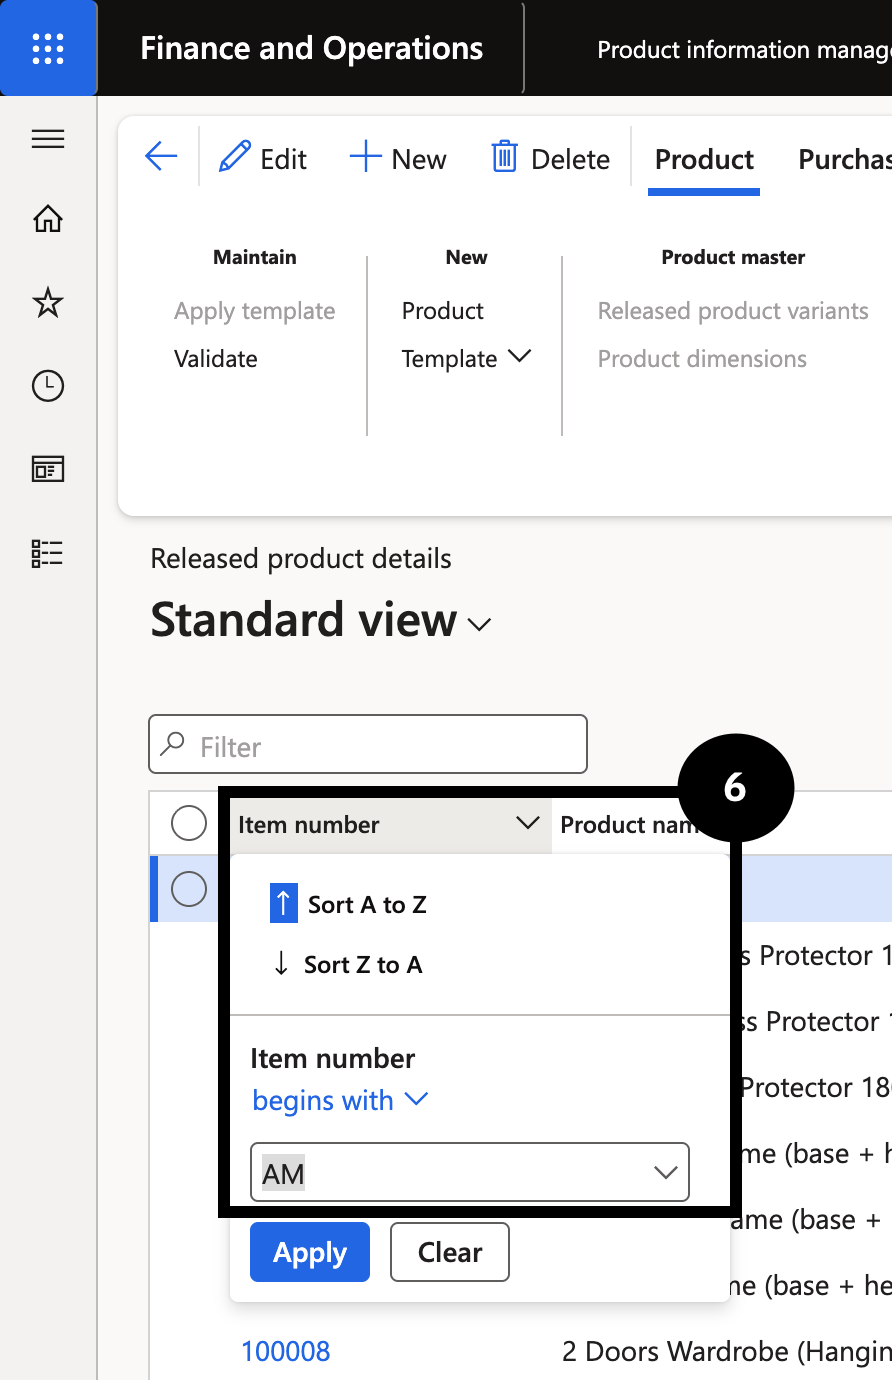
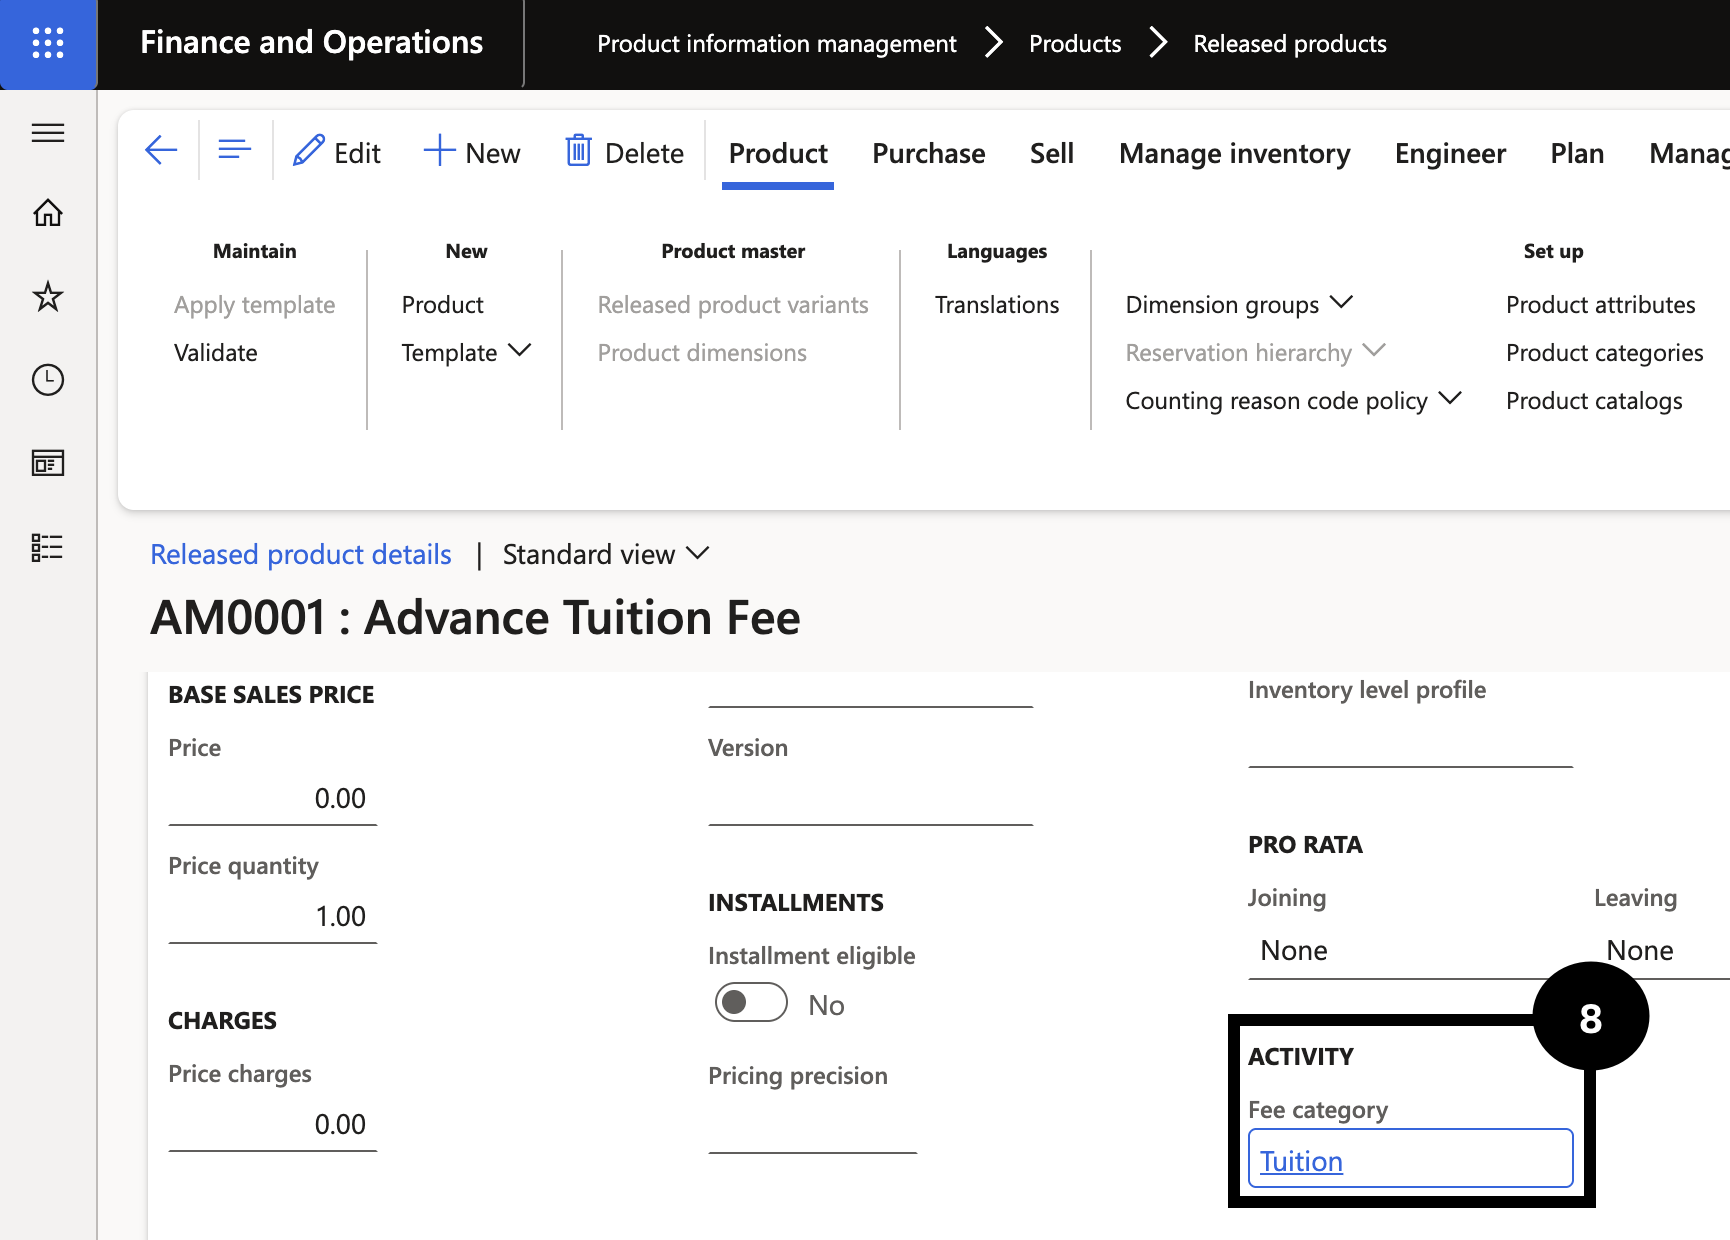
Link these fees to the product master by navigating to Modules ▸ Product information management ▸ Products ▸ Released products.
Use the Item number filter to search for the added fee categories.
Note: Categories related to Academic management start with the letters AM.
Select the category, then scroll down and expand the Sell tab.
Locate Activity ▸ Fee category.
Ensure the fee aligns with the category it will be billed as.
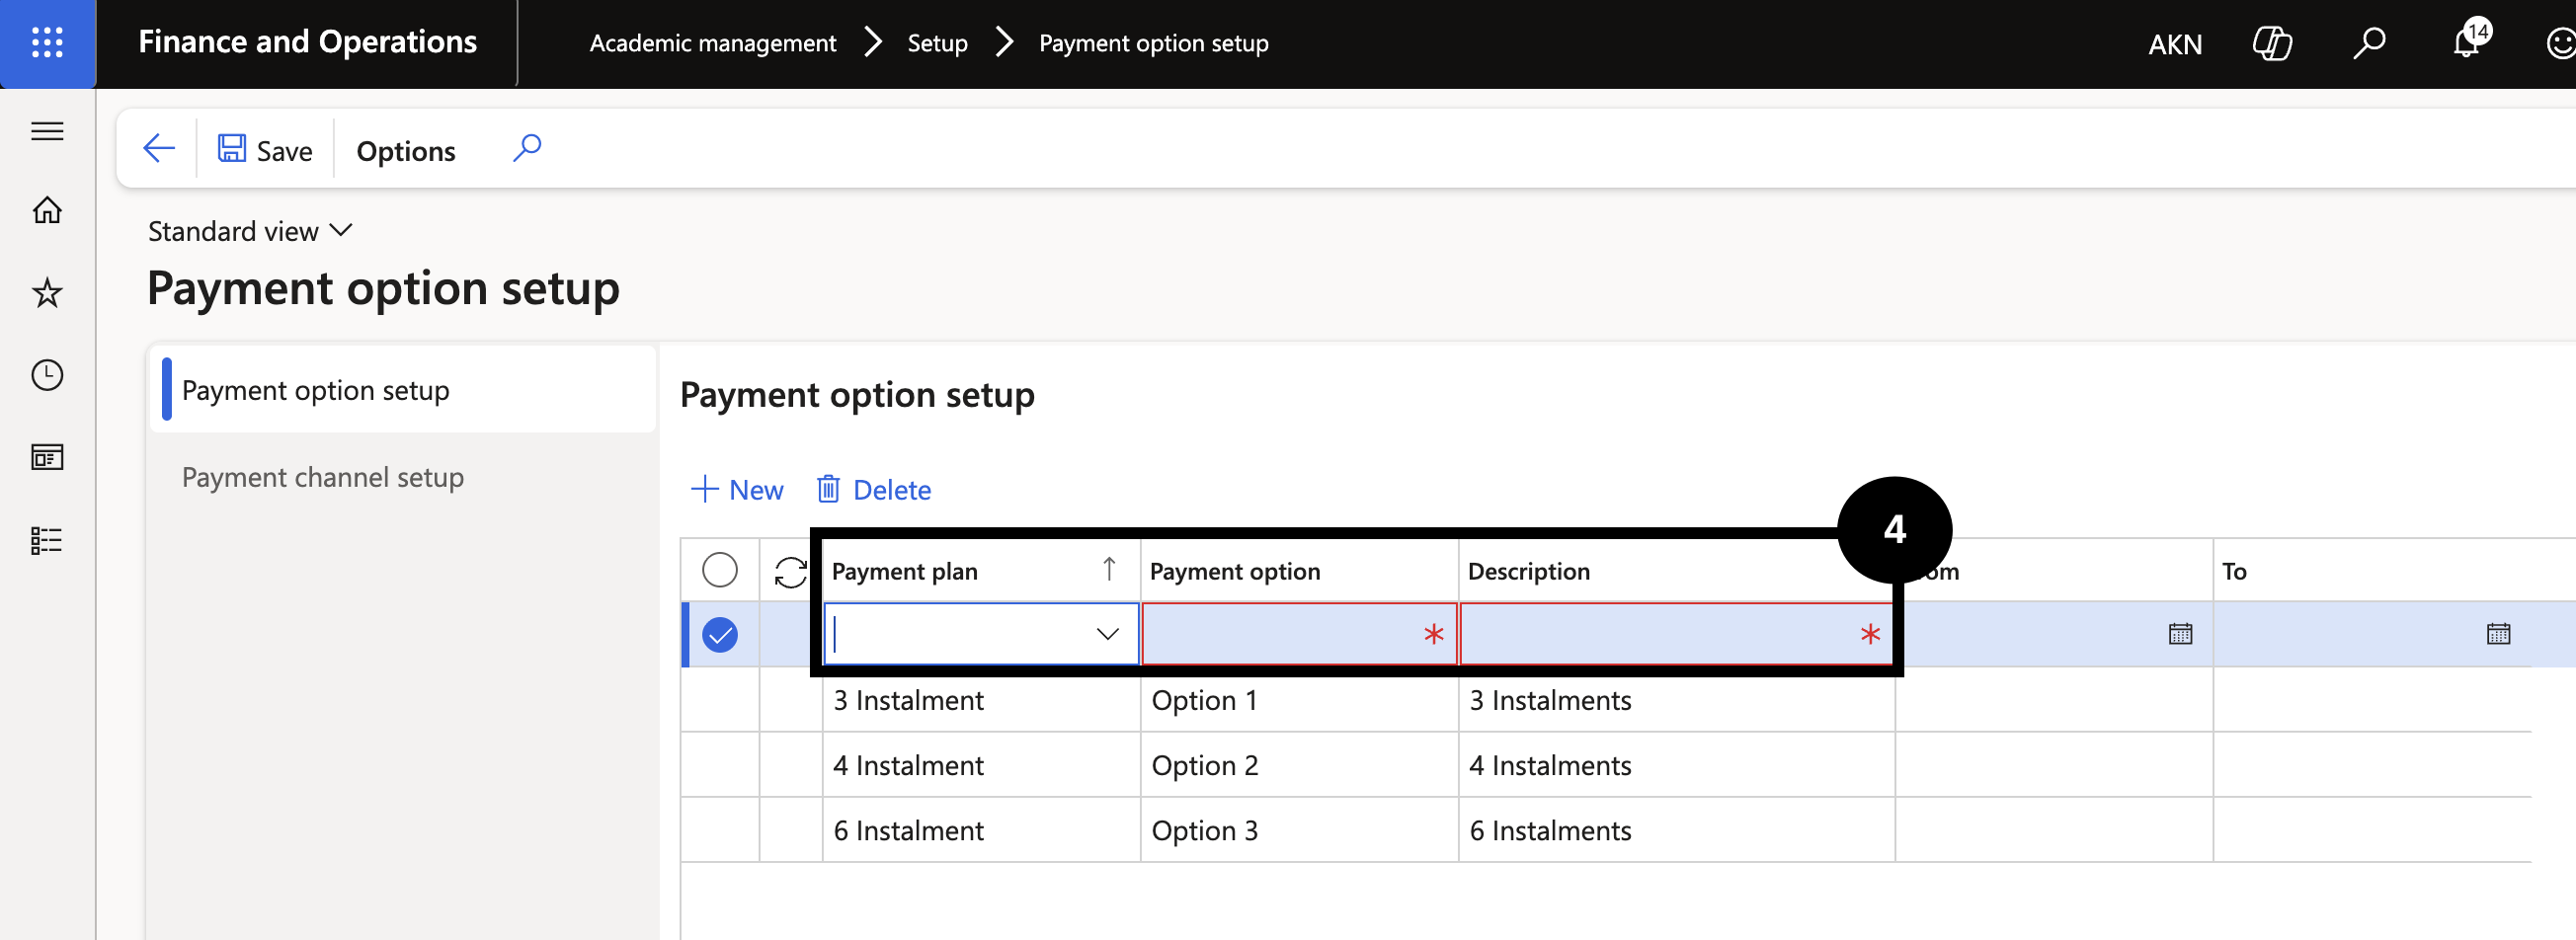
Payment Option Setup
Navigate to Modules ▸ Academic management ▸ Setup ▸ Payment option setup.
Click New.
Select the Payment plan from the dropdown.
Fill in the Payment option and Description fields.
Note: Once saved, there will be a copy on the Customer master or the Student master
Click Save.
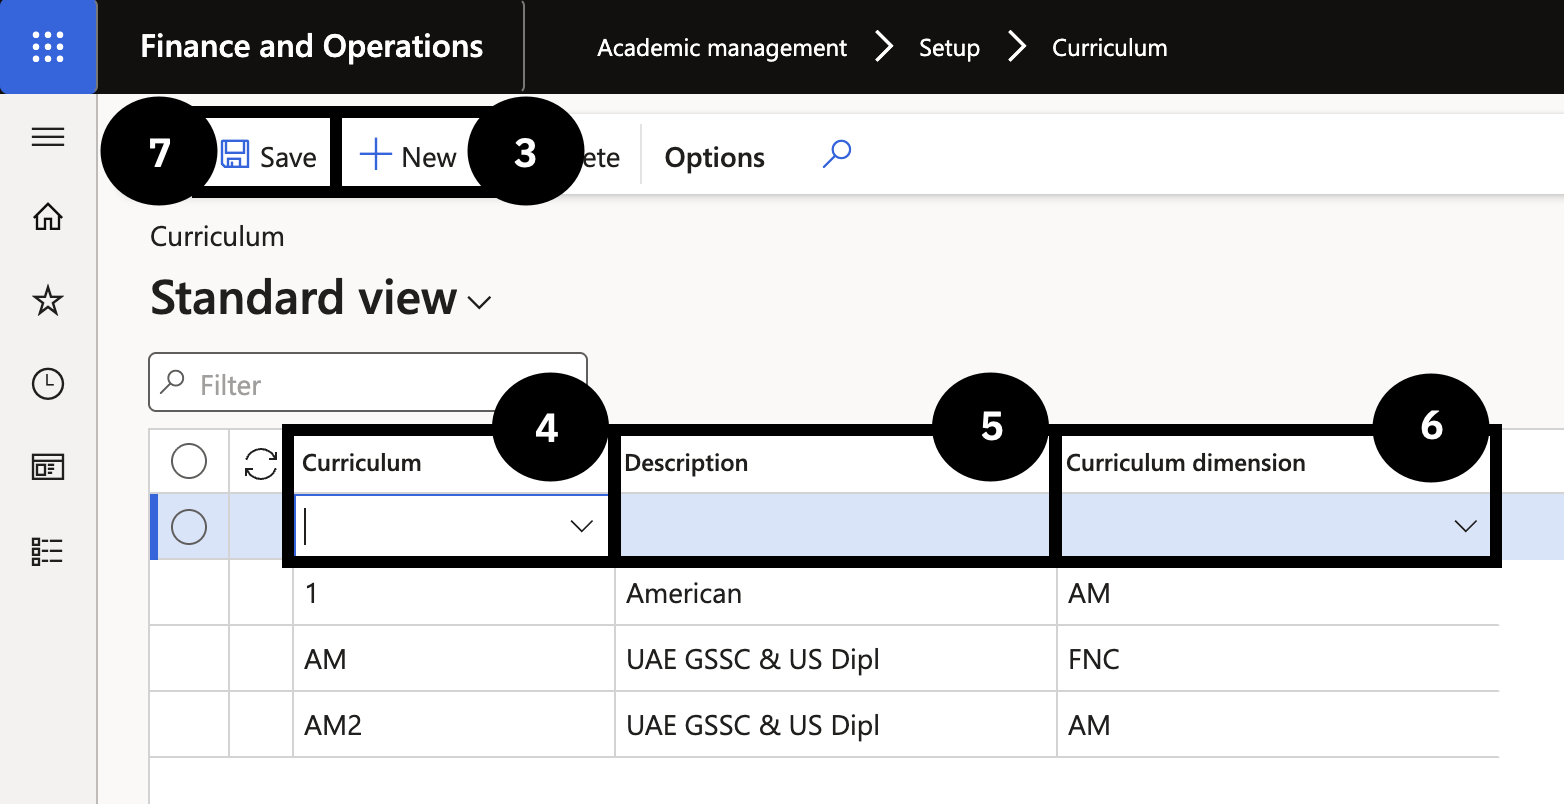
Curriculum (GEMS)
Note: Curriculum codes must be as per student management system.
From the FNO dashboard, open Modules ▸ Academic management.
Expand Setup and click on Curriculum.
Click New in the toolbar to create a new curriculum.
Choose the Curriculum option from the dropdown (e.g., AM).
Enter details in the Description field.
Select the Curriculum dimension from the dropdown.
Click Save.
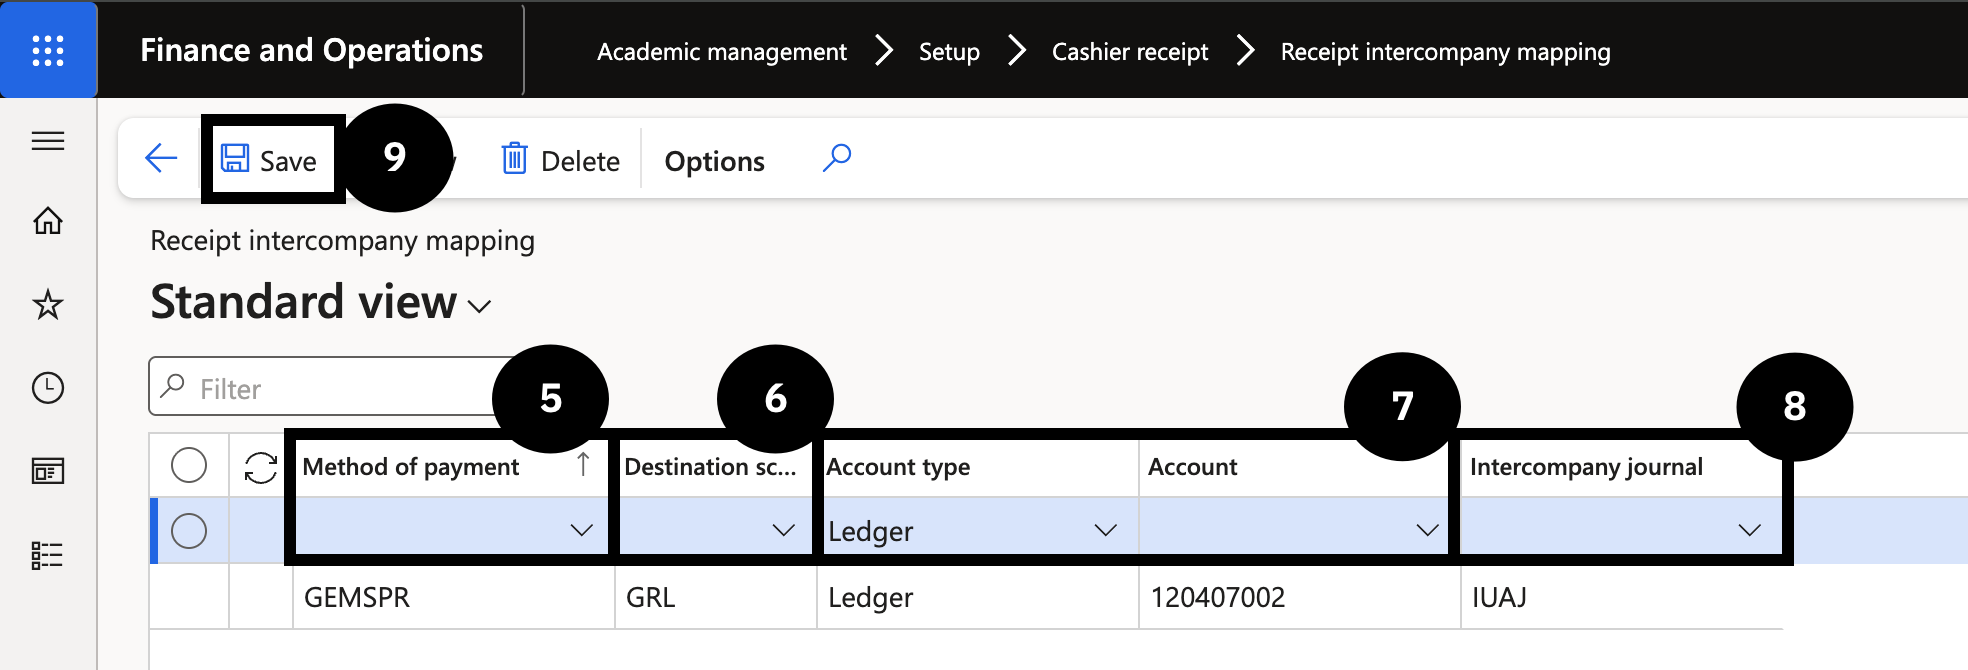
Receipt Intercompany Mapping (GEMS)
From the FNO Dashboard, open Modules ▸ **Academic management.
Expand Setup ▸ Cashier Receipt then click Receipt intercompany mapping.
Click New.
Select a value in the Method of payment field.
Note: Choose the method of payment that is configured for intercompany processing with another school.
Select a value in the Destination school field.
Note: The selected school will receive the Intercompany posting.
Set the Account type and the Account based on the entry posting in the original cashier receipt:
- If the Account type is Ledger, Select the Main Account
- If the Account type is Bank, the Bank Account
Select a value in the Intercompany journal field.
Click Save.
Note: This setup is primarily used to support scenarios such as GEMS Rewards (GRL), where financial liability arising from reward points is initially recorded at the receiving school and requires daily transfer to the GEMS Rewards legal entity.
_1-eec60c5b91c938f0daca1387a0655d7f.png)
Advance Discount Policy (GEMS)
From the FNO dashboard, open Modules ▸ Academic management ▸ Setup ▸ Advance discount policy.
Click New.
Type a value in the Policy code field.
Enter or select a value from the Fee and charges interval dropdown.
Note: Select the billing cycle that applies to this policy.
Click the General tab.
In the Period name field, select the relevant time period.
Note: More than one time period may be selected in this field.
Click Select.
Return to the Overview tab.
In the Charges code field, select Advance Discount.
Enter the discount value into the Discount field.
In the From date and To date fields, enter the time period that the advance discount will be applied.
Complete the Description field for reporting reference.
Click Save.
_1-4352ae94ad14a5c6bce82b0ed7f71c65.png)
_2-a08daa9fd2c1946b28e6b6a9dd8aa787.png)
_3-7a2b902ebc89c742bc66968ad5c6c49b.png)
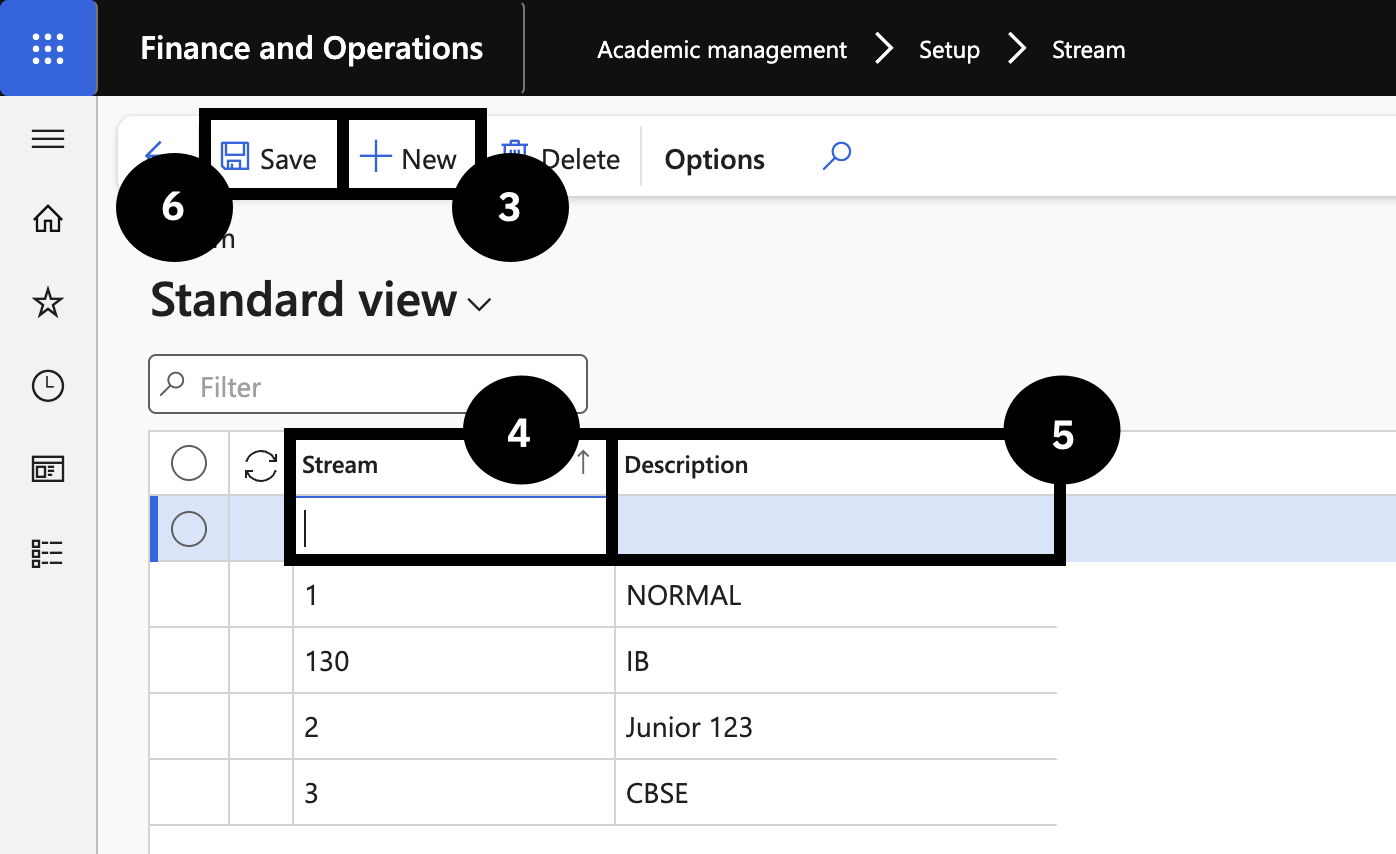
Stream
Streams differentiate groups of students within the same academic year who follow different curricula or learning programmes. The stream code is a key academic attribute in fee generation: where a school charges different fees for different streams, the trade agreement must include a separate price line for each stream combination. Stream codes must match the naming convention used in the student management system to ensure data consistency across both platforms.
From the FNO dashboard, open Modules ▸ Academic management.
Expand Setup and click on Stream.
Click New.
Enter details in the Stream column.
Enter details in the Description column.
Note: Use the same naming and description format as the student management system to keep the setup consistent across both systems.
Click Save.
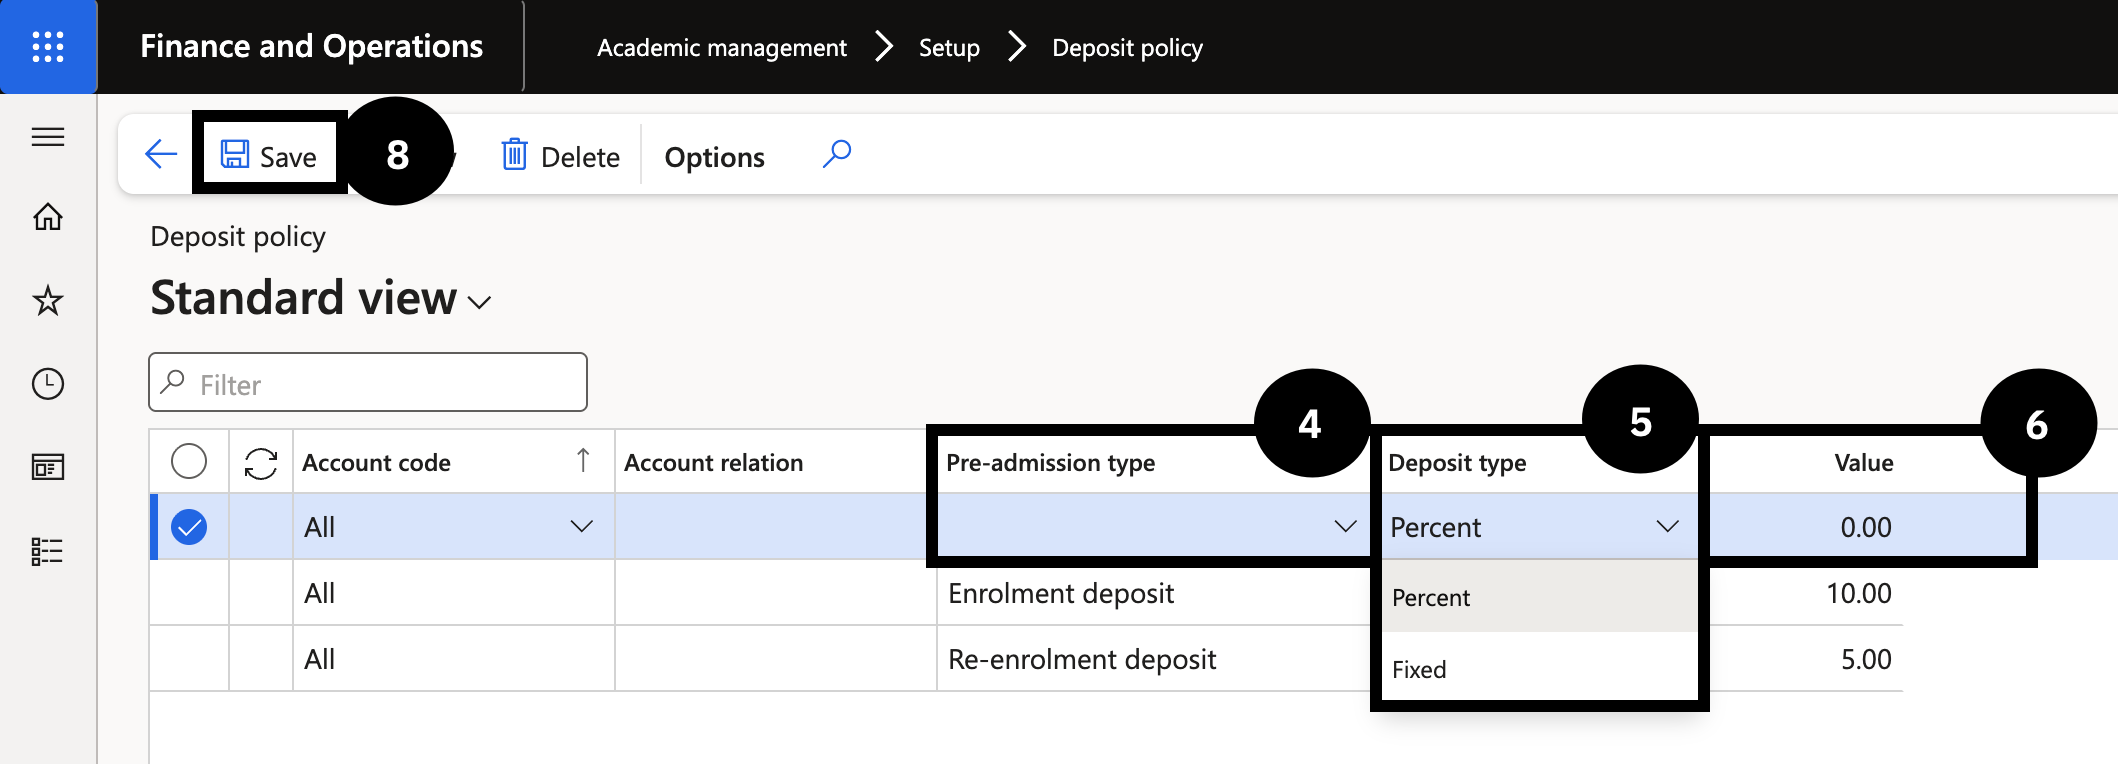
Deposit Policy
The deposit policy defines the amount charged to fee payers at enrolment or re-enrolment, before the full fee schedule is generated. Deposits can be configured as either a fixed amount or a percentage of the annual tuition fee linked to the relevant academic year. Each pre-admission type, such as enrolment deposit or re-enrolment deposit, requires its own policy entry. Once configured, the system uses this policy to calculate the deposit amount automatically when a deposit fee is raised.
From the FNO dashboard, open Modules ▸ Academic management.
Expand Setup and click on Deposit policy.
Click New in the toolbar to create a deposit policy record.
In Pre-admission type select the appropriate deposit from the dropdown.
Select the Deposit type from the dropdown (e.g., Percent or Fixed).
Enter the Value amount in the column section for the selected deposit type.
Repeat steps 3-6 for each deposit type you need to set up.
Click Save.
Note: If using the percentage deposit type, the percentage is calculated from the tuition fee linked to the selected academic year.
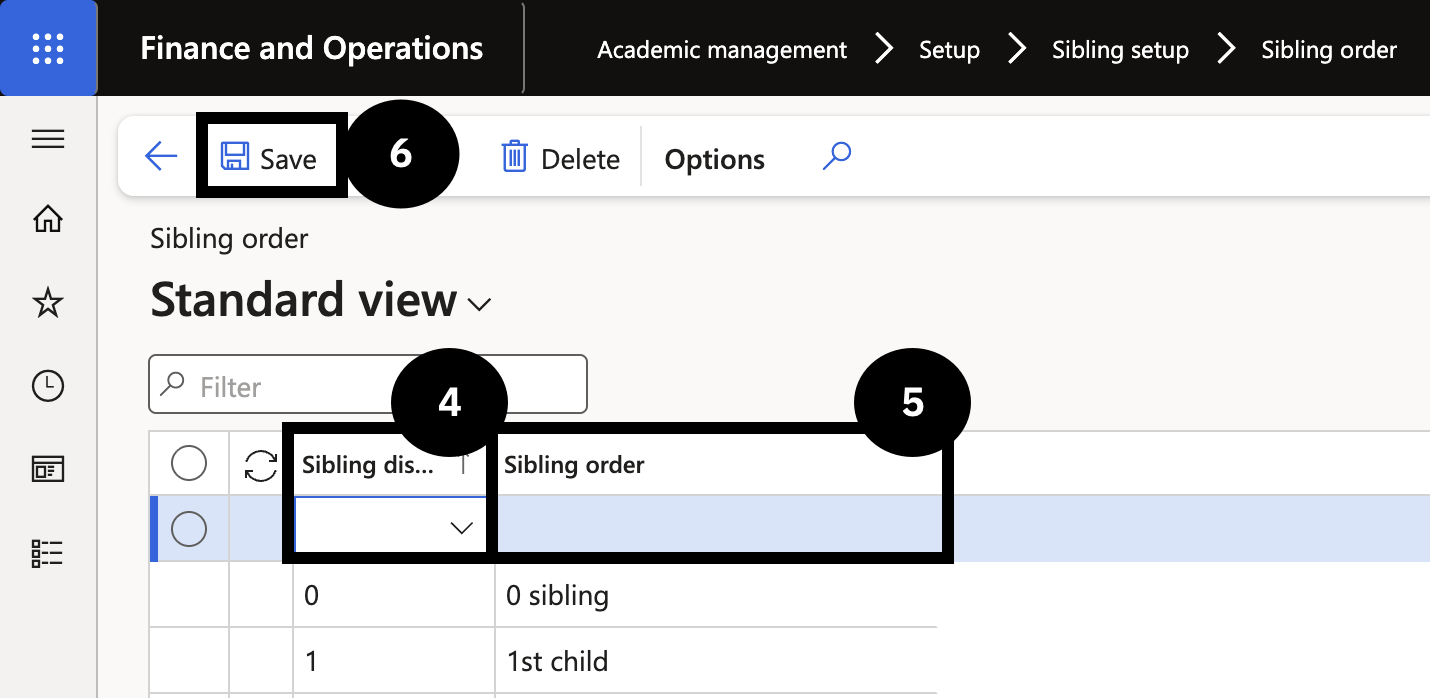
Sibling Order
The sibling discount feature allows the school to automatically apply fee reductions based on how many children from the same family are currently enrolled. To make this work, each student needs to be assigned a sibling order number that reflects their position within the family, with the eldest being 1, the second child being 2, and so on. These numbers are then mapped to customer price and discount groups, which are in turn linked to trade agreements that define the discount percentage for each sibling position. Once this configuration is complete and the trade agreement is posted, the system applies the correct discount automatically when fee invoices are generated.
Sibling Order Setup
Note: For each possible child in a family, assign a sibling order number (e.g., 1 for first child, 2 for second, up to your maximum, such as 9). Use 0 for students who are not yet current (e.g., future students or those transitioning between programs).
From the FNO dashboard, open Modules ▸ Academic management.
Expand Setup and Sibling setup, then click Sibling order.
Click New to create sibling order entries.
Note: Add a new record only if your school needs more sibling positions than the ones already listed.
Enter a unique number in Sibling discount order column (e.g, 11). Follow your school's sequencing convention.
Enter the Sibling order description (e.g., 11th Child). Use the same pattern as existing records.
Click Save.
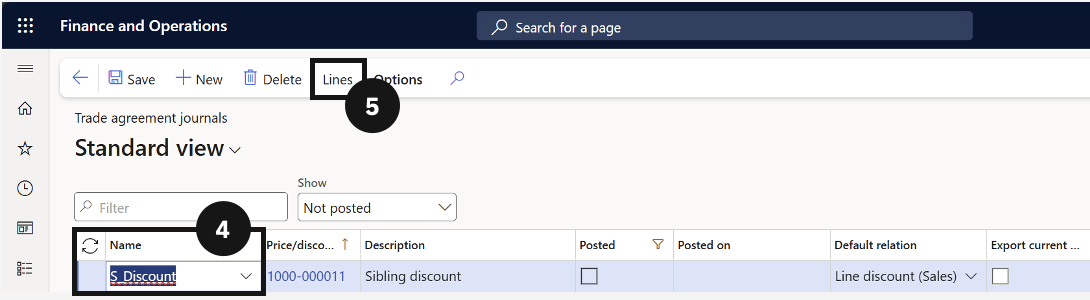
Trade Agreement
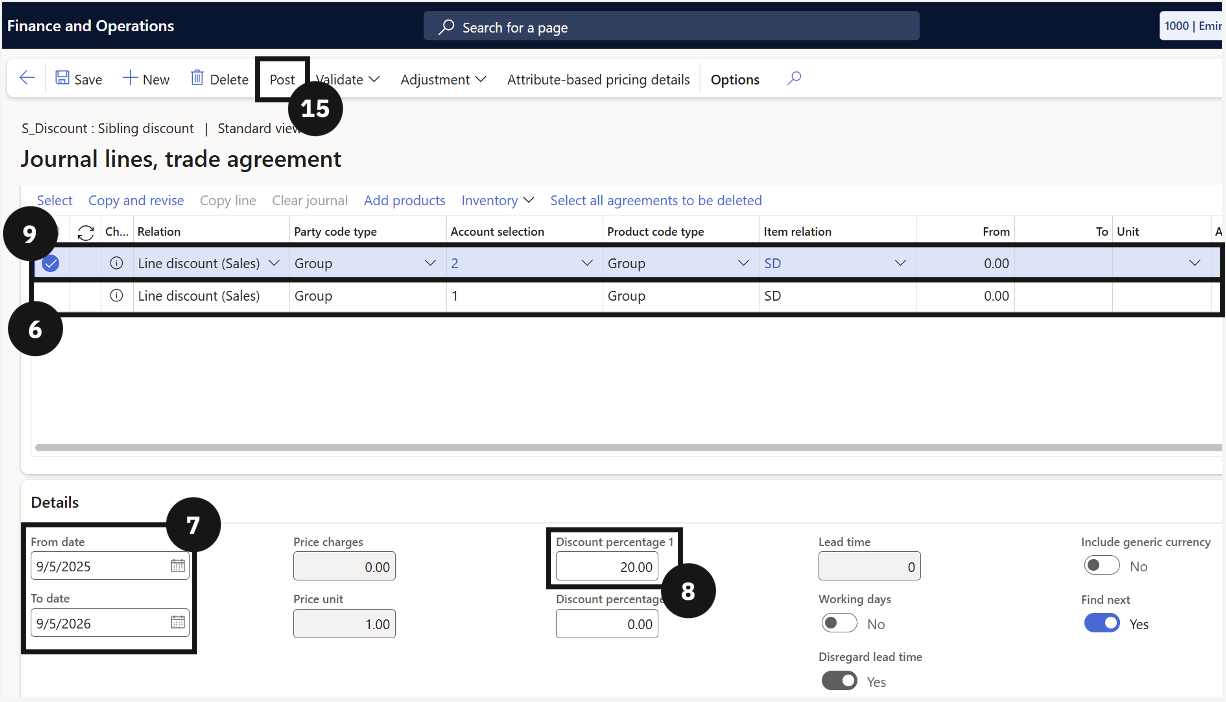
Trade agreements define the discount percentages applied to students based on their sibling order position. A sibling discount journal is created in Sales and Marketing, with a separate line for each child position and the corresponding discount rate. Once all lines are entered, the journal is posted to activate the discount policy. Tuition fee items must then be linked to the sibling discount line discount group so the system knows which items are subject to the discount when invoices are generated.
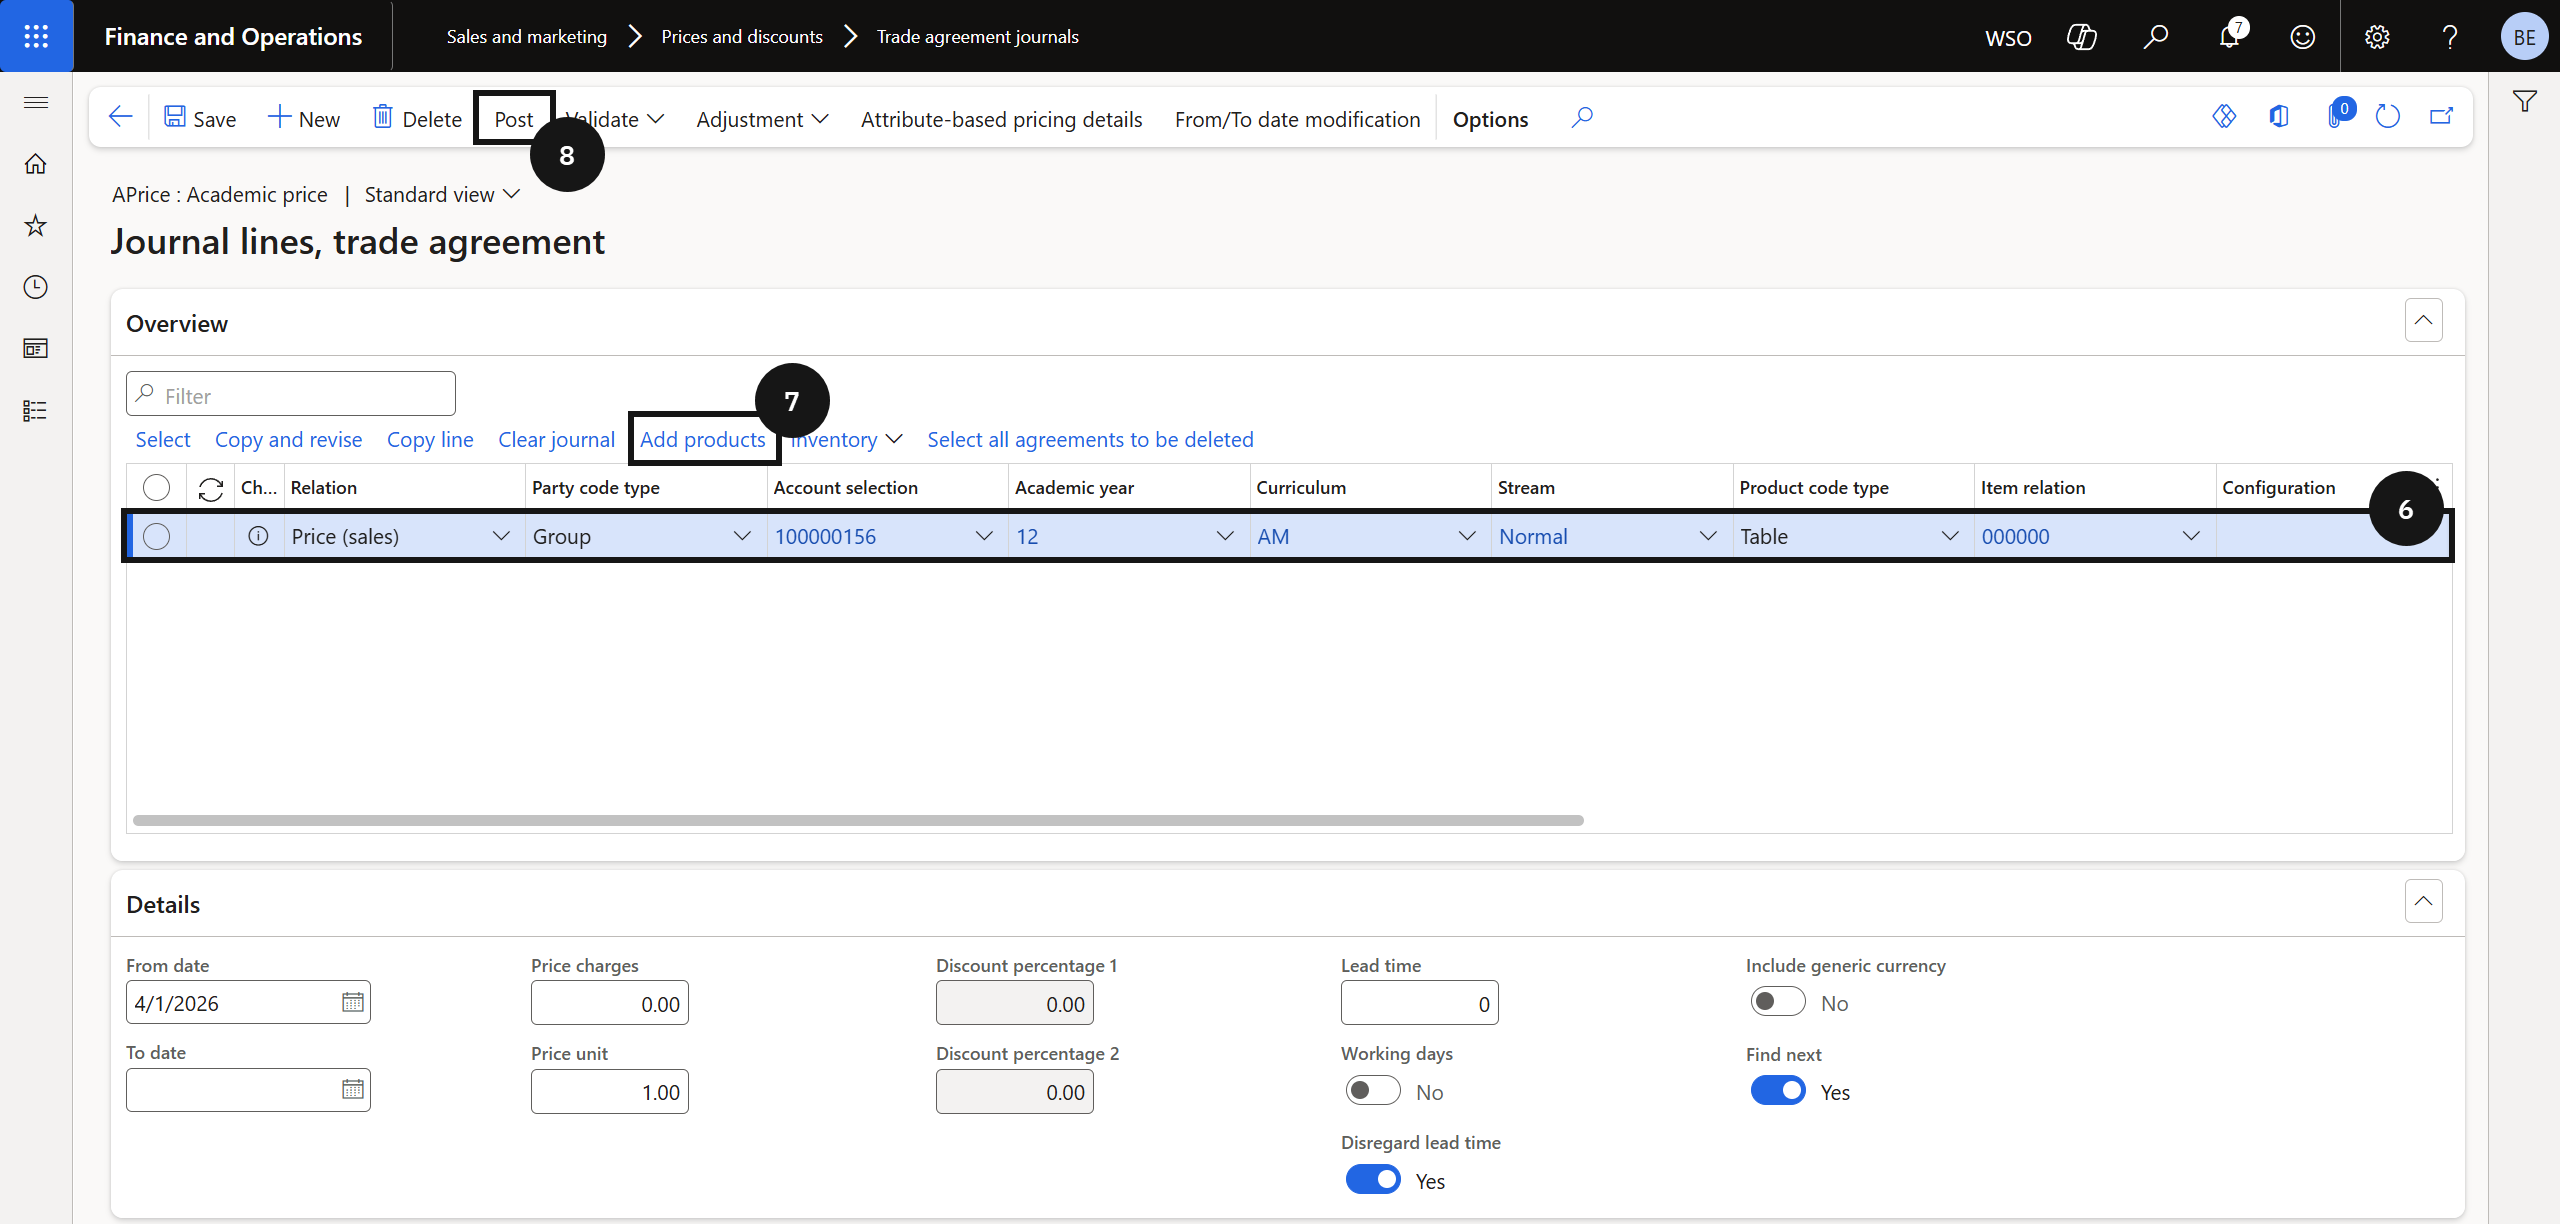
From the FNO dashboard, open Modules ▸ Sales and marketing.
Expand Prices and discounts and click Trade agreement journals.
Click New.
In the Name column, select Sibling discount.
Change view to Lines.
Click New and complete the following columns:
- Change Party code type to Group.
- Set Account selection to the number of siblings (e.g., First child).
- Change Product code type to Group.
- Set Item relation to Sibling discount.
In Details, set the policy start and end date.
Note: Leave the end date blank to run the discount indefinitely.
Enter the discount amount in Discount percentage 1 (e.g., 10.00 for 10%).
Click New to add the second child discount; repeat these steps as needed.
Click Save.
Click Post to activate the trade agreement policy.
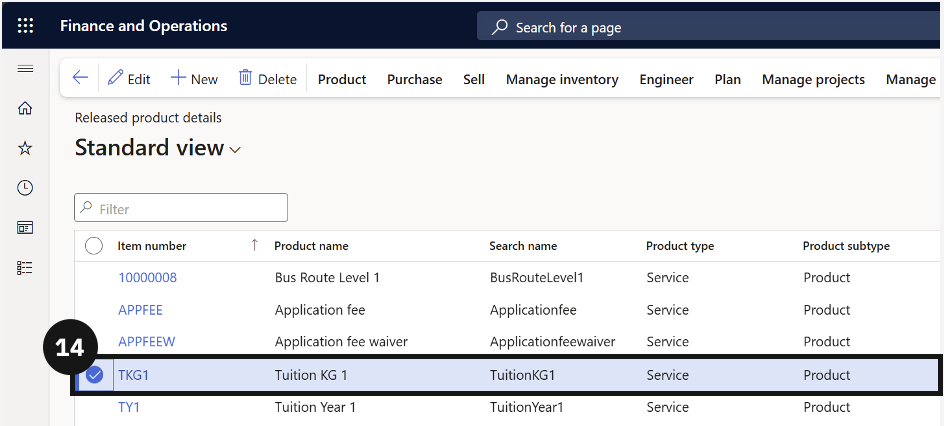
Go back to Modules ▸ Product information management.
Expand Products and click Released products.
Open each line related to tuition.
On the next screen, expand the Sell section.
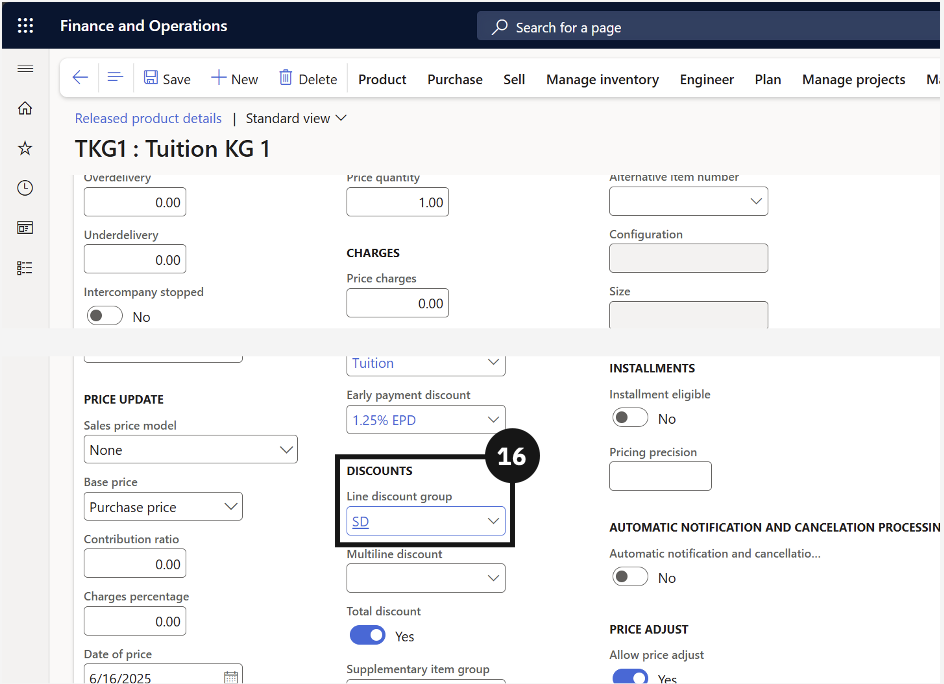
Scroll down to the Line discount group dropdown and choose the Sibling discount trade agreement.
Click Save.
Repeat for other tuition fee items.
Customer Integration Mapping
Note: This process defines how customer data is mapped and synchronised between the source system and Dynamics 365 Finance and Operations. It also classifies records into the correct customer type, such as Student or Fee payer, based on configuration.
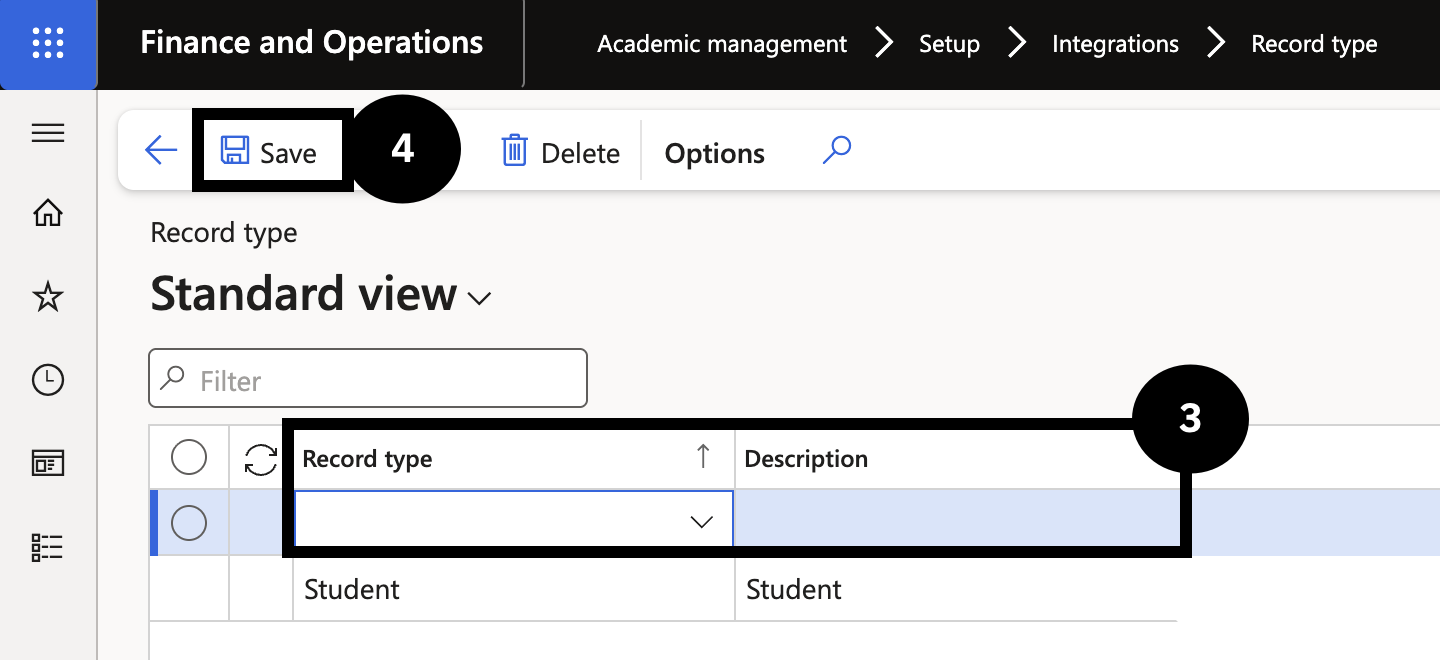
Navigate to Modules ▸ Academic management ▸ Setup ▸ Integration ▸ Report type.
Click New.
Fill in the Record type and Description fields.
Click Save and close the page.
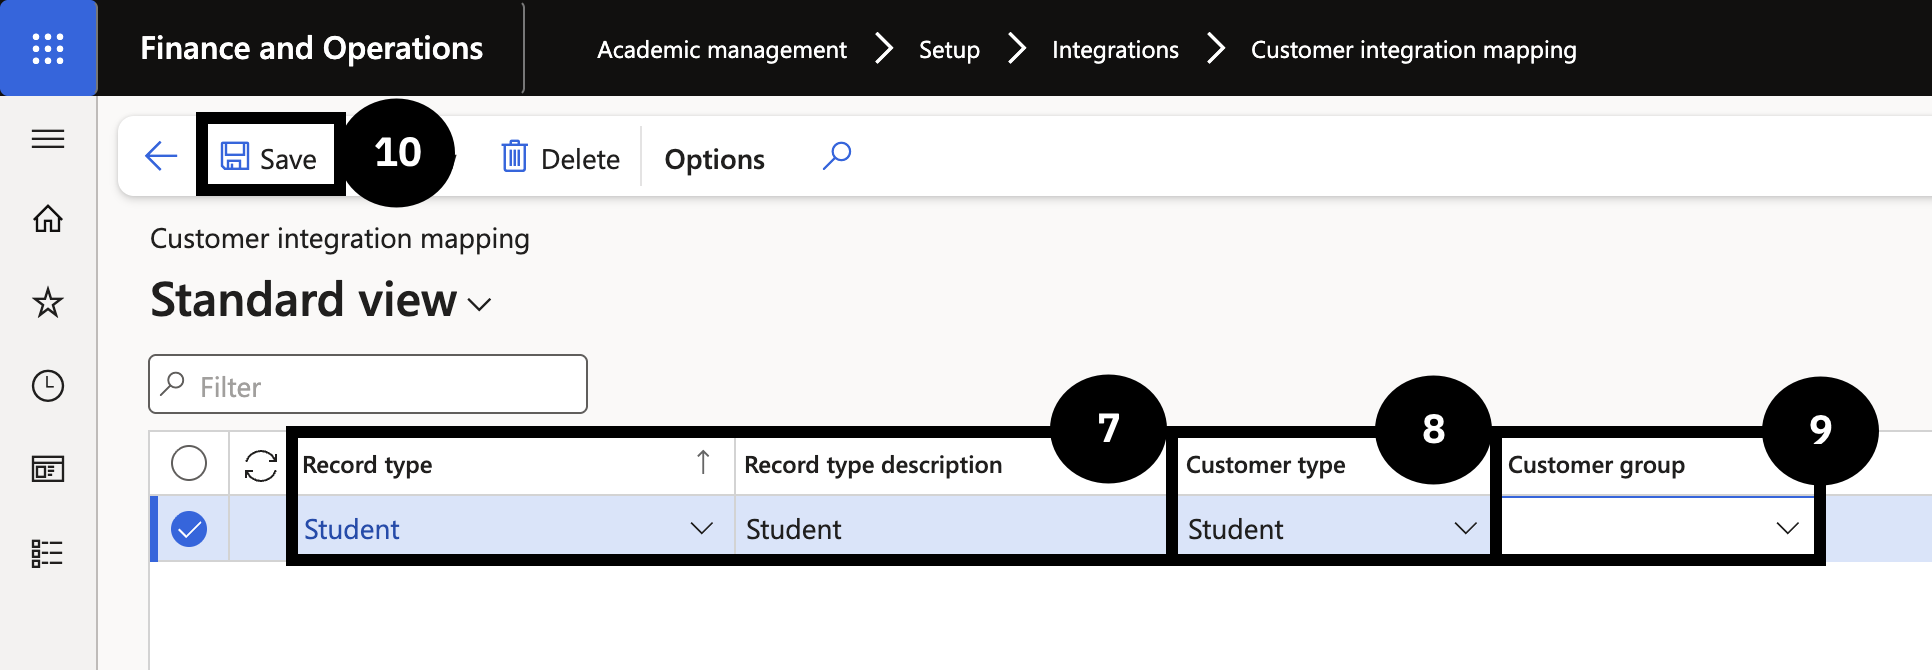
Navigate to Modules ▸ Academic management ▸ Setup ▸ Integration ▸ Customer integration mapping.
Click New.
Select the Record type from the dropdown.
Note: The Record type description should fill in automatically.
In the Customer type field, select between Student and Fee payer.
Select the appropriate Customer group from the dropdown.
Click Save.
Fee Type
Fee types define the default general ledger account and tax postings for miscellaneous receipts. Once a fee type is configured, the system applies those postings automatically whenever that type is selected during cashier or miscellaneous receipt processing, removing the need for manual account selection at the time of payment.
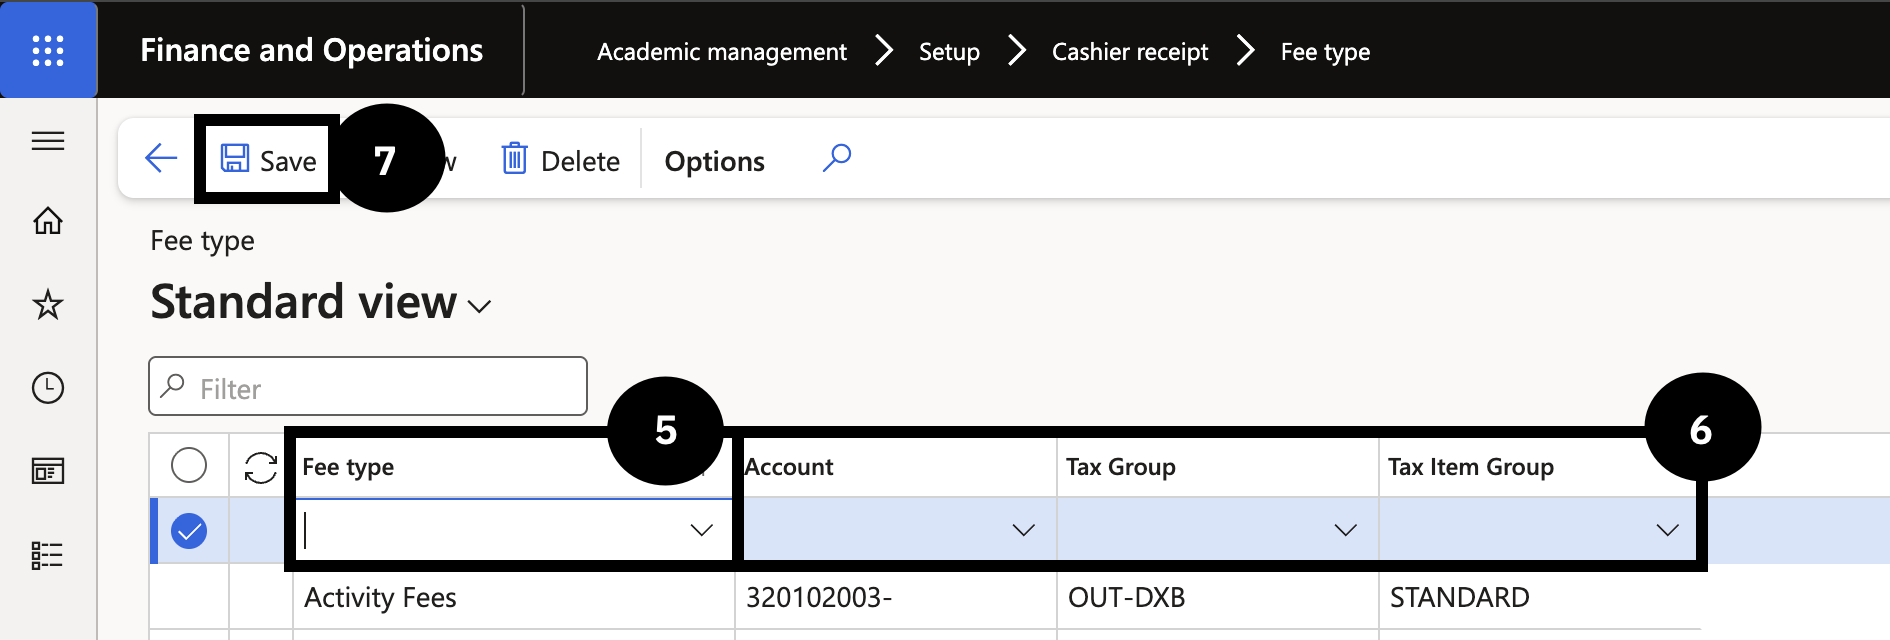
From the FNO dashboard, open Modules ▸ Academic management.
Expand Setup, then expand Cashier receipt.
Click Fee type. Review the list of existing fee types to avoid creating duplicates.
Click New in the toolbar.
Condition: Perform this step only if the required fee type does not exist.
Enter a value in Fee type field (e.g., Security deposit, Transport).
Select a value in Account field (e.g., Transport fee).
Select a value in Tax Group field.
Select a value in Tax Item Group field.
Click Save.
Note: The fee type is configured in advance and can be selected when creating cashier receipts and miscellaneous receipts. When selected, the system then automatically populates the payment type, financial dimensions, and accounting postings related to that fee category.
Receipt Intercompany Mapping
From the FNO dashboard, open Modules ▸ Academic management.
Expand Setup, then expand Cashier receipt.
Click Receipt intercompany mapping.
Click New in the toolbar.
Select the Method of payment from the dropdown (e.g., CobOn).
Note: Choose the method of payment that has an intercompany journal with the destination school.
Select the Destination school from the dropdown.
Set the Account type and the Account fields based on the entry posting in the original cashier receipt:
- If the Account type is Ledger, the Account is Main
- If the Account type is Bank, the Account is Bank account
Select a value in the Intercompany journal field.
Click Save.
Note: When the cashier journal is posted, the selected Destination school will have the intercompany journal created according to the configured Method of payment, Account type/Account, and Intercompany journal selection.
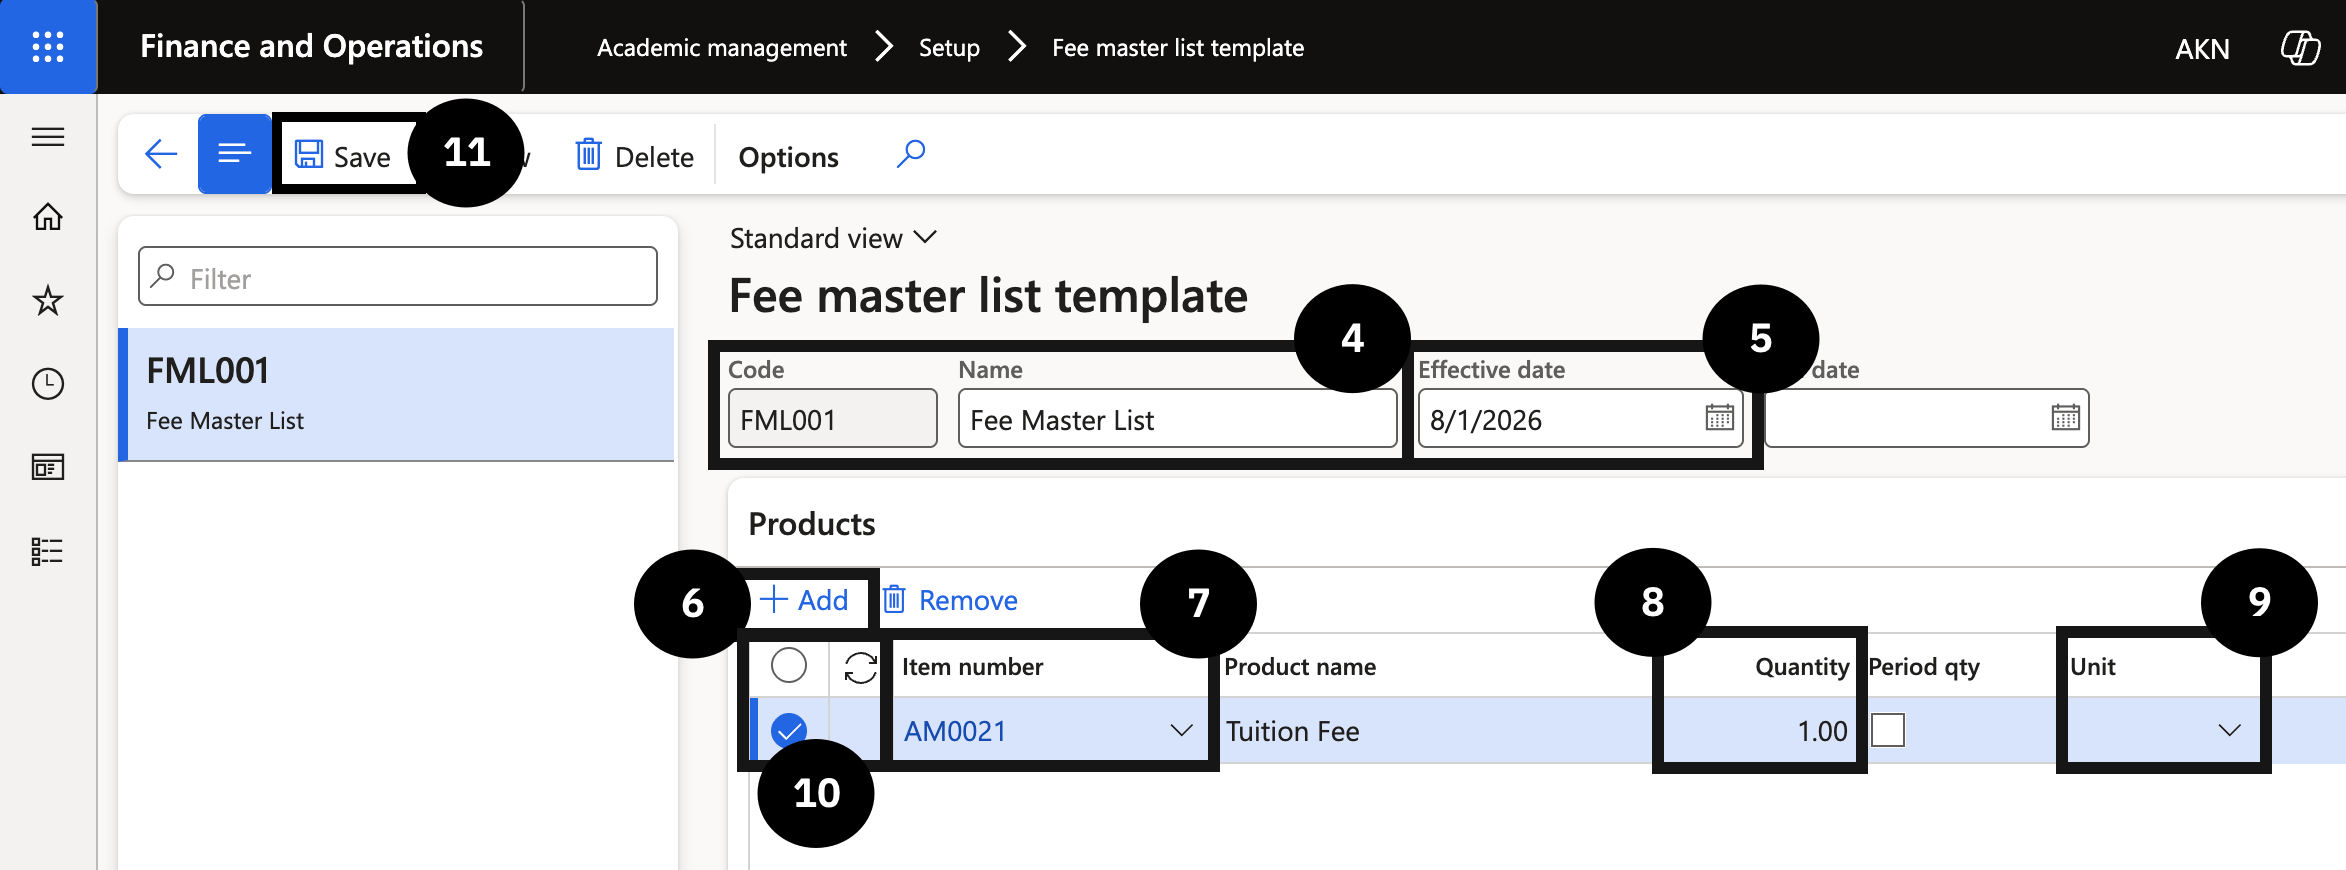
Fee Master Template to Sync Items to CE
Note: This setup creates a fee master list template that determines the fee items synced from D365 F&O to CE for inclusion in student offer letters.
From the FNO dashboard, open Modules ▸ Academic management.
Expand Setup, then click Fee master list template.
Click New in the toolbar.
Enter values in the Code and Name fields.
Enter the date in the Effective date field.
In Products section, click + Add in the toolbar.
Select an Item number from the dropdown to sync the selected fee item to D365 CE.
Set Quantity to 1 in the Quantity field.
Select annual option in the Unit field.
In the Switch view field, select All, then select your template row.
Click Save.
Note: Next steps show how to assign to the Academic year.
Go back to Modules ▸ Academic management.
Expand Setup, then click Academic year.
Select the Academic year row. Then select the Fee master list code from the dropdown.
Repeat step 14 for each academic year.
Click Save.

Non-Tuition Item Price Setup
From the FNO dashboard, open Modules ▸ Sales and marketing.
Expand Prices and discounts and click Trade agreement journals.
Click New to create a new trade agreement journal.
In the Name field, select the standard journal name (without academic attributes enabled).
Click Lines.
Complete the required fields.
Click Add products and repeat step 6 for each item.
Click Post.
Note: Non-tuition items such as ID cards use a standard trade agreement. Academic attributes are not required and should not be selected for these items.

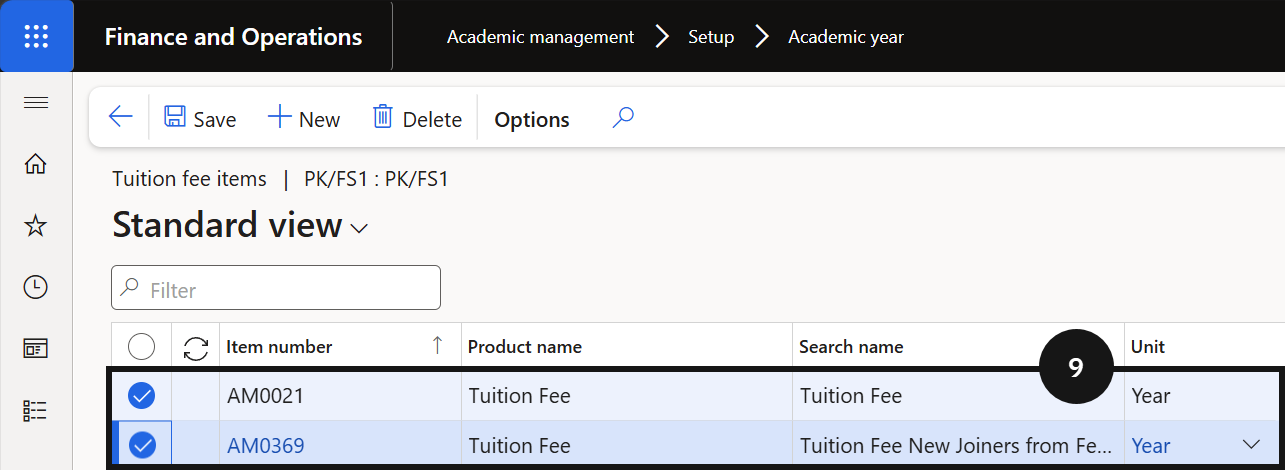
Link Tuition Fee Item to Academic Year
Note: This step is required for enrolment deposit calculations. The system uses this link to identify which item is the tuition fee item and look up the correct annual price from the trade agreement.
From the FNO dashboard, open Modules ▸ Academic management.
Expand Setup and click Academic year.
Select the relevant academic year record.
Click Tuition fee items.
Click New in the tuition fee items section.
Complete the columns to link Tuition Fees to an Academic Year.
If a second tuition fee item exists for the other student type, click New and repeat that item.
Repeat steps 3–8 for each additional academic year.
Click Save.