Pre‑Admission Fees
Before any pre-admission fees can be processed, the system needs to be configured with the correct transaction types and posting logic. This involves defining the categories of fees that will be charged prior to enrolment, such as application fees, enrolment fees, and enrolment deposits, and mapping each of these to the appropriate general ledger accounts. Without this setup in place, the system will not know how to record or post these transactions correctly. Fee schedule parameters also need to be updated to enable pre-admission processing across the platform.
Pre-Admission Type Setup
Pre-admission types define the category of fee or deposit being collected before a student is formally enrolled. Each type determines how the transaction is recorded in the system whether as a general ledger entry, a free text invoice, a sales order, or a prepayment invoice and must be created before the corresponding posting rules can be configured. The note below describes each transaction type and its typical use case.
Note: Review the existing types to avoid creating duplicates.
- General journal — used when there is no student record at this stage and the setup requires posting directly to the general ledger. Records the fee as other income in the main account. No posting profile or receipt journal name is required. Typically used for application fees.
- Free text invoice — used when a student record exists and the setup requires immediate posting as revenue to a liability account. Requires a posting profile and receipt journal name. Typically used for enrolment fees.
- Sales order — used when a student record exists and the setup requires a sales order invoice for the pre-admission fee.
- Prepayment invoice — used to record an enrolment deposit or re-enrolment deposit. The deposit is settled against the tuition fee invoice once finalised.
From the FNO dashboard, open Modules ▸ Academic Management.
Expand Setup, then expand Pre‑admission fees.
Click Pre‑admission types.
Click New in the toolbar.
In Pre-admission type, enter a value (e.g., Application fee, Enrolment fee).
In Description, enter a value (e.g., Application fee, Enrolment fee).
Note: In most cases, match the description to the pre-admission type name for easier identification.
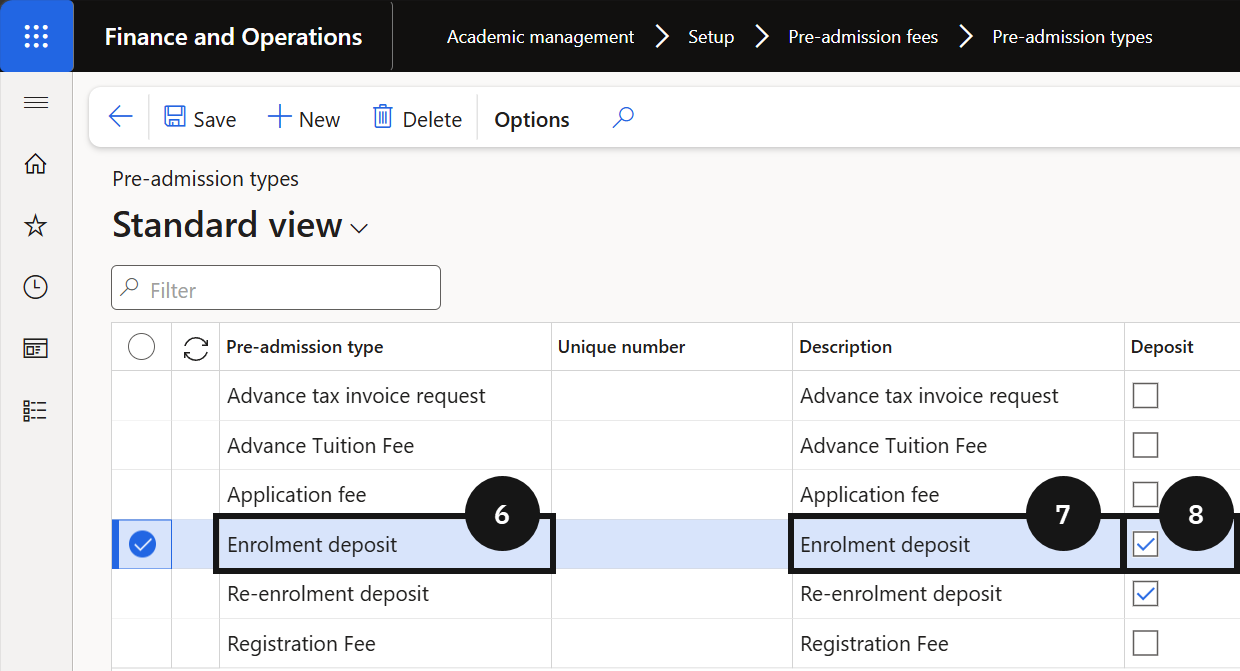
To create an Enrolment deposit:
- Enter Enrolment deposit in both Pre-admission type and Description.
- Select the Deposit check box.
Note: The deposit check box is only selected when the pre-admission type represents a deposit.
Click Save.
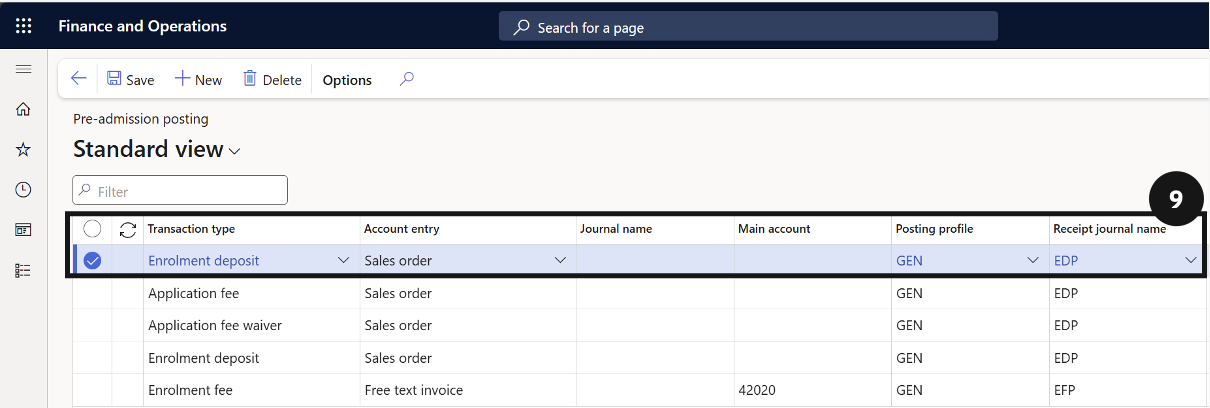
Pre-Admission Posting Setup
From the FNO dashboard, open Modules ▸ Academic management.
Expand Setup, then expand Pre‑admission fees.
Click Pre‑admission posting.
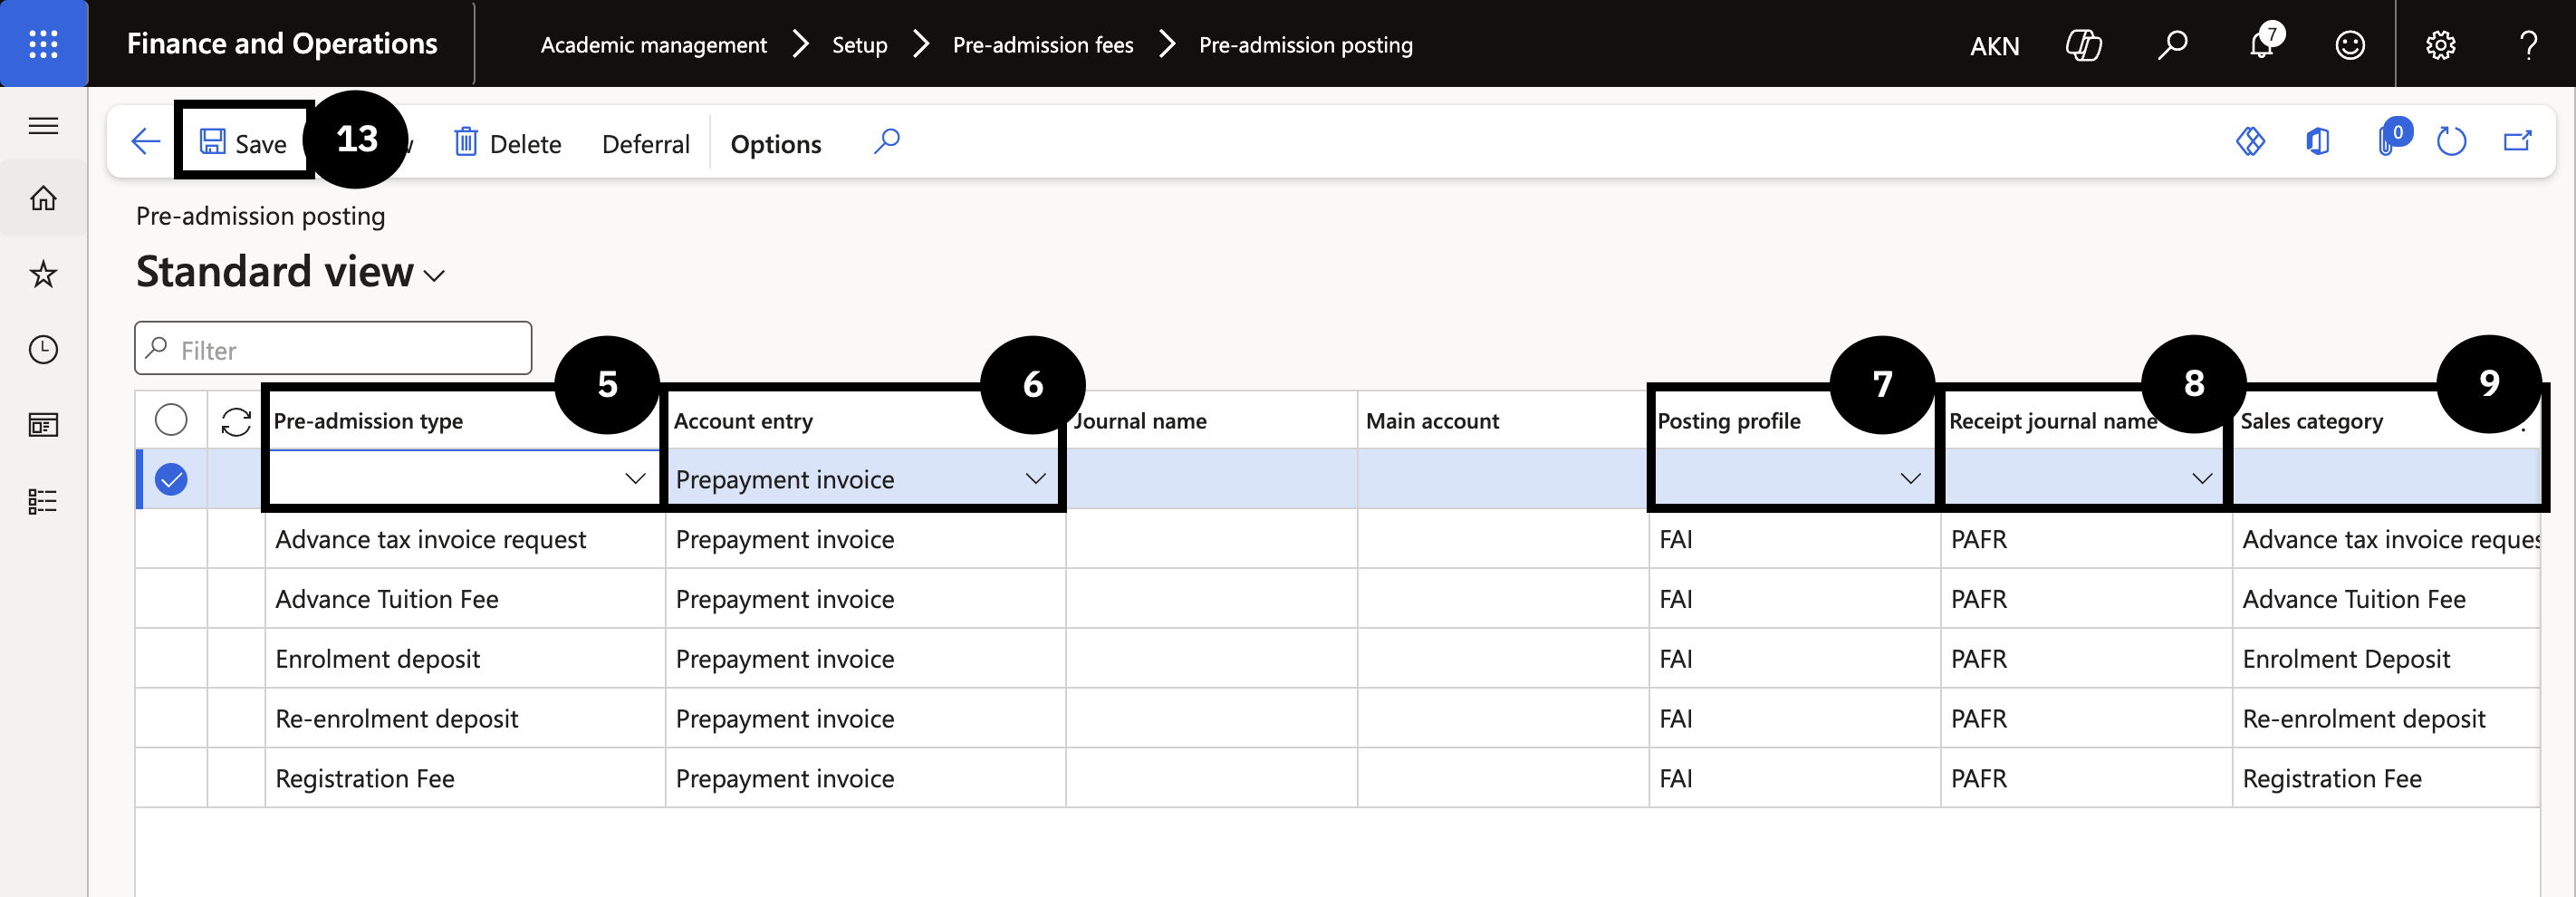
Click New in the toolbar to create a pre-admission posting entry.
Select a value in Pre-admission type (e.g., Application fee, Enrolment fee).
Select a value in Account entry (e.g., Sales order, Free text invoice, General journal).
Select a value in Posting profile.
Select a value in Receipt journal name that applies to online payments for this admission type.
Select a unique value in Sales category. Do not use the same sales category for multiple pre-admission types.
Select a value in Item number. This is required only for application or registration fees.
Click New to add another pre-admission type, such as Enrolment Deposit or Re-enrolment Deposit.
Enter the required values for each column in the table.
Note: For Enrolment Deposit and Re-enrolment Deposit types, do not select an item number. The system generates an open sales order header for fee generation.
Click Save.
Setup Posting Logic For Each Transaction Type
From the FNO dashboard, open Modules ▸ Academic Management.
Expand Setup, then expand Pre‑admission fees.
Click Pre‑admission posting.
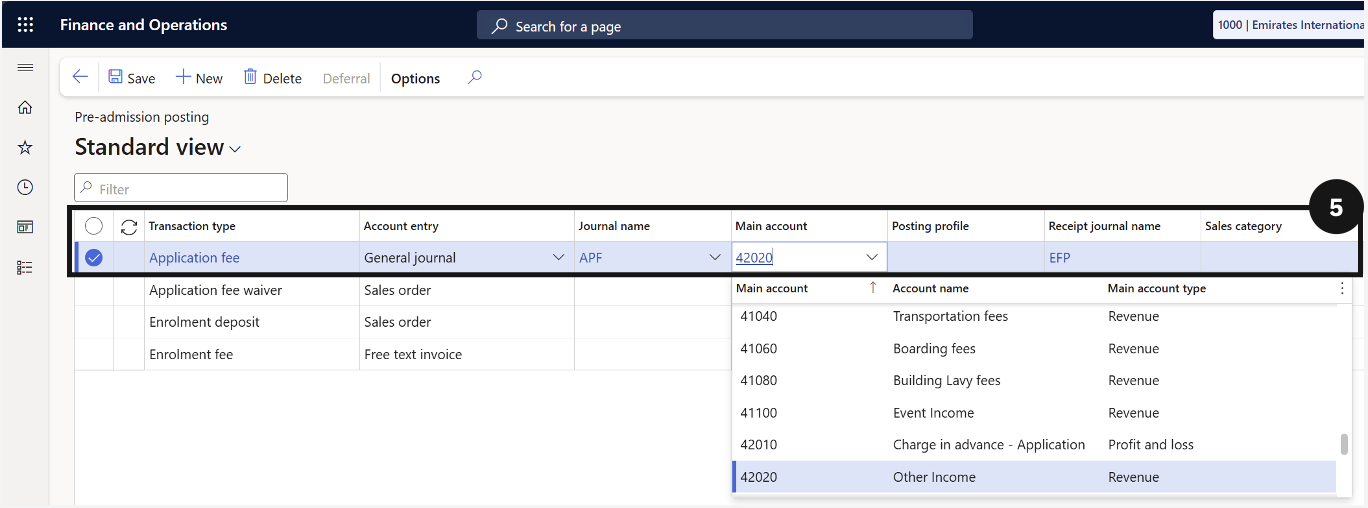
Click New in the toolbar to create the Application Fee entry.
Enter the required information for each column in the table.
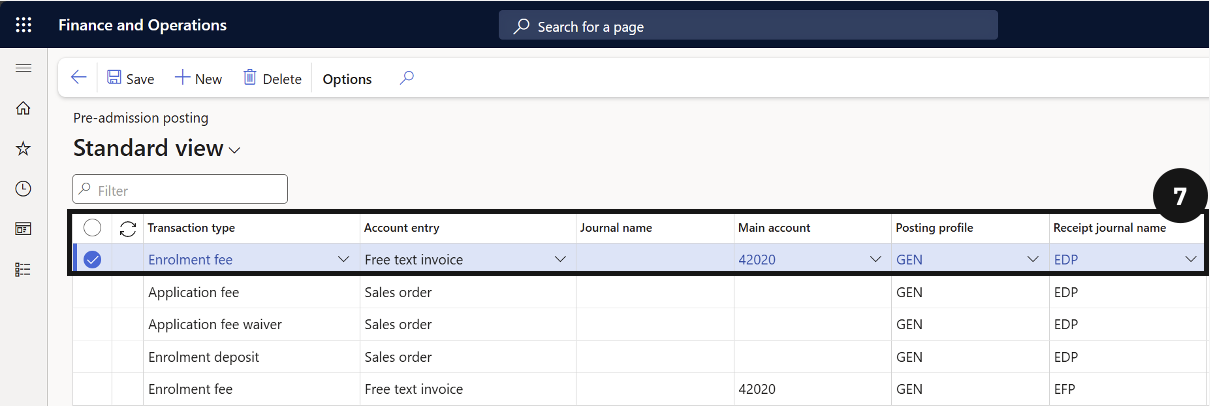
Click New in the toolbar to create the Enrolment Fee entry.
Set values for each of the columns in the table.
Click New in the toolbar to create the Enrolment Deposit entry.
Set values for each of the columns in the table.
Click Save.
All Pre-Admission Fee Tables
Pre-Admission Deposits Table
Pre-Admission Deposits Held
Application Fee Waiver
Note: This process explains how to waive or cancel an application fee at any pre-admission stage, before or after the payment is posted.
From the FNO dashboard, open Modules ▸ Academic Management.
Expand Inquiries and reports, then expand Pre‑admission fees.
Click All pre‑admission fees.
Search for or filter student account.
Select the row of the application to waive.
Click Edit in the toolbar.
Tick the checkbox in the Waive column.
Click Save.
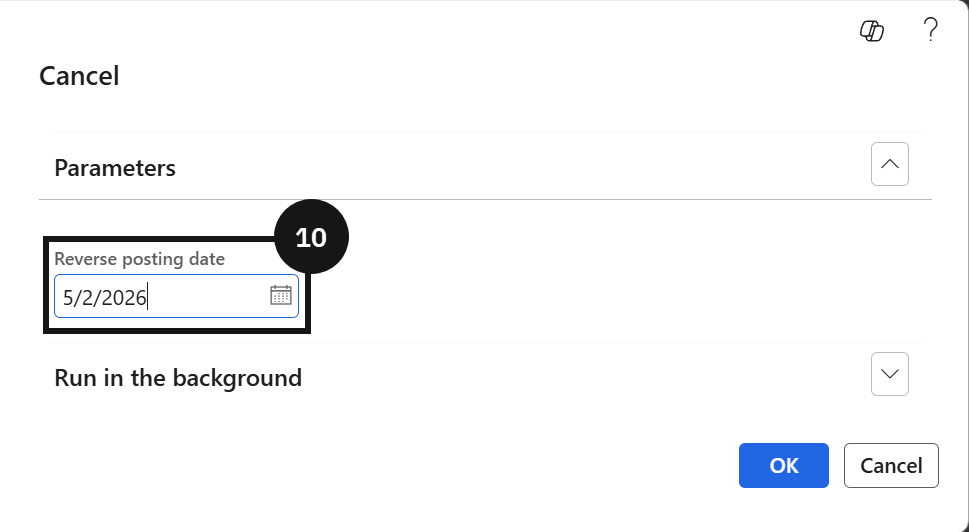
Click Cancel in the toolbar.
Select a Reversing posting date.
Click Ok, then refresh the page to see the updated status.
Note: System auto-handles cancellation based on fee status:
- Application fee created (no sales order) ▸ status cancelled
- Application fee created (sales order and prepayment invoice created) ▸ cancels sales order
- Application fee paid (customer payment posted) ▸ reverses prepayment invoice and cancels sales order
- Application fee posted (sales order invoice posted) ▸ system creates and posts sales order credit note

Application / Registration Fee Process via Online
When a student record arrives from the student management system with an enrolment status of Prospective and an enrolment application status of Registered, the system automatically generates a registration fee request. No manual intervention is required to create the fee or the receipt — both are triggered by the student management system sending a payment link to the fee payer. Once payment is received, D365 automatically posts the receipt. This process covers how to verify the fee was created and confirm the receipt has been posted.
Note: The registration fee is automatically created when the student record syncs from the student management system with an enrolment status of Prospective and application status of Registered.
From the FNO dashboard, open Modules ▸ Academic management.
Expand Inquiries and reports, then expand Pre-admission fees.
Click All pre-admission fees.
Search for the student by name or account number.
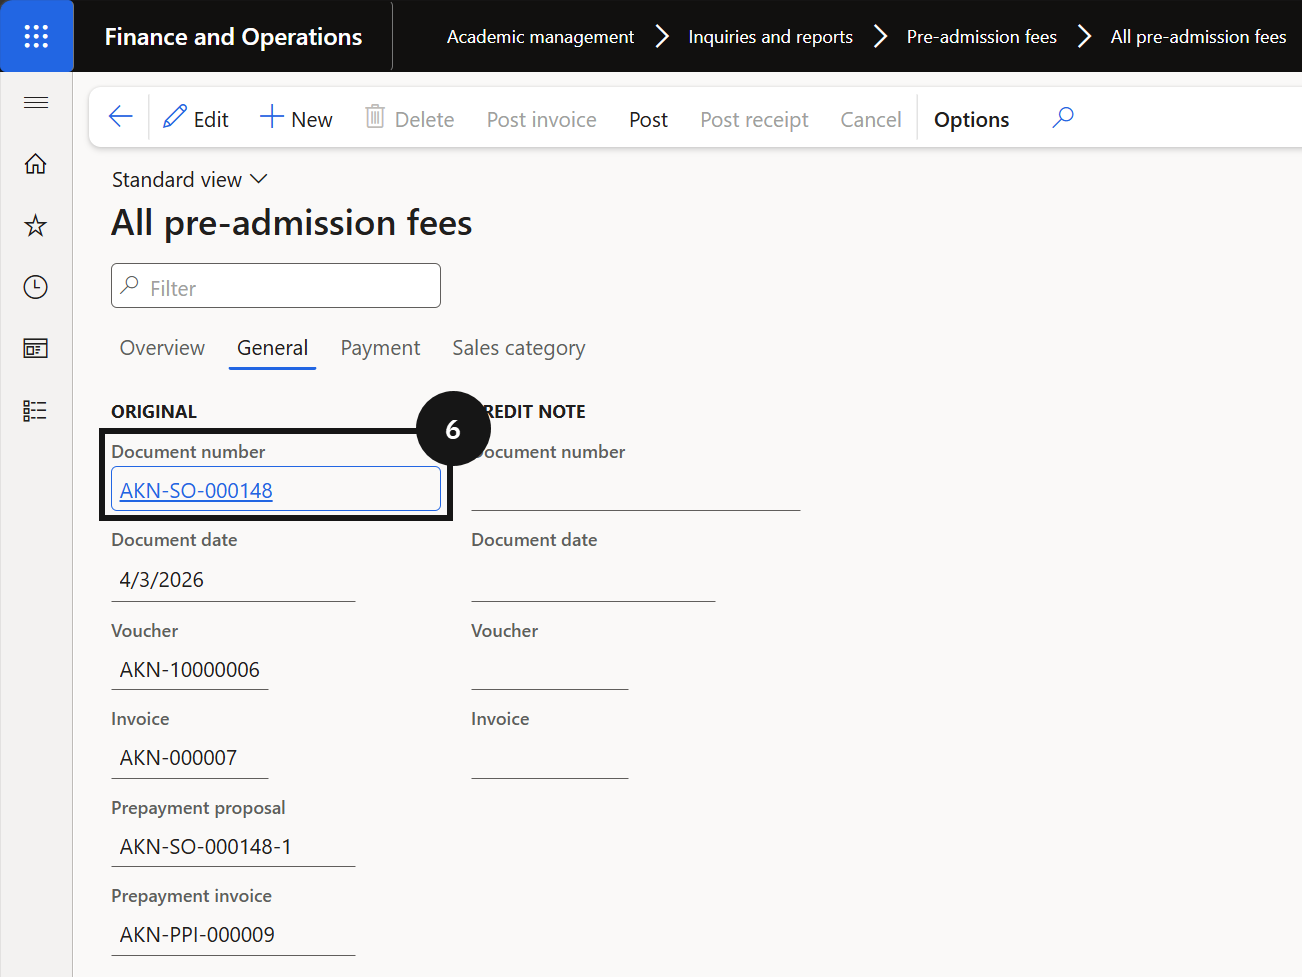
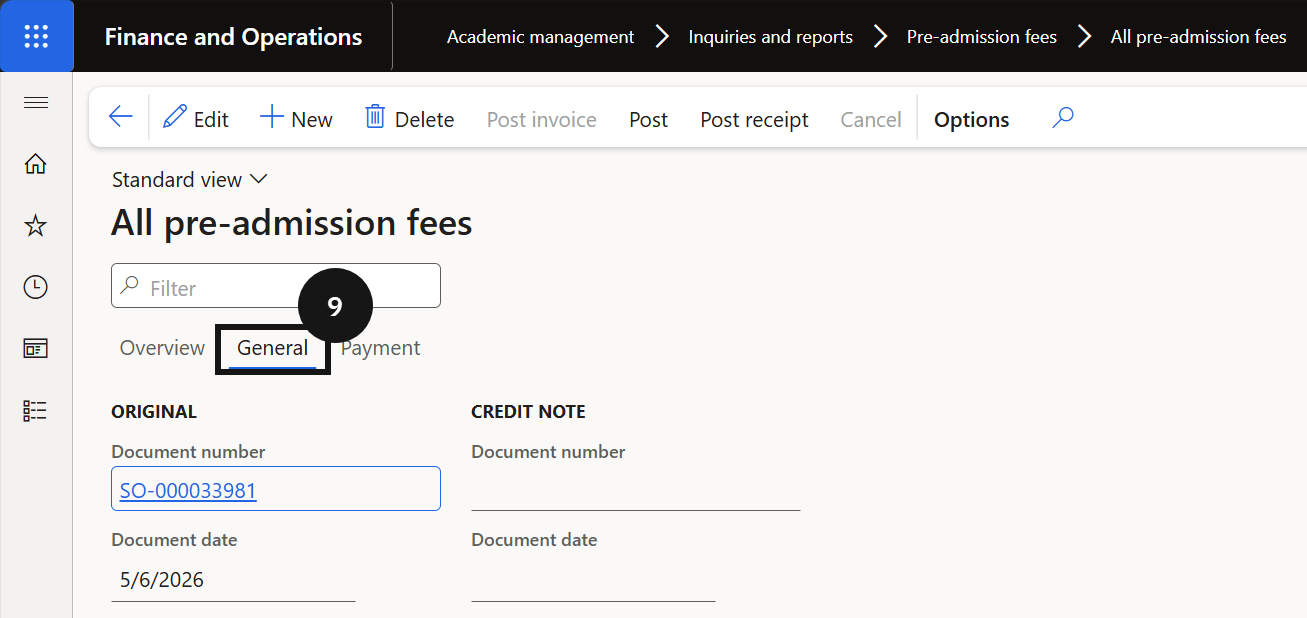
Click the General tab.
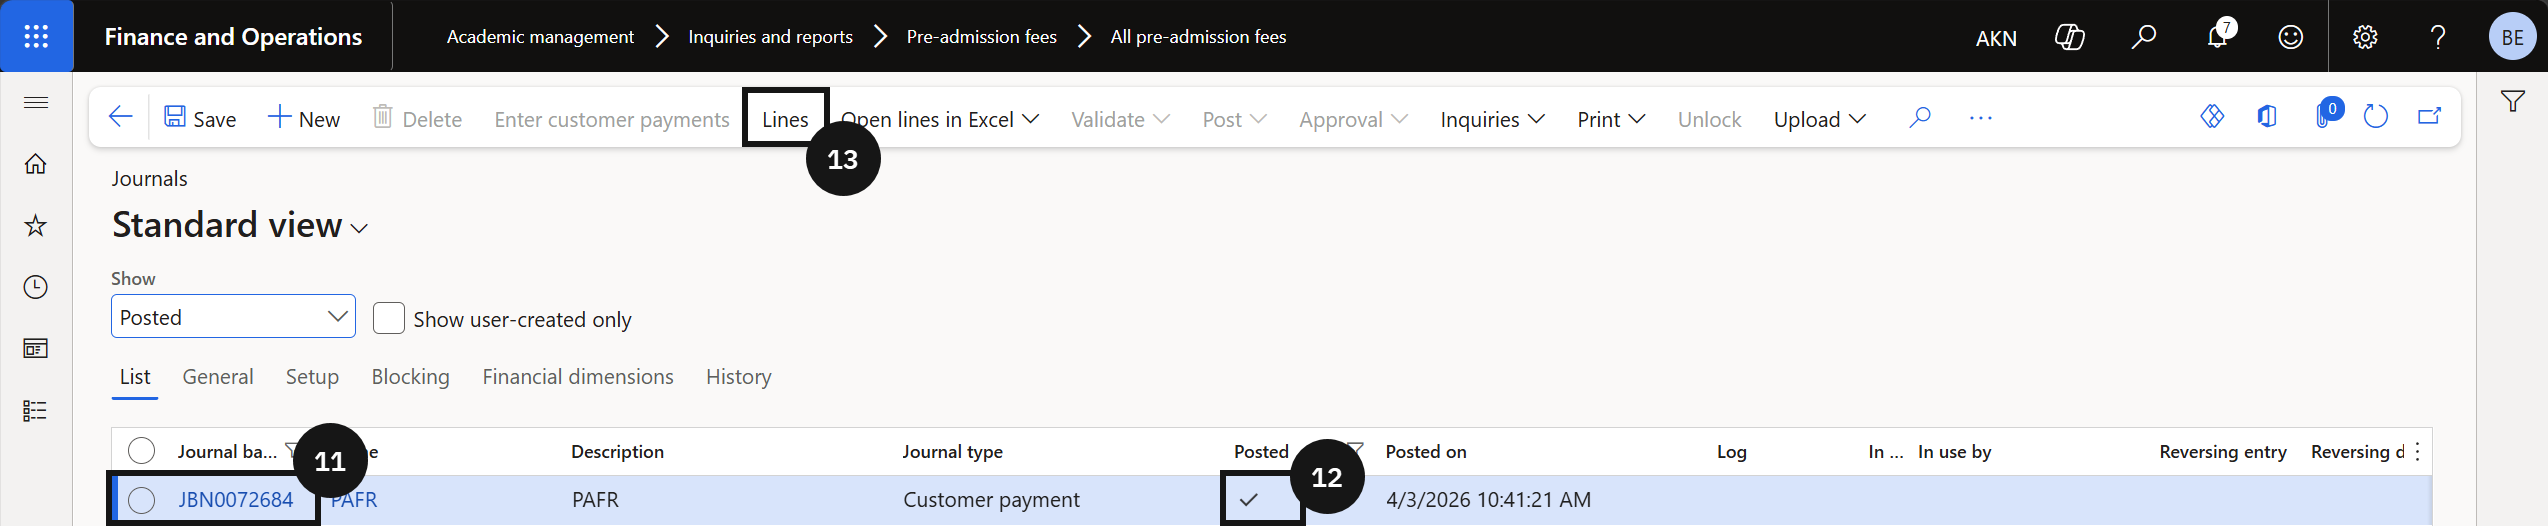
Click the link in the Document number field to open the sales order for the registration fee.
Locate the student's registration fee record.
Click Back.
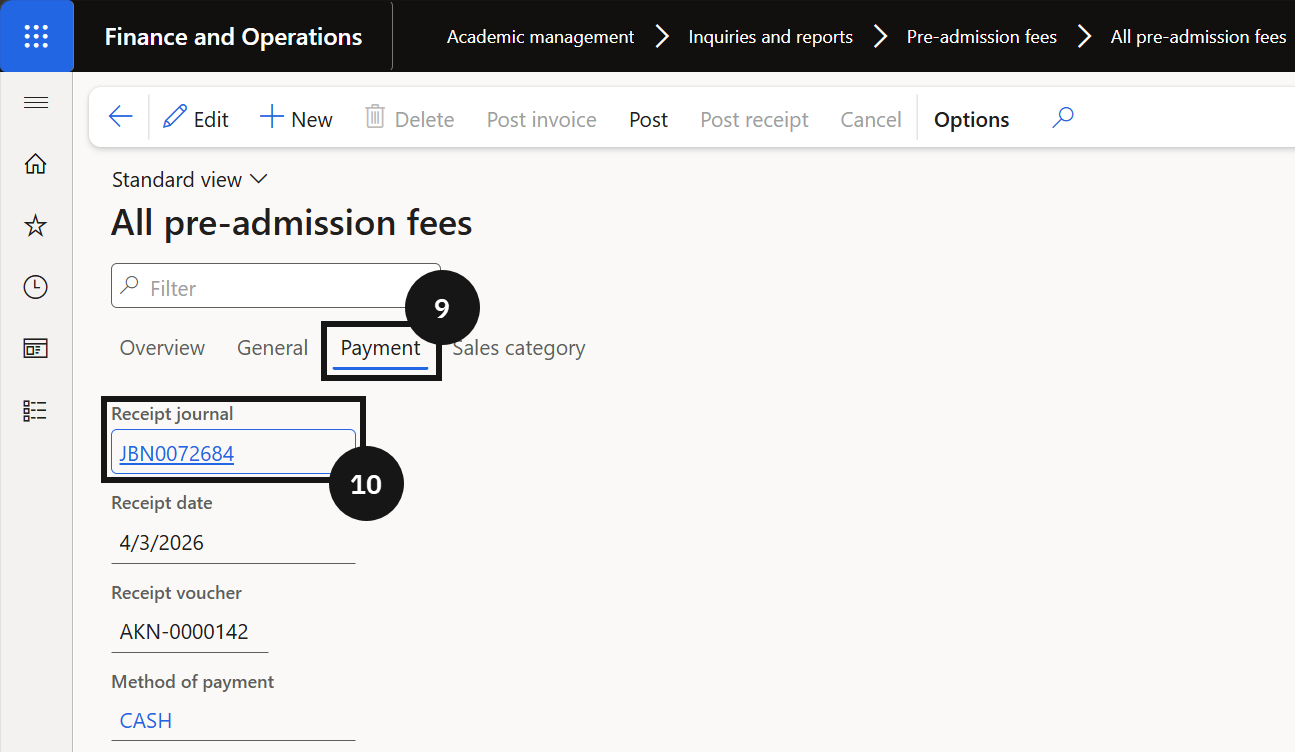
Click the Payment tab.
Click the link in the Receipt journal field.
Locate the student's receipt journal record.
Note: The receipt is created automatically once the fee payer completes payment via the payment link sent by the student management system. No manual posting is required.
Verify the receipt status shows as Posted.
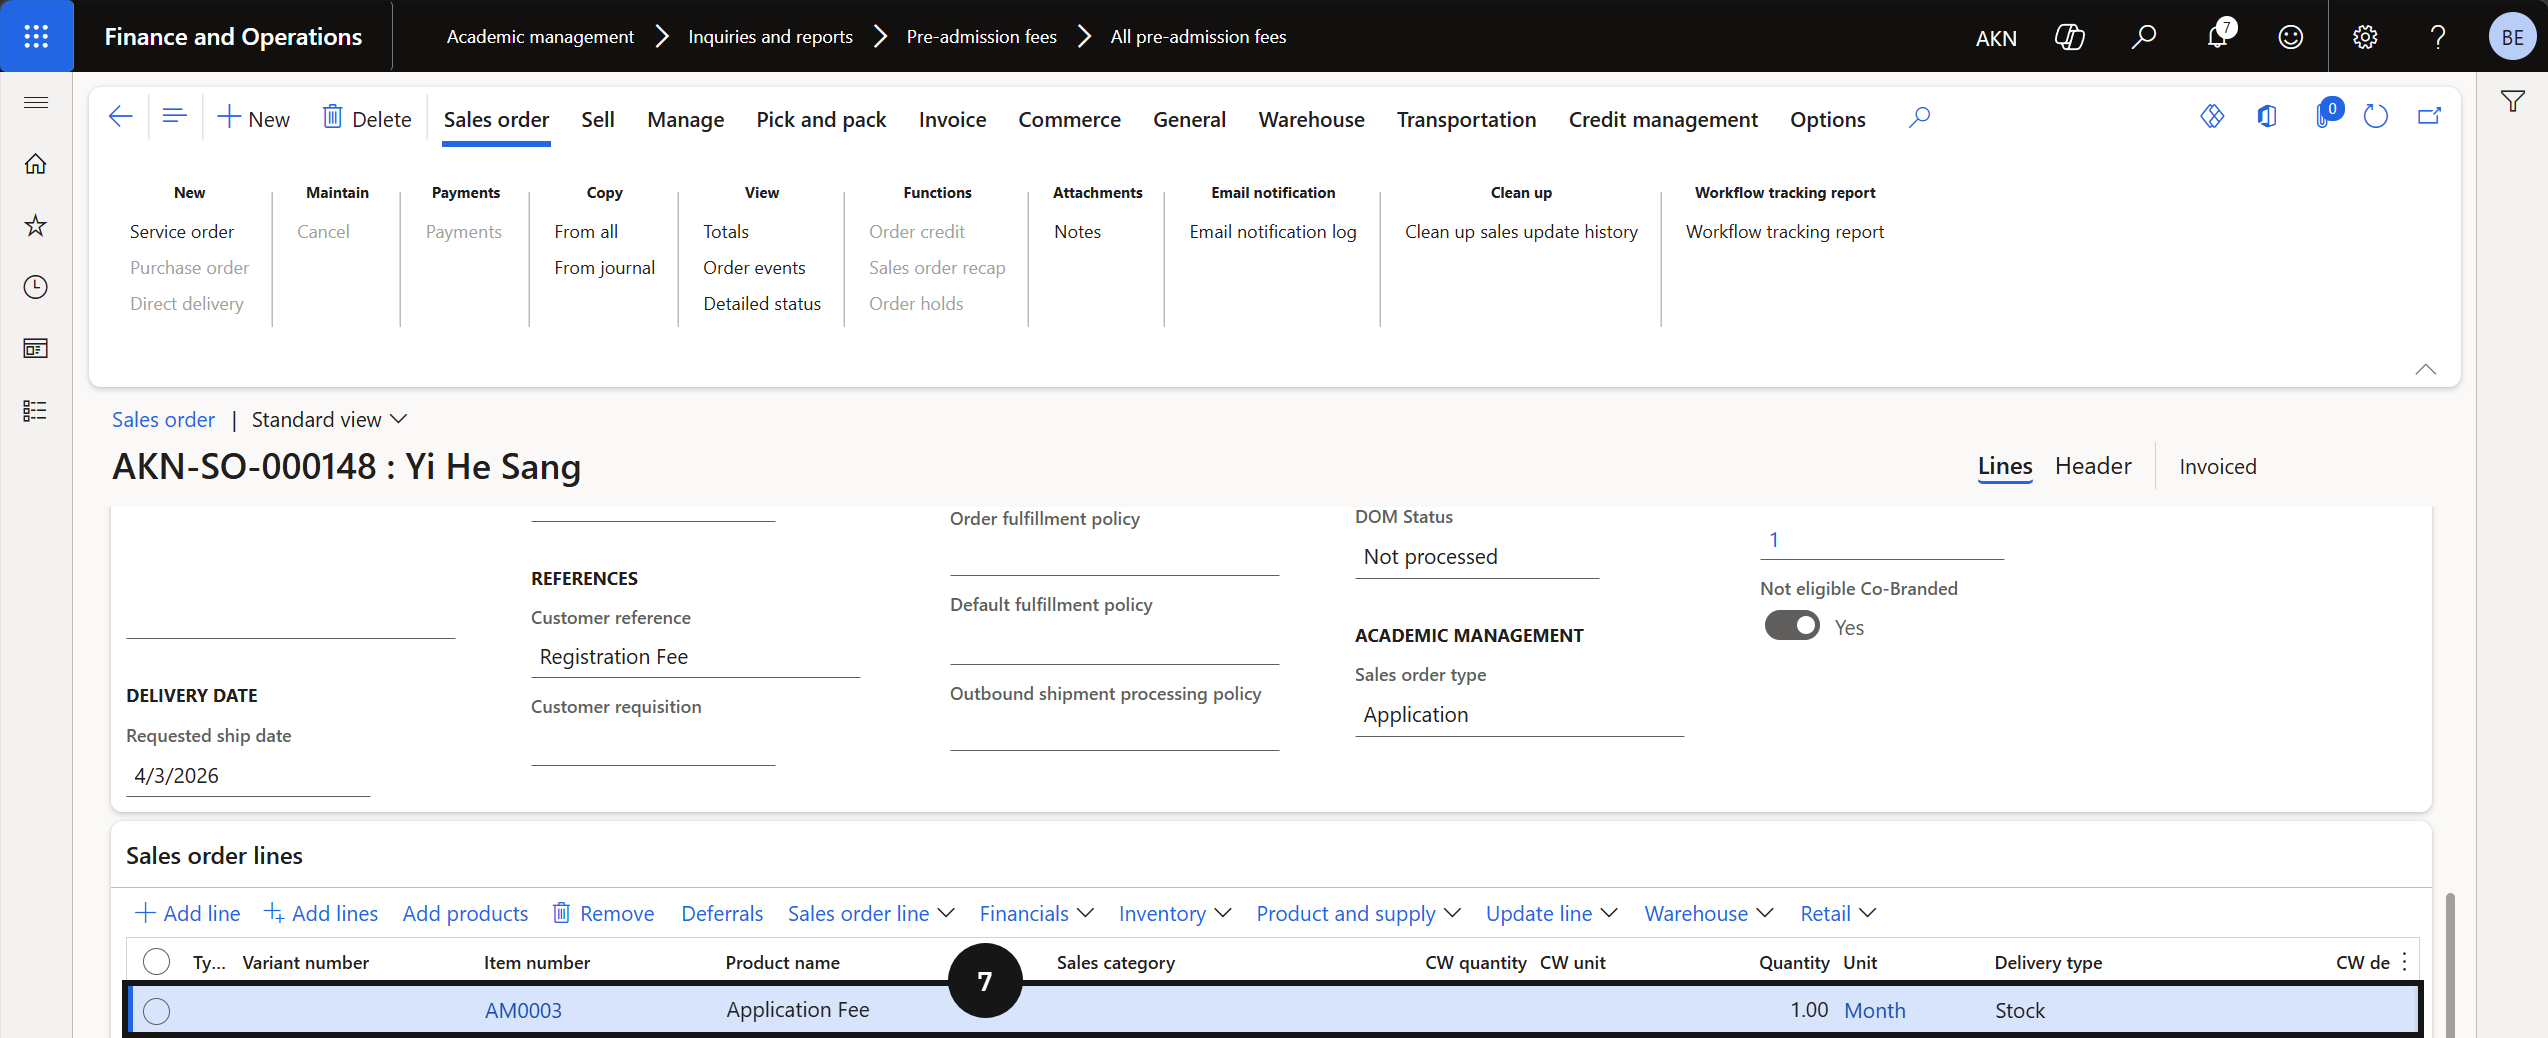
Click Lines in the toolbar to view the posting detail for the registration fee.

Cashier Receipting
Registration fees can be receipted over the counter when a fee payer makes payment in person at the school. When a student record syncs from the student management system with a status of Prospective and Registered, the system automatically creates a registration fee document ready for payment. Before processing the cashier receipt, the enrolment officer must manually push the record through to Registered status in the student management system. Staff then access the Cashier Receipt form under Accounts Receivable to process and post the payment.
Manual Post — Pre-Admission Fee to Create a Sales Order for Payment via Cashier Receipt
Note: This step is only required when a parent wishes to pay the registration fee over the counter. Typically, when payment is made online, the enrolment record is created automatically in D365 FnO and the sales order invoice is generated and posted without manual intervention. For counter payments, the student management system must first be manually progressed to Registered, after which a user must follow the steps below to create the sales order in readiness for receipting.
From the FNO dashboard, open Modules ▸ Academic management ▸ Inquiries and reports.
Expand Pre-admission fees and click All pre-admission fees.
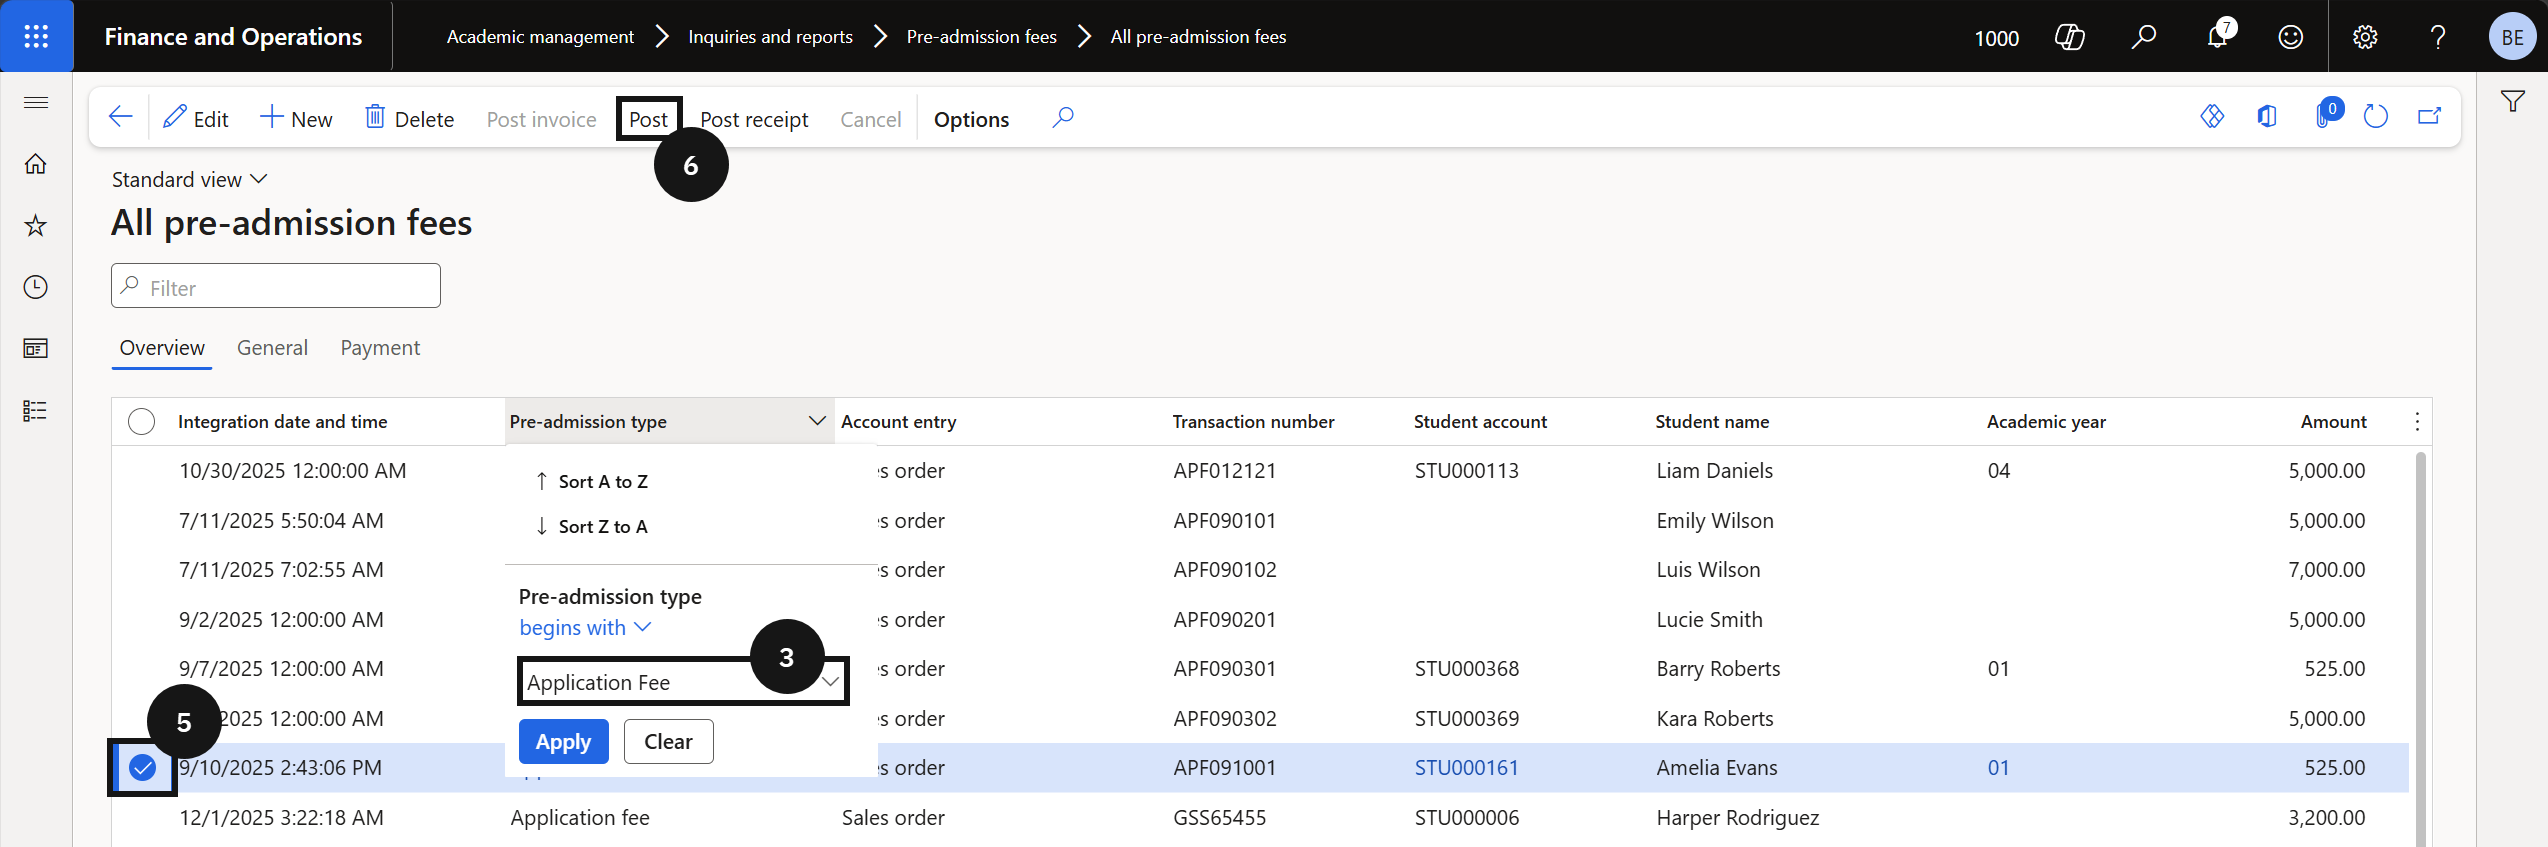
Filter the Pre-admission type column by Application Fee.
Filter to locate the correct student record.
Select the record.
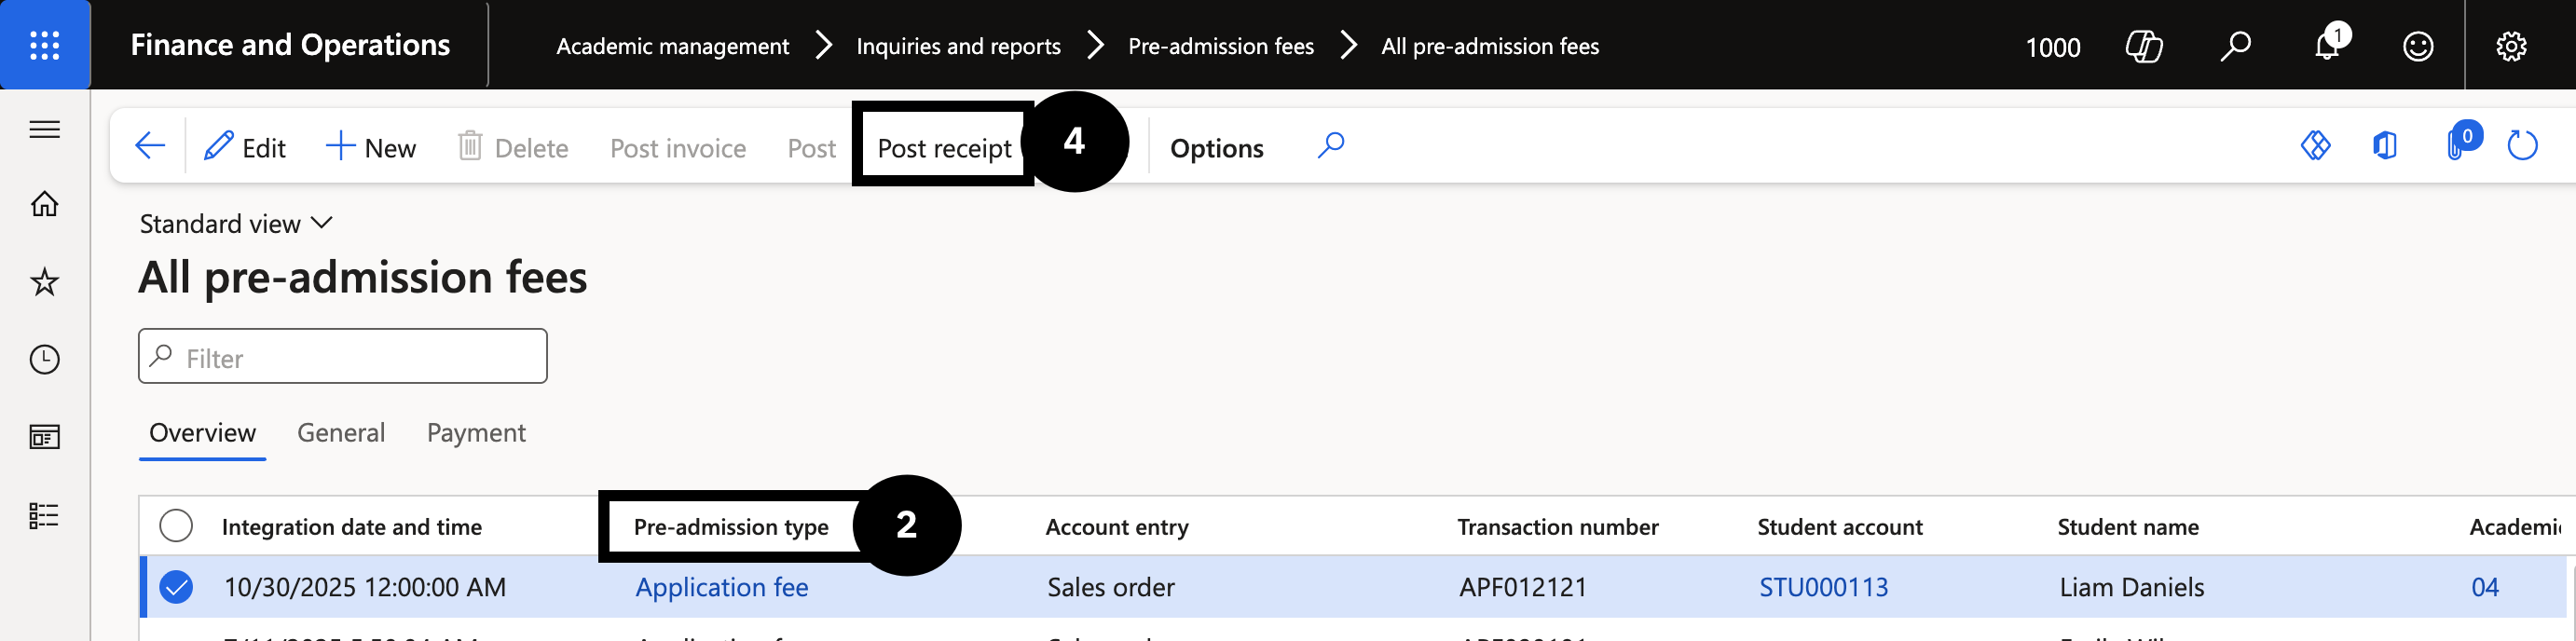
Click Post.
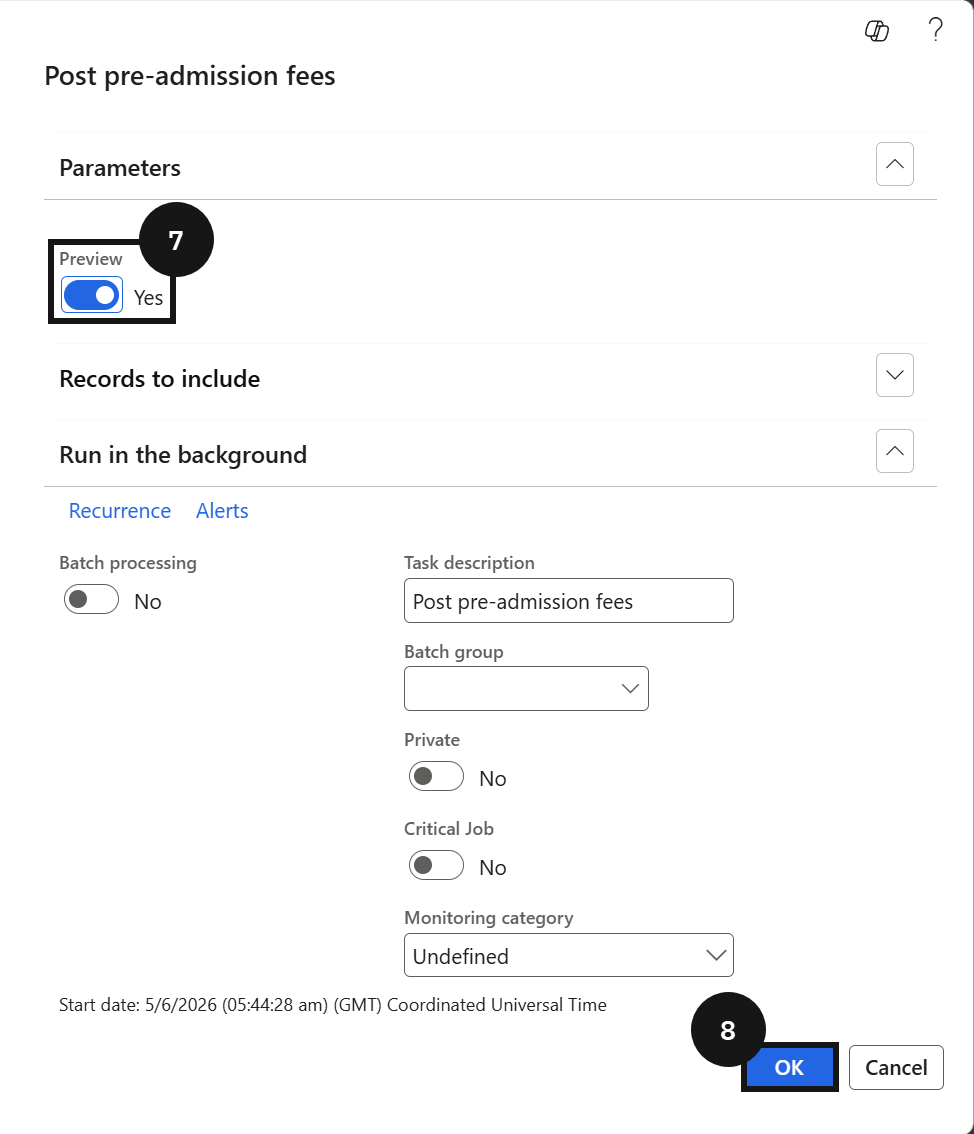
Ensure the Preview toggle is set to Yes.
Note: Setting Preview to Yes allows you to review the posting before it is finalised.
Click OK.
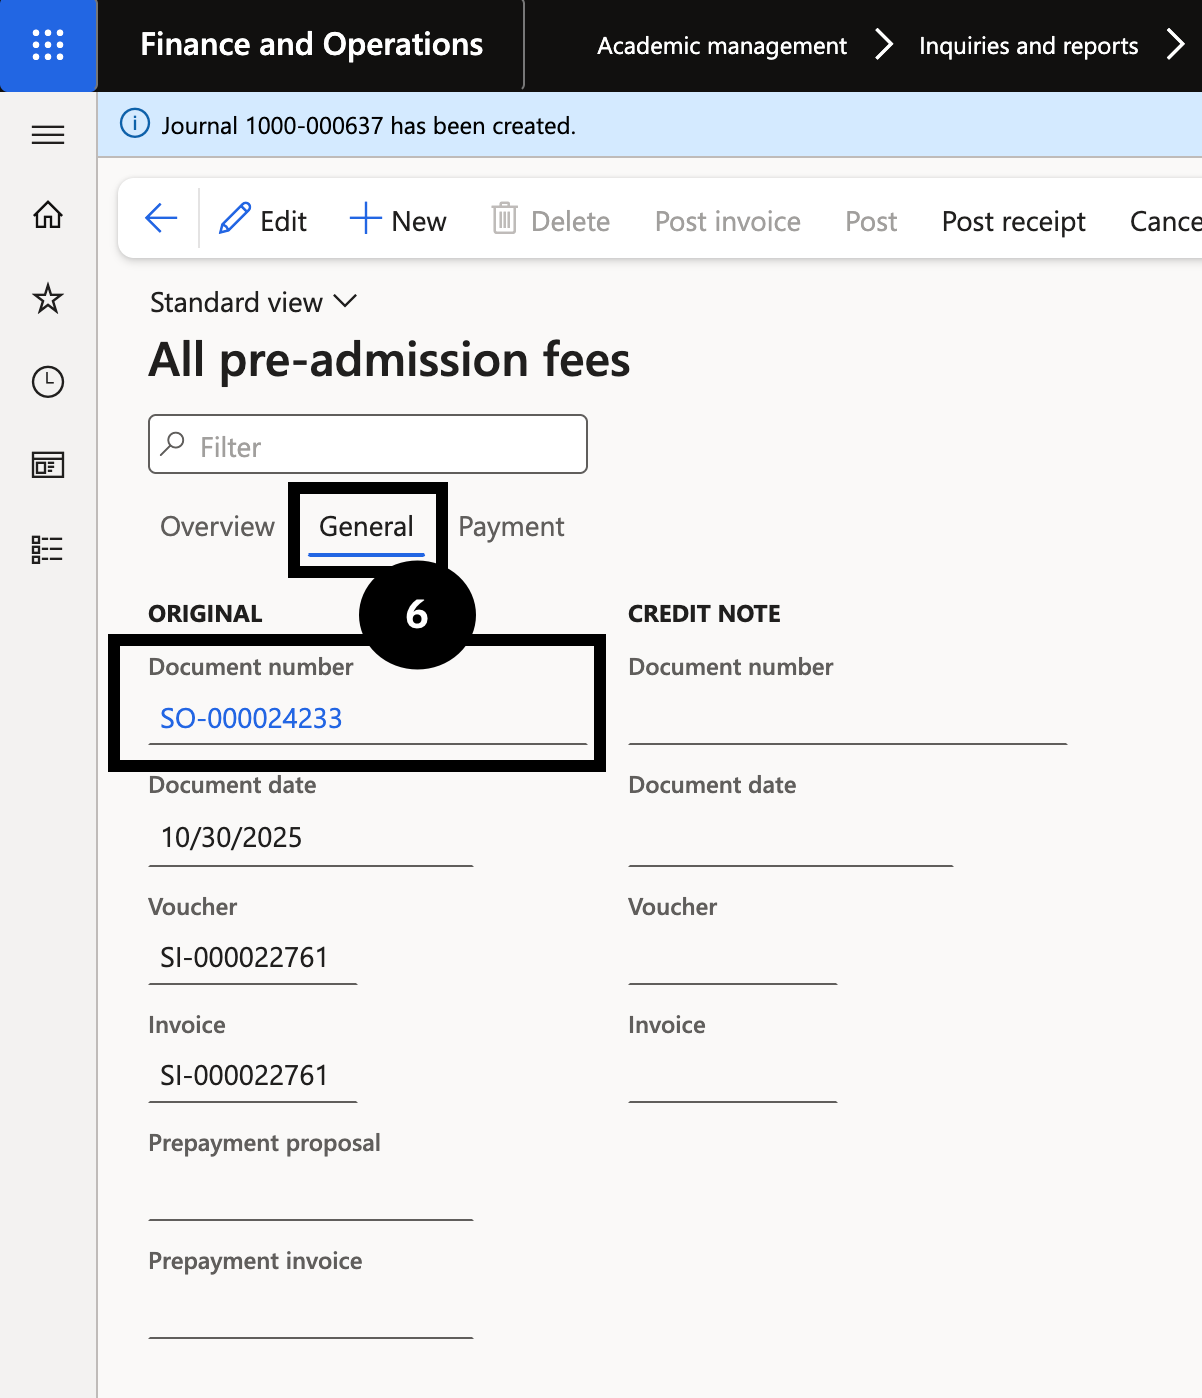
Click the General tab to view the created sales order number.
Note: Once posted, the sales order will be available in Cashier receipt for payment processing.
Application / Registration Fee Process via Cashier
Note: The enrolment officer must manually push the student record to Registered status in the student management system before the fee can be receipted over the counter. Then, create the Sales order invoice. This step is automated when the payment is made online.
Navigate to Academic management ▸ Inquiries and reports ▸ Pre-admission fees ▸ All admission fees.
Use the Pre-admission filter to search for Application fee.
Find and select the correct student record.
Click Post.
Ensure Preview is toggled on.
View the sales order by clicking General.
Note: The sales order will be available in cashier receipt for payment.
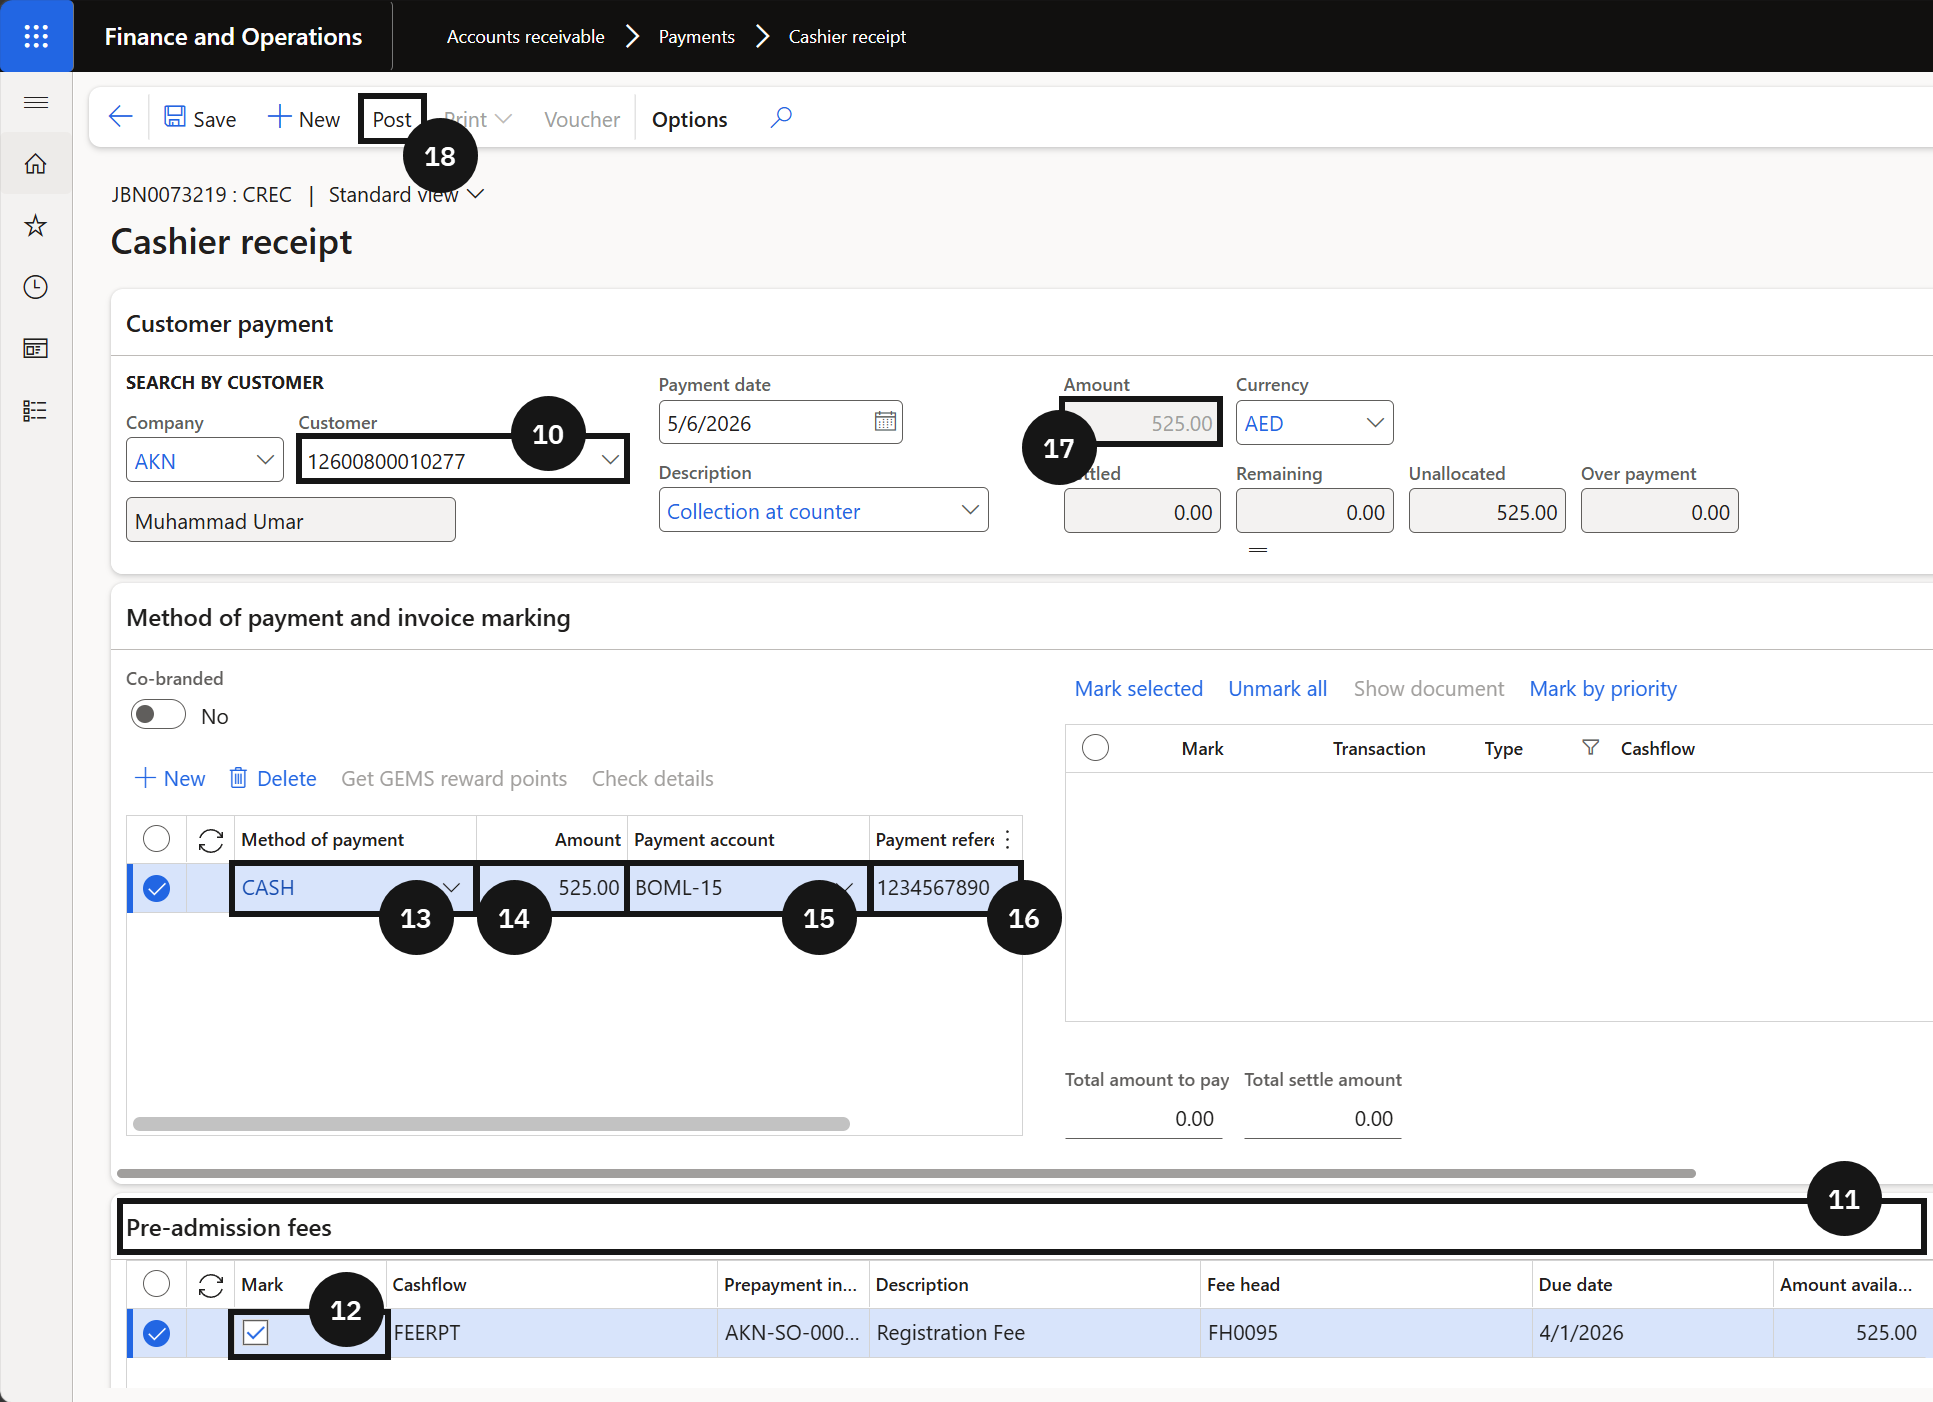
From the FNO dashboard, open Modules ▸ Accounts receivable.
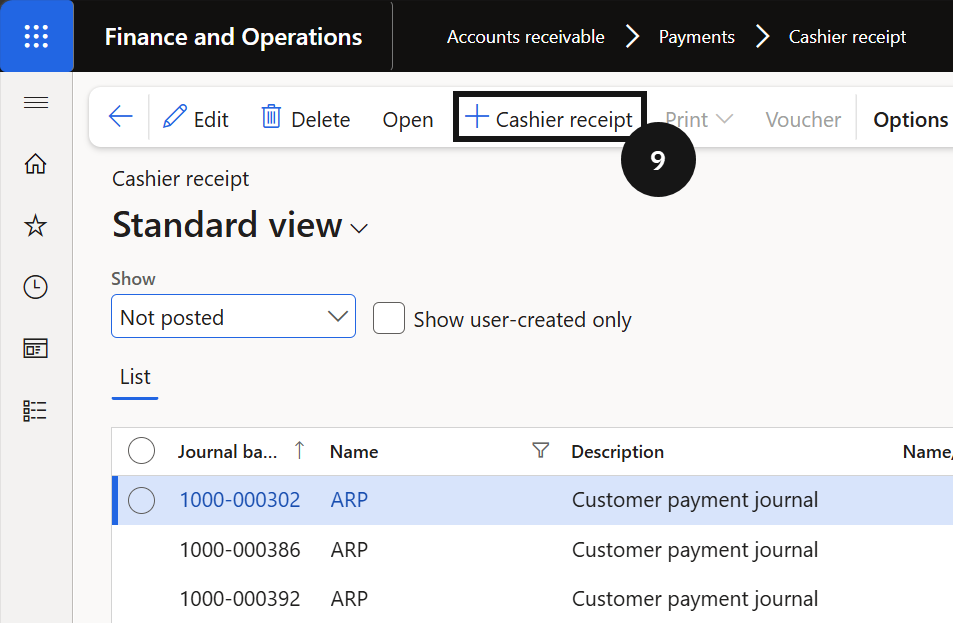
Expand Payments and click Cashier receipt.
Click New cashier receipt in the toolbar.
Select the student name from the fee payer list.
Click the Pre-admissions tab.
Locate the registration fee entry and tick the Mark checkbox.
Select the Method of payment from the dropdown.
Enter the amount in the Amount field.
Select the deposit account in the Payment account field.
Enter a value in the Payment reference field.
Verify the fee is fully allocated in the allocations summary.
Click Post in the toolbar.
Select your receipt delivery option:
- Print receipt — prints a physical copy for the fee payer.
- Email receipt — sends the receipt to the fee payer's email address on file.
Click OK.
Note: Once posted, the receipt journal flows back to the student management system, allowing the enrolment record to proceed to the next stage.
Adhoc Forfeiting Deposits
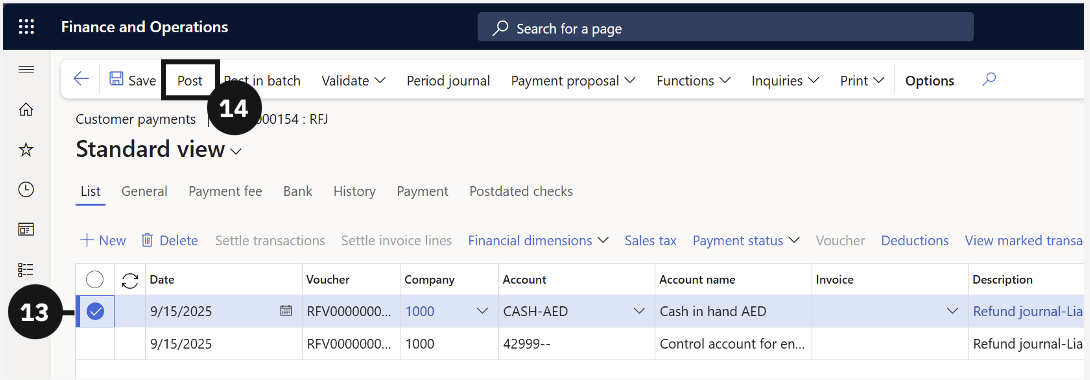
Refunding Deposits
Enrolment deposits are designed to be refundable under certain circumstances, but they can also be forfeited if a student does not proceed with enrolment. This section covers both scenarios. When a refund is required, staff select the deposit, choose the refund bank account, and process the transaction through the journal. When a deposit is to be forfeited, the same selection process applies, but the forfeit action is used instead. In both cases, only deposits with a status of Received or Partial are eligible for processing, ensuring that incomplete or unsettled deposits are not actioned prematurely.
Forfeiting Deposits
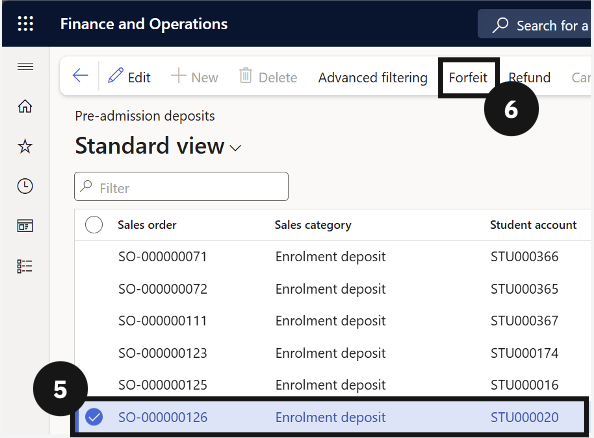
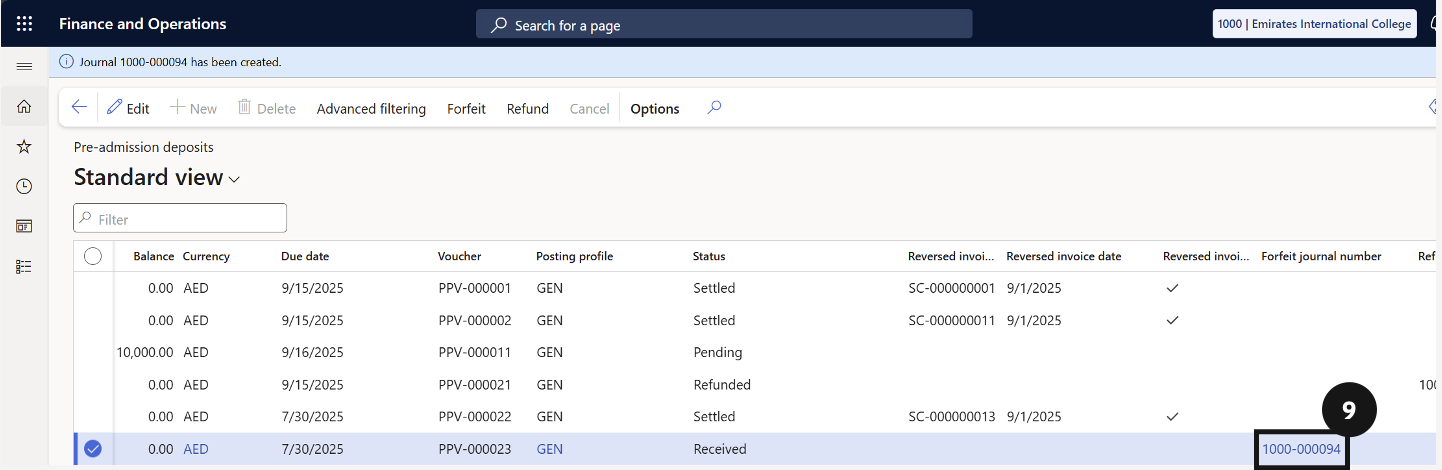
Deposits are forfeited when a student does not proceed with enrolment and the school elects to retain the funds rather than return them. The process is similar to a refund. Staff select the relevant deposit from the Pre-Admission Deposits view but the Forfeit action is used instead. Only deposits with a status of Received or Partial are eligible. The system generates a forfeit journal that can be previewed before posting.
Note: Only deposits with Status = Received or Partial is eligible to be forfeited.
From the FNO dashboard, open Modules ▸ Academic Management.
Expand Inquiries and reports, then expand Pre-admission fees.
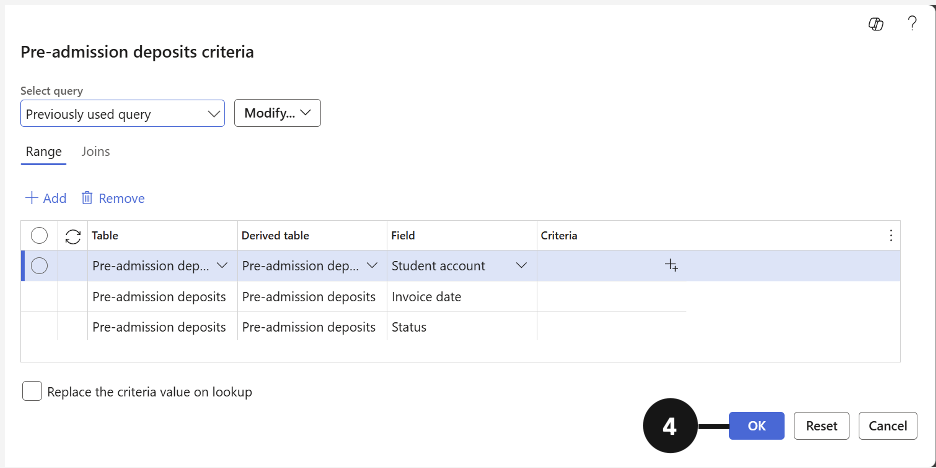
Click Pre-admission deposits.
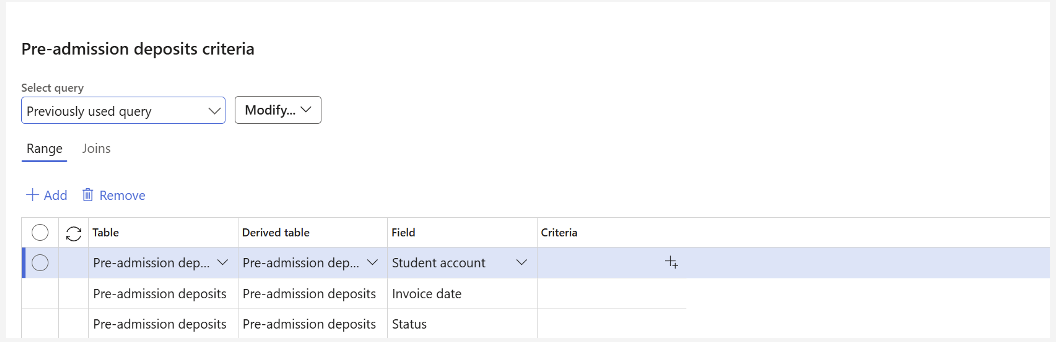
When the deposit criteria window opens, click OK to view all deposits.
Check the deposit to be forfeited from the far-left column.
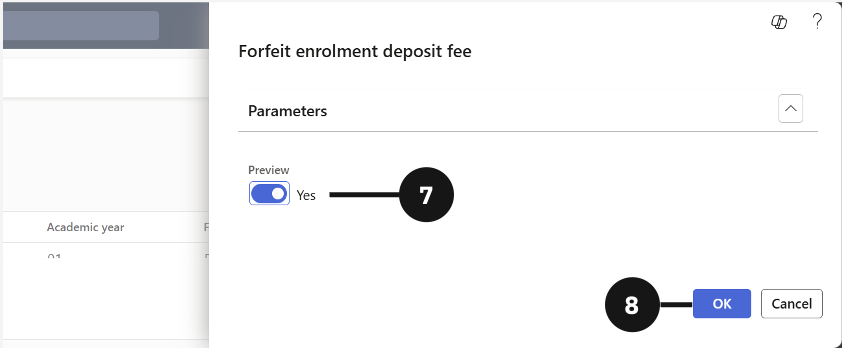
Click Forfeit in the toolbar.
In the dialogue box on the right, choose whether to Preview or disable the toggle to post automatically.
Click OK.
To preview, click the Forfeit journal number.
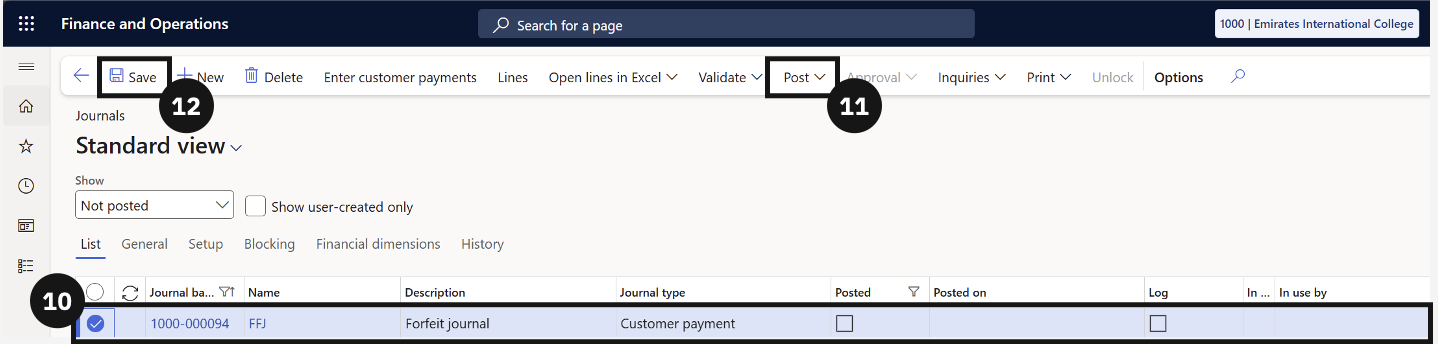
Open the journal by clicking Lines in the toolbar.
Select the credit line using the checkbox, review or edit the VAT as required, and click Post.
Click Save in the toolbar.
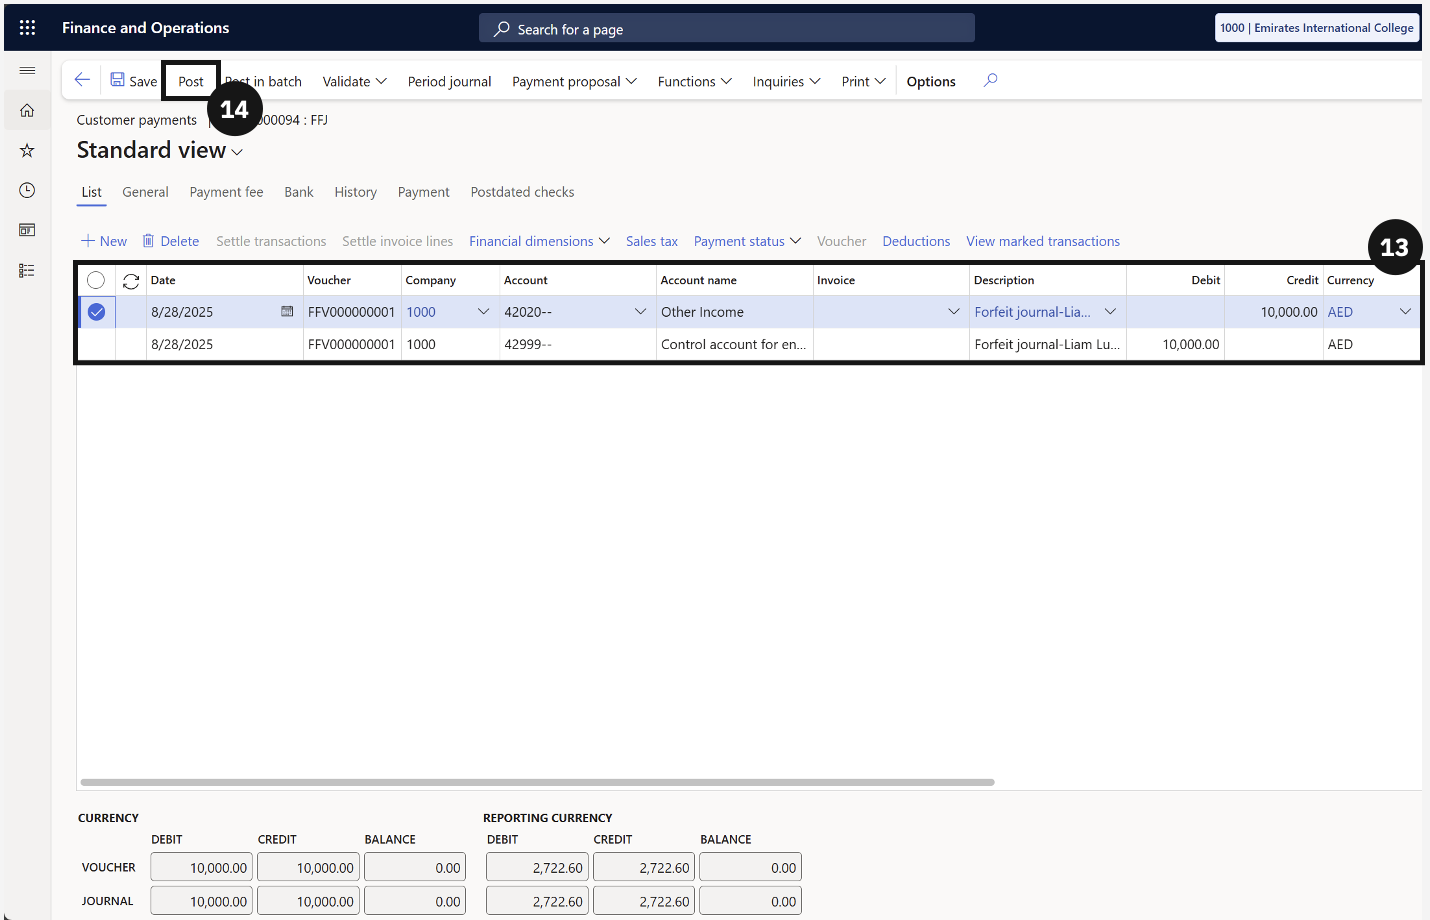
Review the transaction.
Select the credit line using the checkbox and click Post.
Click Save in the toolbar.
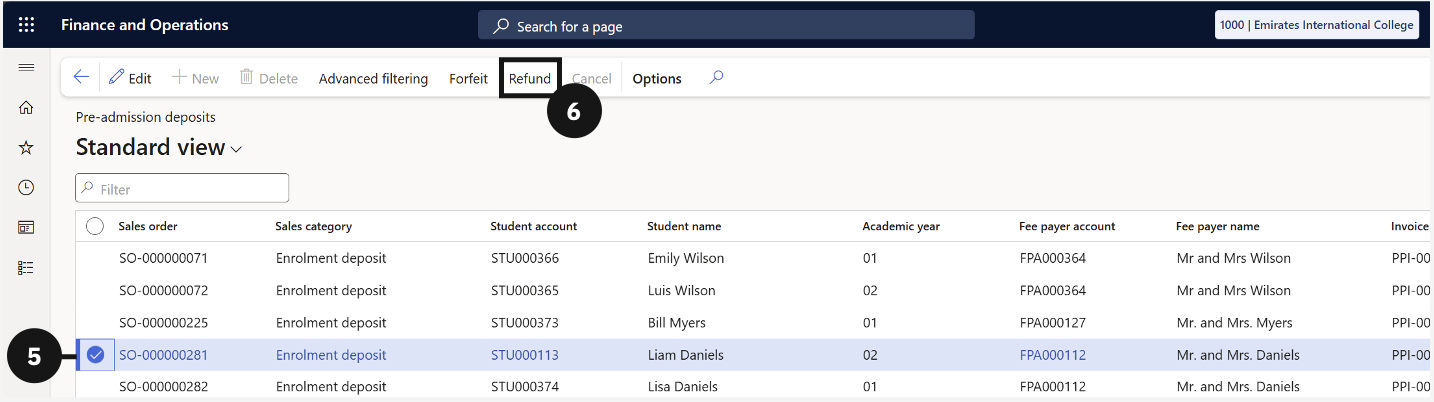
Refunding Deposits
From the FNO dashboard, open Modules ▸ Academic Management.
Expand Inquiries and reports, then expand Pre-admission fees.
Click Pre-admission deposits.
When the deposit criteria window opens, click OK to view all deposits.
Check the deposit to be refunded from the far-left column.
Click Refund in the toolbar.
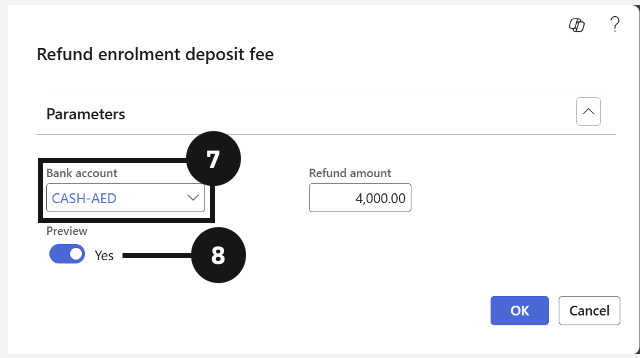
In the dialogue box on the right, choose the Bank account for the refund.
Choose whether to Preview or disable the toggle to post automatically. Click OK.
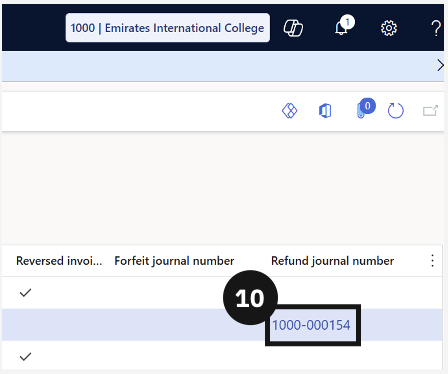
To preview, click the Refund journal number.
Open the journal by selecting the refund journal and clicking Lines in the toolbar.
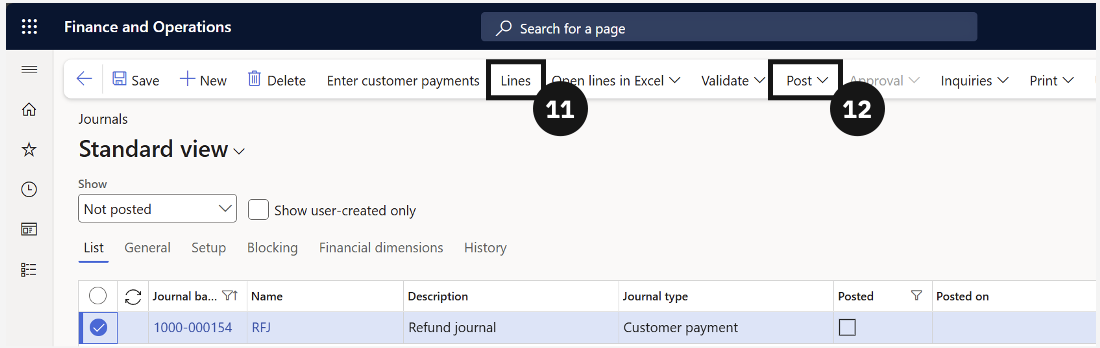
Review the refund, select the credit line using the checkbox, and click Post.
Review the transaction.
Select the credit line using the checkbox, and click Post.
Click Save in the toolbar.

Cancel Enrolment Deposit or Fee
Reversing Unpaid Fees
There are situations where a posted enrolment fee or deposit needs to be reversed, such as when a fee was created in error or circumstances have changed before payment was received. This process allows staff to cancel a posted record by selecting it from the pre-admission fees list and applying a reverse posting date. The reversal creates an offsetting entry in the system, effectively cancelling the original transaction and restoring the record to a neutral state without permanently deleting any audit history.
Reverse Enrolment Deposit or Fee
From the FNO dashboard, open Modules ▸ Academic Management.
Expand Inquiries and reports, then expand Pre-admission fees.
Click All pre-admission fees.
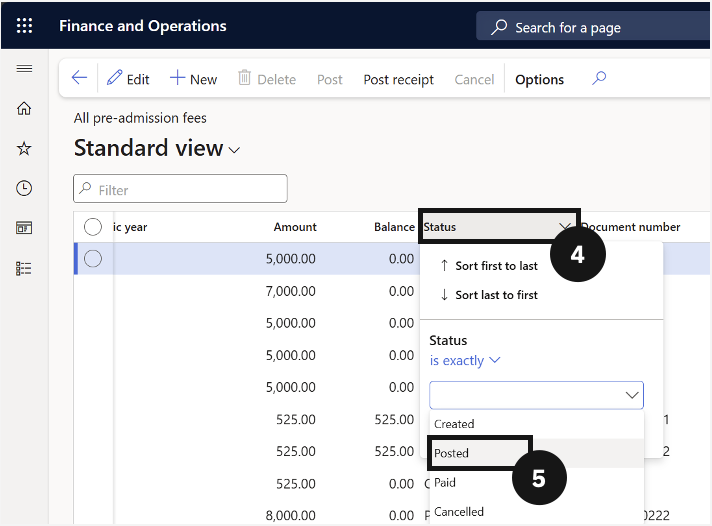
To filter the view by Posted entries, click the Status column.
Select Posted.
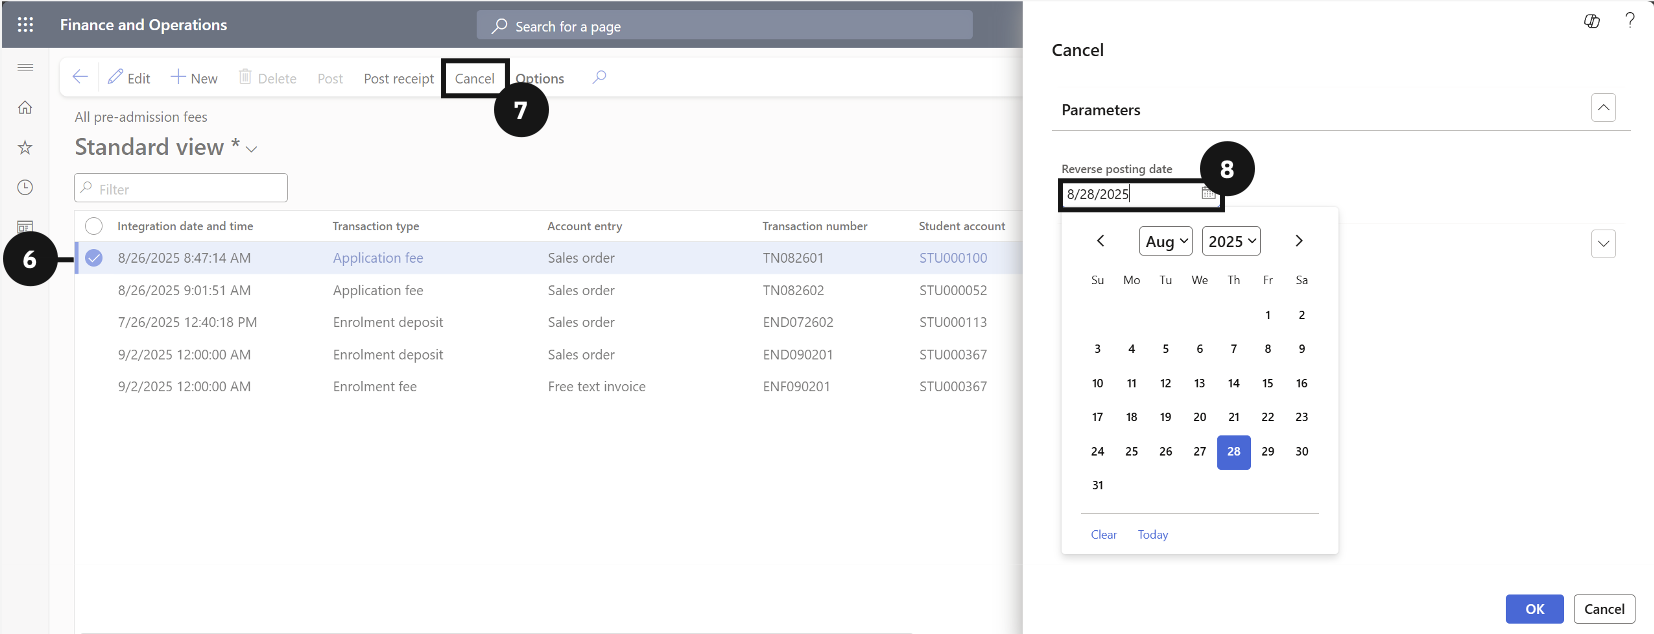
Select the enrolment deposit or fee using the checkbox on the far-left column.
Click Cancel in the toolbar.
In the dialogue box on the right, choose the Reverse posting date.
Click OK.
Manually Adding Enrolment Fee Records
In most cases, enrolment fee records are created automatically when the student management system sends data to D365 F&O. Where a record needs to be created manually (for example, when a fee was not captured through the integration) staff can create a new pre-admission fee record directly in the All Pre-Admission Fees table and post it immediately.
From the FNO dashboard, open Modules ▸ Academic Management.
Expand Inquiries and reports, then expand Pre-admission fees.
Click All pre-admission fees.
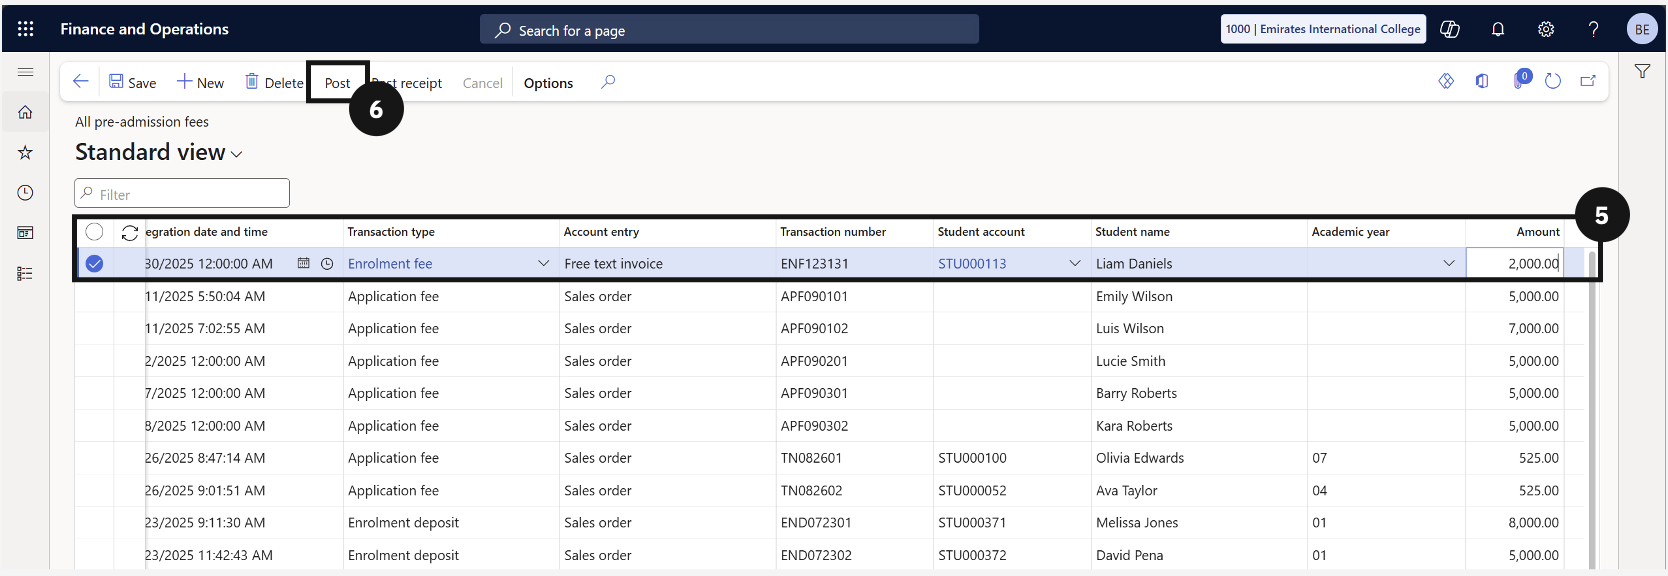
Click New in the toolbar.
Enter the required information for each column in the table.
Click Post in the toolbar.
Note: The status updates from Created to Posted.
Click Save.
Payments
Once enrolment fees and deposits have been created and posted, payments can be processed directly from the Pre-Admission Fees table. This process is used when a fee payer makes a payment in person at the school's counter, rather than through the Parent Portal (PXP). Staff select the relevant fee or deposit, choose the appropriate bank account, and confirm the payment. The system then updates the record status to reflect that payment has been received, providing an accurate and up-to-date view of each student's financial position prior to enrolment.